"The influence of a good teacher can never be erased" - Unknown

Month: February 2025

From Knits to Purls

Last week as I was knitting I discovered that the stitches were incredibly tight on the needle, I could barely get the yarn to move. I ended up coming across this video on how to fix tight knitting. Through this video I discovered that this is a common occurrence when you are first starting off learning how to knit, as you are nervous. Thus, results in holding tighter to the yarn as you are afraid it will slip off the needle. Eventually you will become more comfortable and less nervous which will allow the stich to naturally be looser. In the video she suggested:

  • Use wood or bamboo needles as the yarn grips easier to these.
  • Also suggested a larger needle size.

I am already using large wood needles so that was a nice affirmation that I am on the right track. I also learned this happens when you are using only the tip of the left needle and not maximizing the rest of the surface space. I followed this advice and it seemed to really help make the knitting looser and made the yarn easier to work with.

Purl Stitch
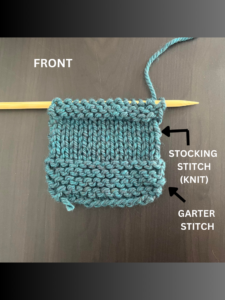
Knitted dishcloth showing both the stocking stitch and the garter stitchThis week I decided to learn the purl stitch as when I was researching different knitting stiches, Sheep and Stitch mentioned that purl stitch and knit stitch are the two basic stitches you should learn. It sounds like all the other stitches are a combination of these stitches or build upon these stiches. So this seemed like the logical next step. I ended up using two different videos to teach me the purl stitch. Both of these videos were great resources but also had their downfalls. I found when learning online it is good to learn from multiple sources, as sometimes one source will leave things out you didn’t even know are important. Also, I found I struggled with keep good tension on the purl stitch which is something that came naturally and easier to me when doing the knit stitch. I know with practice this will get better as I become more comfortable with this new technique.
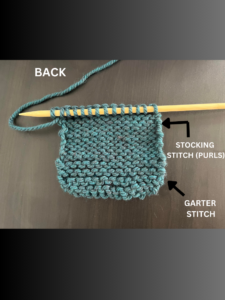
Knitted dishcloth showing both the stocking stitch and the garter stitchAlso, I think it is important to note that while I was practicing the purl stitch I stumbled upon a piece of information I didn’t realize I was missing. I was practicing my purl stitch, row after row, and when I looked at what I was creating I realized it looked the exact same as my previous dishcloth I had made. This left me confused and wondering if I was doing the technique wrong. After some researching, I discovered that since knit and purl stitches are exact opposites of each other when you only do the one you end up with a combination called a garter stitch. This means that in my previous work, even though I was using the knit stitch technique I was actually creating a garter stitch. In order to see the true difference between the stitches, you have to do what is a called a stocking stitch (or stockinette stitch). A stocking stitch is one row knit and one row purl.

Studio Knit Video

Pros:

  • This video was good to learn from in the sense that she repeated the purl stitch many times, so was a good example of repetition when trying to learn
  • She also slowed down each step, so was great to visually see what was happening
  • Video was short and direct to the point which is beneficial if you just need to see how to make the stitch without needing to know any background information or if just looking for a refresher

 Cons:

  • Only showed the breakdown of the technique and didn’t give any additional information on the purl stitch


Love Crafts Video

Pros:

  • Great visuals for each step along the process of purl stitching
  • Provided general knitting information, including the difference between knit stitch and purl stitch and how to visually tell the difference. Explained that knit stitch are flat ‘V’s’ and purl stitch are bumps.
  • Demonstrated the knit stitch first and then the purl stitch which helped to see the comparison of the two and understand that they are exact opposites of each other. This was very helpful to know when learning about knitting in general and when trying to figure out how the stitches go together.

Cons:

  • Nothing noteworthy


Overview of What I Learned

  • When doing a stocking stitch one side is knits and the flip side is purls
  • Knit and purl stitch are opposites of each other.
  • Knit stitch is right needle goes underneath the left needle and the yarn wraps around the back of the right needle
  • Purl stich is right needle goes on top of the left needle and the yarn wraps around the front of the right needle

Thanks for following along with Amber’s Knitting Chronicles and I look forward to what next week will bring for my learning journey!
Two hands, two knitting needles and a heart in the background of logo for Amber's Knitting Chronicles

Photo by Canva


TikTok Here I Come

Wow! What an adventure I have had this week with my learning! I didn’t do much learning in the aspect of my knitting as I wanted to have the opportunity to practice the basics of knitting (cast on, knit stitch and cast off). I wanted to get a good grasp on those skills before carrying on as I believe if take the time to create a strong foundation with those basic skills, it makes things a lot easier as you go along! Also, this week I knew I had a learning curve coming with the technology side of creating a video and man was it right. Things don’t always go as smoothly as we would like but within it all is a learning opportunity. Lets dive into mine!

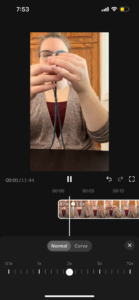
Video editing screen on TikTok where you can change the speed of the video playback. Picture of woman knitting

Options to change the speed of playback on video

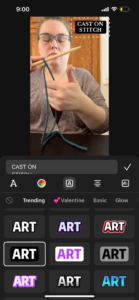
Well to start, I jumped on the bandwagon and joined the TikTok community! I don’t have much experience with TikTok at all. I had downloaded the app a few months ago just to see what it was all about, but I ended up scrolling for a few minutes and then decided that was good enough. That was the extent of my association with TikTok up until now! I knew I wanted to create a video to document my learning project this week and I was always a bit curious about how to create a TikTok video as I know students at my school often talk about them creating these videos. I figured it can’t be that complicated! Wrong! I found it to be an overwhelming space to navigate especially since I don’t have any prior experience with video creation apps or programs. I found the most overwhelming part was all the options that were available when editing the video. At one point I even found myself Googling “How to change the speed of a TikTok video after recording” and this resulted in me watching a TikTok about how to edit in TikTok!! Another frustrating part was I had the video segments all edited and timed out and was just needing to add music when it all got erased!! I accidentally clicked on a button that I thought would help me with sound but when I tried to cancel it somehow reverted all my work back to the original videos I had started with. Ahhhhh!

Video editing screen on TikTok where you can create captions on the video. Picture of woman knitting

Caption Creation Options

Anyway, after I got those few hiccups figured out and I started to gain more confidence in exploring the editing tools I started to find the fun in the process! I was amazed at all the options available and the creativity that can be used to create these videos. I would recommend taking the time to just have fun exploring and trying the different features without pressure of needing a completed product.

The learning definitely didn’t stop here though! I had to publish the video on TikTok before I was able to save it to my phone. Luckily when you publish you have the option to keep it private, meaning only you can see it. Once this was completed, I then started on the journey to uploading the video to YouTube. Which once again, I had never upload videos to YouTube before but I needed to do this extra step in order to share it on my blog. I found YouTube to have a very user-friendly platform and the process seemed seamless. Too seamless? Yes! A problem arose once the video was published with copyright infringement due to a song I used for the first part. I discovered that although it has been okay on TikTok, on YouTube when a video is less than 3 minutes long it automatically converts it into a “short”. The problem was the song I had chosen wasn’t allowed to be played on a “short” that was longer than 60 seconds. Although, the song I chose for the second part of the video was allowed to remain. This left me with two options:

  1. Go back to TikTok and create the video all over again and chose a different song
  2. Have YouTube erase the song off my video

Due to time restraints and frustration building I went with option #2. The result is a less than perfect video with music starting hallway through the video but what I think this shows is the reality of learning. Learning isn’t perfect, it is a journey that often takes twists and turns and sometimes gets messy. In the words of The Beatles, sometimes you have to start stop fighting the reality and just “Let it Be”.

TikTok in the Classroom

In my connection of TikTok video editing to classroom use I believe this tool is important to experience as a future educator. I believe it will help me to connect to my students as it allows me to understand something that is a part of their everyday life! Also, tools such as this can be used to make assignments more relevant and engaging to students. I may not be able to get them to create TikTok depending on the social polices, but I can have them create a video in a similar style using another approved platform. I feel that incorporating this into an assignment would allow my students to use their creativity and utilize their knowledge to show me their own learning in a relevant way for them.


Welp, Here Goes Nothing

How come even when it is something we are interested in we sometimes procrastinate getting started? Is it fear of failure? Fear of the unknown? Uncertainty? Overwhelm? Who knows but I will say this was me starting this learning project! BUT after finally getting started I had so much fun learning the basics of knitting. I found this really great website called Sheep & Stitch. They have many resources for anyone who is knitting, right from the beginning basics to the more experienced patterns. They also have a Youtube channel full of videos to help!

The Basics I Learned

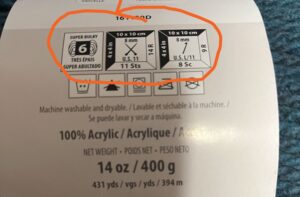
  • A bulky yarn and larger size needles are recommended for beginners as it is easier to handleNeedle Size Recommendations on Bundle of Yarn
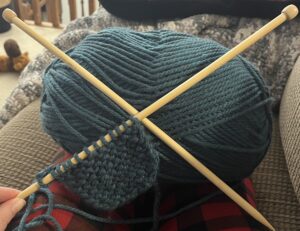
  • I used a 8mm needle and a super bulky acrylic yarn
  • Bamboo or wood needles are recommended for beginners as the yarn is less likely to slip on these needles versus other types
  • The labels on yarn bundles will always tell you the type of yarn & the needle size recommendation
  • When starting a project consider the width of the project you want to make and times that number by 3. Then measure out that much yarn and start your slipknot on the needle at that point.
    • You want to make a scarf that is 6 inches wide (6 x 3 = 18 in). Measure out 18 inches and then start your slipknot from there.
  • The first row you make on the needle is called a “cast on”
  • After learning how to cast on the needle, I learned the basic “Knit Stitch”

Yarn and Knitting Needles

Thoughts on Sheep & Stitch

  • I enjoyed the layout of the webpage as it was in manageable chunks and provided the necessary basics without giving too much information at once, which would otherwise overwhelm a beginner.
  • The videos were easy to follow. The demonstrations were slow enough to follow along and they also repeated every step along the way. So you could easily see it twice in a row in case you got lost the first time.
  • Also, in case you learn better via pictures versus video or just want to look back for a quick reminder, on the webpage below the video, there are step by step pictures of the process
  • It also provided little “Pep talks” along the way. It took a few watches and many attempts before I got the hand of the knit stich. Then just when I thought I got it, it became confusing again and didn’t work. So I went to continue reading on the article for additional support and what I came across instead was a “Pep talk” telling me that it is normal to not get it on the first or second time and to just keep trying. It definitely look me A LOT more attempts than 2, more like 12? I think I stopped counting after 10 but this was the motivation I needed to hear! I had gotten confident when I quickly learned the cast on and assumed the knit stitch would be just as easy!

Stay tuned for more updates on my knitting adventures next week! I feel I have gained some momentum after finally taking the diving into learning and I am excited to build on my foundational skills of knitting! There is no stopping me now! After I finished my first knitting experience, I was motivated to make a logo for my blog on Canva. I used their logo template and just changed the text style & words.


Two hands, two knitting needles and a heart in the background of logo for Amber's Knitting Chronicles

Photo by Canva

Uncovering The Truth Around My Tech Habits

I would like to say that I have good control over my tech habits but let’s be honest. In a society that is now so reliant on technology it is easy to get wrapped up in it without fully realizing. Now don’t get me wrong, I think technology is wonderful and definitely plays an important role in making our lives easier and helps with efficiency in our tasks but I do think it is important to be mindful of the time we are spending on screens.

Before I deep dive into my habits, I know right away that between work, classes and my personal use, my screen time is way more daily that I prefer or think is ideal. To try to counter act this before bed I will try to do some reading if my eyes aren’t too tired. Reading books is my happy place. It helps my mind decompress and allows me for a better sleep!


School Tech Habits

On a daily basis, for academic purposes my technology and websites I am accessing are:

  • UR Courses
  • Zoom
  • Microsoft Word
  • Edusites
  • YouTube
  • Discord
app, software, contour, settings, computer, application, operating system, smartphone, display, os, program, remote control, app, app, app, software, software, software, software, software, application, application

Photo by Peggy_Marco on Pixabay

Personal Tech Habits

My most common tech culprits that take up my personal time are:

  • Snapchat
  • Instagram
  • WhatsApp
  • Facebook
  • Calm


Strategies to Empower Myself Over The Social Media Vortex

I find I easily get lost in the social media world when someone will share something with me and I go to view it and then other items catch my attention and time passes very quickly. To counteract this when I am in classes or working on homework I will turn my phone on “Do Not Disturb” mode. This silences my notifications and I have configured it to only allow specific people’s messages through. It also lets phone calls through.

Another strategy that I have been actively trying to use when I do check social media is to allocate a set amount of time on the app. I will set a timer and when the timer goes off I have to click out of the app and move on. In the past I have also tried logging out of the social media apps, so that if I unconsciously click on the app I have to consciously login.

Overall, I feel I am slowly feeling more in control of my tech habits but I know I still have work to do. I am always open to suggestions while at times I struggle to find a healthy balance!

© 2025 Amber Landels

Theme by Anders NorenUp ↑