Welcome back to another week of Amber’s Knitting Chronicles! This week I decided to learn how to knit in the round using circular needles in order to make a cup cozy. I chose to learn from this tutorial video by Mikaela Martens. I would say that this week I definitely experienced a learning curve and my final product wasn’t as good as I had hoped for. However, mistakes are an important part of the learning process and I truly believe they deepen our understanding.
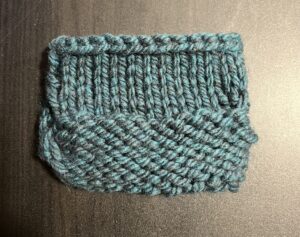
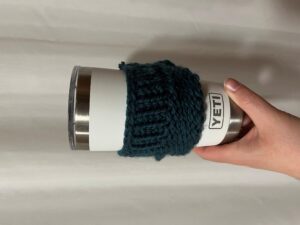 For this project I used 8 mm curricular knitting needles and a super bulky acrylic yarn. I found that as I was working in the round, I noticed I started to have a better understanding by the end and that my movements seemed to come more naturally too. Unfortunately, I was so focused on my project that I completely forgot to take any pictures of my process to document the concept of knitting in the round. But I am happy to share with you pictures of my flawed final product! You will notice that the cup cozy is half Stockinette Stitches and half Purl Stitches. That wasn’t supposed to happen, the outside is supposed to be all Stockinette and the inside all Purl Stitches. I believe that my stitches got twisted halfway through my work and resulted in me accidentally flipping my work. Therefore, when I continued my knitting I was then knitting on the wrong side. However, I will say that amidst the imperfections I am still very proud of my first cup cozy and I look forward to creating more in the future. I plan to work on improving my techniques while trying out different designs.
Learning from Mikaela
I found Mikaela’s video to be a great fit for me to learn from overall. It is hard to exactly pinpoint what made it a great video to learn from but I believe sometimes you just easily connect with a person’s explanation style. Although, I will say I noticed many similarities to the other sources I have enjoyed learning from. This was seen in the way Mikaela walked you through the steps at a slow enough pace to follow along, she repeated the steps multiple times and she shared general knitting knowledge that as a beginner I greatly appreciate. Also, below the video, in the comments, Mikaela shared a link to the written pattern that you could follow along to. I enjoy when sources include these alternative/additional learning resources. A few noteworthy things I learned from Mikaela is:
- When knitting in the round, you automatically get a ‘Stockinette Stitch’ by using only a Knit stitch. Whereas, usually you have to knit one row, purl one row in order to achieve this. This happens because in the round, you are always knitting on the same side of the swatch compared to regular straight knitting needles, where you are alternating the sides of the swatch you are knitting on.
- Using circular needles to knit in the round is called using the ‘Magic Loop Method’. The magic loop refers to the plastic loop that is attaching the needles together. (See photo below for reference).
- An alternative way to ‘Longtail Cast On’ the first layer of stitches, which seems like it could be a potentially quicker way than the way I first learned from Sheep & Stitch.
- A good trick for how to measure out how much yarn you will need for your cast on. I originally learned a formula to figure it out: The width of project x 3. I found this method to be hard on some projects I was doing when I didn’t always know the width. I often just overestimated the yarn and ended up having to cut off the extra, which would result in a waste of yarn. But Mikaela showed a way that makes way more sense for smaller projects. You simply wrap the yarn around your needle and repeat this, until your loops equal the number of stitches you have to cast on. Then since we are knitting in the round, you include an extra stitch as this will be the joining stitch.

8 mm Curricular Needles
Tips for My Next Attempt
After I finished my cup cozy, I did some extra research for ideas on how to improve on my next attempt.
- I found this video that suggested curricular needles with a longer cable make it easier to knit in the round.
- This video explained to me how to use a stitch marker when knitting. When knitting in the round, it is sometimes hard to know when you have completed one whole line. I used a stitch marker in my project, but after watching this video, I realized I didn’t use it properly. This explains why I found it hard to follow my stitch marker at times.
- This video by Studio Knit shares a brief overview of the five steps of knitting in the round. She mentions that it is important to make sure that all your stitches have the edge facing the middle of the circle, as it is common for the stitches to get twisted in the round. I believe this was my problem when I was knitting in the round and why half my project is ‘Stockinette Stitches’ and half is ‘Purl Stitches’.
Thanks for following along for another week of my knitting journey!
Love all the goals for next time! Your first one looks great! I can’t wait for you to practice and make an even better one! Good luck!