"The influence of a good teacher can never be erased" - Unknown

Author: Amber Landels (Page 2 of 3)

Mistake Rib Stitch: Who Said Mistakes Aren’t Possible?!

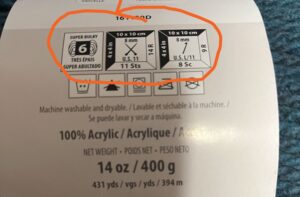
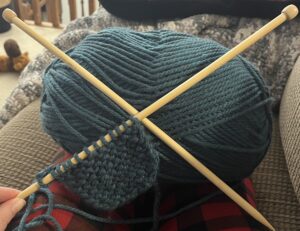
Hey EDTC 300! Welcome back to my knitting chronicles and oh man was it a journey this week!!! Just when I was starting to feel confident in the knitting skills I have developed thus far, I was given a reality check. Since I have been using the same needles and yarn for a few weeks now, I decided I wanted to switch it up a bit.  Until now I have been knitting with 8 mm needles and a super bulky acrylic yarn as both were recommended for beginners. This week I went out shopping and purchased some smaller needles, 6 mm, and a medium weight yarn. I figured is it really that much harder to knit with smaller needles after I have learned the basics? Spoiler alert, the answer is yes!! I felt like I was just learning to knit for the first time again, as I was beginning to cast on my initial stitches. I was feeling uncoordinated and clumsy with the needles and the stitches didn’t want to go on nicely for me as the yarn was slipping around. This sometimes resulted in stitches slipping off the needles and leaving holes in my knitting where the stitch was dropped. Also, I found my stitches to be too tight at times which is a similar problem I had when first learning to knit. As I had learned, this is something that improves with practice and naturally loosens as you become more relaxed with the movements. Overall, it is hard to pinpoint what exactly makes the smaller needles harder to work with, but I will say it does get better once you use them a bit. Luckily, working with the new yarn was a smoother transition for me. I didn’t find much of a difference working with the medium weight yarn compared to the super bulky yarn.


Mistake Rib Stitch

Blue yarn knitted in the Mistake Rib Stitch pattern

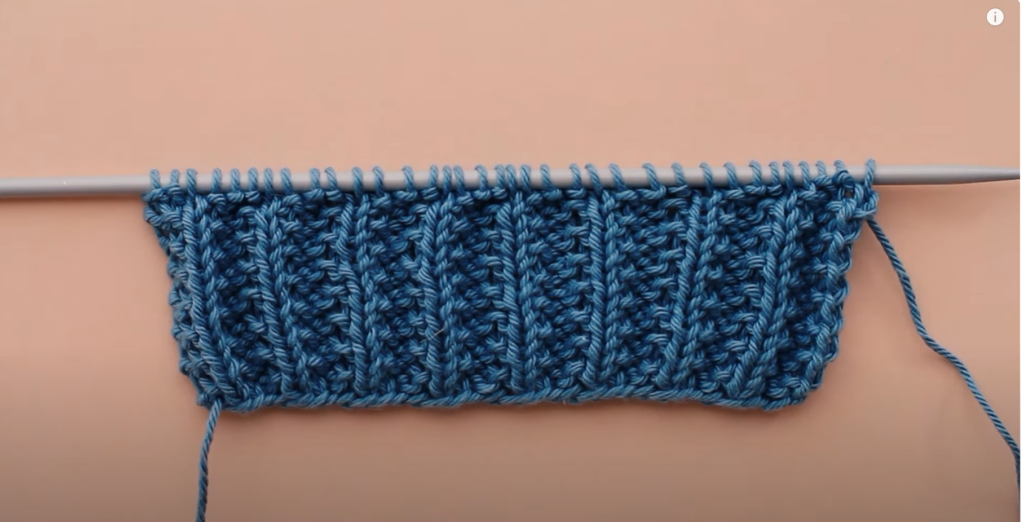
Example of Mistake Rib Stitch from Sheep & Stitch Video

Now comes the next part of my adventure this week. I decided I wanted to try learning the “Mistake Rib Stitch”.  This stitch was recommended by many sources as a beginner stitch since you only use the knit and purl stitch, and it is a one row repeat. This means the sequence for the first row just repeats itself row after row until you are done. I figured this stitch would be beneficial for a few reasons:


The Learning Review

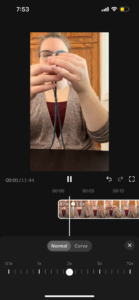
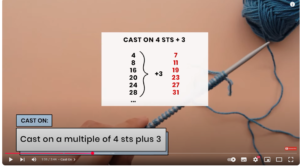
This week I tried to learn from “The Yarnist” on YouTube but I ended up getting frustrated and trying another YouTube video by “The Nervous Knitter”. However, both of these resources left me extremely frustrated and I will admit I went back to my usual go to for knitting help which is, Sheep and Stitch. When doing Mistake Rib Stitch, the stitches casted on have to be a multiple of four (4, 8,12,16, etc.) and then add 3 to your total number of stiches. The purpose of having a specific number of stitches is due to the pattern being a sequence of 2 Knit followed by 2 Purl and repeat until you get to the remaining 3 stitches, which you do 2 Knit and 1 Purl.  This seemed pretty basic but when you are switching between Knit and Purl Stitch, you have to move the yarn from the front to the back and vice versa whenever you switch. This is because Knit Stitch requires the yarn to wrap around the back of the right needle, whereas the Purl Stitch requires the yarn to wrap around the front of the right needle. What happens when you don’t switch the yarn is your line of stitching looks like random hoops and twisted yarn. There is no real stitch formed. I should have taken a photo of the product that these mistakes created but I was too frustrated at the moment. I have created a video in order to give you a visual representation of my explanation.


When comparing all three sources I realized they all did a good job at explaining the background information about the stitch. However, The Yarnist and The Nervous Knitter left out some information I consider to be important. This includes:

  • They didn’t explain the need to switch the yarn from the front to the back. For a more experienced knitter this might not of been a problem but since I am lacking experience, I didn’t catch onto that on my own.
  • They both knit pretty quickly and didn’t slow it down or explain the techniques. I believe they were both thinking their audience was already confident with the combination of stitches being used (knit and purl)


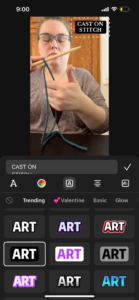
Whereas, when watching the Sheep and Stitch video it included the explanation about switching the yarn and it also slowed down the stitches as she was doing it which allowed you to follow along easier. Also, she included additional text in the video along with her verbal explanations which helped my comprehension. See image below as an example.

Picture screenshot of a video that has a visual describing the number of stitches needed for knitting the mistake rib stitch

The ironic part of this story is in The Nervous Knitter video she said, “I really don’t know how you can make a mistake on this stitch, but it is called a mistake rib stitch”. Well, I guess she overestimated her viewers’ abilities!

I believe that The Yarnist and The Nervous Knitter have the potential to be good videos for other learners who maybe need less of an explanation and just an general overview, but for me and my learning journey it just wasn’t a great fit!

Dark Purple yarn knitted in the Mistake Rib Stitch pattern

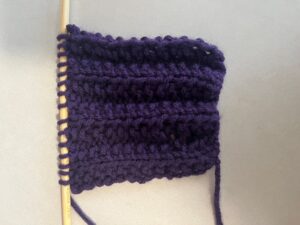
My Mistake Rib Stitch Knitting

Continental vs. English Knitting. Say What?!?

Well as my knitting journey continues this week, I discovered there are two distinct techniques for knitting! Who knew?!?  When I was learning knitting from Sheep & Stitch I just assumed there was only one way to knit but I have now discovered that I learned what is called “English Knitting”. The other one is called “Continental Knitting”. While trying to learn more about the differences between the two techniques, I came across this article by Handy Little Me that was full of interesting information.

Continental vs. English Knitting

Continental

  • Also called “German Knitting” or “European Knitting”. As you may have already guessed from those names, this is a common knitting technique in various parts of Europe
  • Left hand holds the yarn and controls the tension
  • Sometimes referred to as “pickers” due to the motion of the right needle picking the yarn and wrapping around the yarn that is being tensioned with the left hand
  • Beneficial for people who struggle with arthritis, since smaller movements mean less strain on the hands, wrists and fingers
  • Has the potential to be a faster knit, which is good if doing large projects and wanting to speed things up


English

  • Also known as “American Knitting”
  • Right hand holds the yarn and controls the tension
  • Sometimes referred to as “throwers” since the right hand “throws” the yarn around the right needle
  • This style is often taught to beginners since the movements are easier to grasp when first learning how to knit. I found this true in my own learning experience.


I will admit that in my attempts to learn Continental Knitting I wasn’t very successful. I found it to be a hard technique to learn, even after watching multiple videos from different sources. I gave it a fair shot and I am okay with not being able to do Continental Knitting in the end. I heard that once you have learned a particular style, it can be hard to switch to the other style. I feel that since I have learned English Knitting I prefer to just remain with that technique for now and focus on improving my skills from there. Also, there is no substantial benefit for Continental opposed to English Knitting, it is more a personal preference.  In saying that, I do plan to give it another shot further down the line once I am more confident overall in my knitting ability.


 My Learning Experience  

Overall, I really enjoyed learning from the source Handy Little Me. I imagine it is going to be another one of my ‘go to’ resources. I was exploring the website and found so many blogs I want to read that I think will be beneficial in my journey! This article I found, nicely lays out the basics that a beginner knitter should know, including a list of basic supplies. I even found a section that explains how if doing knit stitches only it technically makes a “Garter Stitch”. I had documented about this in one of my previous blogs since this is a piece of information that was left out of many sources I originally learned from and hadn’t known until I stumbled upon this realization myself later on. Another beneficial feature is Handy Little Me is connected to various platforms, including Facebook, Instagram, YouTube, Pinterest, X and TikTok which makes it easy to find valuable content of hers. Also, she has many different free knitting patterns to download, ranging from easy to hard, which I am excited to try in the future! The only problem I had with this source, is some of the blogs were extremely long and had an overwhelming amount of much information to digest. The other thing was there were quite a few ads that kept breaking up the information and this interrupted the nice flow of the webpage. However, those were both minor things and barely even noteworthy. I would highly recommend checking out Handy Little Me to anyone who is knitting, no matter where they are in their journey!


Digital Citizenship in the Classroom

I believe in my future classroom it is important to teach from a “one life” perspective, as discussed in the article by Jason Ohler. This involves students use of technology being accepted at school instead of being segregated only to their time outside of school hours. This is based on the belief that elimination of technology in the school environment doesn’t adequately teach students about appropriate use of technology. In order to access this level of learning, proper integration of technology is required. If we aren’t teaching students about appropriate use of technology at school, they are potentially not being taught these essential skills at all. It is our responsibility as educators to teach our students necessary skills that will help to set them up for success in their future. By ignoring technology and restricting their access to it, we are setting them up for potential failure in the future. Additionally, as we discussed in class, banning technology only solves the problem of inappropriate technology use on a surface level. It isn’t accurately teaching the students about responsible technology use and appropriate usage. Although, as Ohler mentions it is simply not enough to go from banning technology to integrating it. We must go beyond and educate our students on how to question the technology they are using. Our

A children looking the laptop

Photo by Max Fischer on Pexels

world is constantly changing with the use of technology, and we need to help students stay in the forefront of it all in a helpful, responsible way and proactive way. Also, in an article by Nathan Jurgenson, he brings about the idea that one can never truly separate ourselves from technology, even if we are “offline”. Since technology has come into our lives, it has changed the way our brains are thinking about our daily experiences, even when we aren’t connected to technology.  This brings about the question, is it possible to truly eliminate technology from the school environment when considering this factor?

In my future classroom I will teach the 9 elements of digital citizenship through not only informing my students about each element and what it truly means but I will also lead by example. I will exhibit what it means to have healthy boundaries with technology and how to use technology responsibility. This includes showing how if used properly, technology does have great benefit. I don’t want my students to be afraid of technology, I want them to embrace it, while also understanding that balance is key. Providing students with the information and skills required for digital citizenship gives them the opportunity to make informed, positive and safe decisions. Lastly, as with any other subject, I plan to be open to learning along the process with my students and learn from their experiences.

A final note in the stating of my belief and my intentions for my future classroom, I do recognize that I have to abide by and work within the boundaries put in place by the school policies.

There is an App for That

Distribute Increase and Decrease Function on the app called Knitting GeniusAs I have been going along this knitting journey, the one thing I noticed is that it is easy to lose track of how many rows you have knit. I found this particularly hard when doing the stocking stitch last week, where I had to alternate one row purl, one row knit. At one point I got distracted at the end of the row and then couldn’t remember if I had done purl or knit for that row. I thought, I can’t be the only one having this problem, there has to be some kind of knitting tool available to help! Luckily, in my search I stumbled upon the app Knitting Genius. As I started to explore the app and seen so many functions that I was clueless too I realized there is so much about knitting I still don’t know. A lot of the functions were related to help with patterns which I don’t have much experience with yet. These included:

  • Swatch AdapterYarn Ball Converter on the app called Knitting Genius
  • Yarn Ball Converter – Helps you figure out how many balls of yarn you will need to use for a specific pattern by asking how many meters/yards/grams your ball of yarn is and how much the pattern calls for
  • Distribute Increase & Decrease
  • Length: Unit Converter (meters, cm, inches, yards)
  • Needle Size: Unit Converter (Metric, UK, US) – depending on the pattern it might tell you the size of needles by UK standards and you will need this tool to convert to US sizes.
  • Wool weights: Units Converter

Additional Functions:

  • Tutorial videos for various stitches
  • Glossary – Abbreviations used in the patterns available on the app
  • Patterns available to use
  • Row counter
  • App is multifunctional since within the app there is the ability to specify and select whether you are knitting or crocheting
  • Ability within the app to join an online knitting community to access forums and ask questions to other members

Screenshot of all the functions available on the app Knitting Genius Row Counter and Patterns Shown on the app Knitting Genius

Critiques of App

  • Frequent ads when trying to flip between functions and when exploring the app
  • Despite all the functions, seems like a low budget app, which make sense considering it was free and you are able to access all the functions without any in app purchases
  • The tutorial videos were not too helpful as there wasn’t any voice over explanations. The videos were primarily a person knitting a specific stitch and music playing in the background. Some videos had text boxes explaining along with the knitting, but still found it hard to follow.


Row Counter

The Row Counter Function in the App Knitting Genius that is labelled for Knit StitchesNow that I have told you about the various functions and what I didn’t like about the app, I am excited to share that I was happy with the row counter function. Which, in reality, was the tool I set out to find anyway! Once I clicked on the row counter, I was able to name my project (in case you have multiple projects happening at once) and then chose whether I was knitting, crocheting, using a machine or using a loom. Once the basic counter was setup, I was able to modify and create two counters. One counter for my knit rows and one for my purl rows. I can switch between the two counters fairly easily by clicking on the button in the upper right corner that says “Part 1” or “Part 2” depending on which counter I am on. I was also able to label the counters “Knit” and “Purl” so that I don’t get confused. A few other handy functions I noticed was “Voice Control”. When activated, this allows you to say the word “Next” and the counter will automatically increase your count by one. This would be convenient if you don’t want to put your knitting down to press the buttons. Another function available was a timer that you can use to time how long it is taking you to do each row. That doesn’t sound very beneficial to me, as I like to be relaxed while knitting and not worried about the time it is taking me, but I am sure some people would use it.The Row Counter Function in the App Knitting Genius that is labeled for Purl Stitches


Overall, despite the downfalls of the app I will say it was rather user friendly and easy to navigate. As time goes along and I learn more about the world of knitting patterns I might find myself using the app more but for now I can’t see myself using the app for much more than the basics, which includes the row counter!


Two hands, two knitting needles and a heart in the background of logo for Amber's Knitting Chronicles

Photo by Canva


Technology in the Classroom: Our New Reality

In Michael Wesch’s YouTube video he states his belief that media is mediating human relationships. This means that media directly impacts and changes human relationships. Similarly, in class we discussed how:

Change in content + Change in tools = Change in relationships.

As a future educator it is important to understand how technology is impacting our relationships with our students. If we are unaware of the technology at play, we are out of touch with our students. This creates a disconnect and can negatively impact our ability to build and foster healthy relationships with our students. I see teachers’ relationships with their students being in a triangle with technology.

A blue triangle with the words "technology, student and teacher" written individually on each point of the triangle


Michael discusses how technology is changing so rapidly that we can’t predict the new technology. This means we will have to be open to pivoting and rethinking our ways of doing things on a consistent basis. It is easier to be open to change and be willing to move with it versus against it.  For me this also means I will have to be willing to go out of my comfort zone and be vulnerable, as there are bound to be mistakes along the learning process. Additionally, in class we talked about previous moments throughout history when similar doom and gloom feelings or on the other hand, feelings of high hopes for advancement in technology had arisen. I feel it is valuable to remember this when we are approached with everchanging technology, these are not new reactions, and we can learn from the past.

What Does This Mean for the Classroom?

In my future classroom, as an educator, in order to keep students engaged in learning it will be important for me to be innovative when presenting of the content I am wanting my students to learn.  This means viewing technology as my friend/partner and not my enemy. I believe educating oneself and our students is the best way to balance the challenges of our new digital reality. While embracing that technology does open the playing field for a level of collaboration that wasn’t possible before. Also, it is important to note that we are role models to our students, they are like sponges that absorb and copy the actions of the adults in their lives, so one must exhibit healthy technology use in front of our students. Like anything, there are pros and cons and too much of anything isn’t good for you. Balance is key and we must find a way to create a healthy relationship with our new reality. It is a learning process and I believe it is okay to learn alongside our students.


From Knits to Purls

Last week as I was knitting I discovered that the stitches were incredibly tight on the needle, I could barely get the yarn to move. I ended up coming across this video on how to fix tight knitting. Through this video I discovered that this is a common occurrence when you are first starting off learning how to knit, as you are nervous. Thus, results in holding tighter to the yarn as you are afraid it will slip off the needle. Eventually you will become more comfortable and less nervous which will allow the stich to naturally be looser. In the video she suggested:

  • Use wood or bamboo needles as the yarn grips easier to these.
  • Also suggested a larger needle size.

I am already using large wood needles so that was a nice affirmation that I am on the right track. I also learned this happens when you are using only the tip of the left needle and not maximizing the rest of the surface space. I followed this advice and it seemed to really help make the knitting looser and made the yarn easier to work with.

Purl Stitch

Knitted dishcloth showing both the stocking stitch and the garter stitch
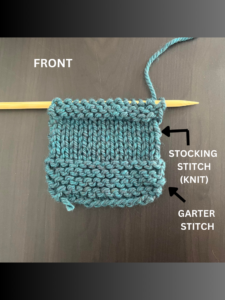
This week I decided to learn the purl stitch as when I was researching different knitting stiches, Sheep and Stitch mentioned that purl stitch and knit stitch are the two basic stitches you should learn. It sounds like all the other stitches are a combination of these stitches or build upon these stiches. So this seemed like the logical next step. I ended up using two different videos to teach me the purl stitch. Both of these videos were great resources but also had their downfalls. I found when learning online it is good to learn from multiple sources, as sometimes one source will leave things out you didn’t even know are important. Also, I found I struggled with keep good tension on the purl stitch which is something that came naturally and easier to me when doing the knit stitch. I know with practice this will get better as I become more comfortable with this new technique.

Knitted dishcloth showing both the stocking stitch and the garter stitch
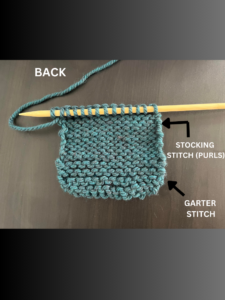
Also, I think it is important to note that while I was practicing the purl stitch I stumbled upon a piece of information I didn’t realize I was missing. I was practicing my purl stitch, row after row, and when I looked at what I was creating I realized it looked the exact same as my previous dishcloth I had made. This left me confused and wondering if I was doing the technique wrong. After some researching, I discovered that since knit and purl stitches are exact opposites of each other when you only do the one you end up with a combination called a garter stitch. This means that in my previous work, even though I was using the knit stitch technique I was actually creating a garter stitch. In order to see the true difference between the stitches, you have to do what is a called a stocking stitch (or stockinette stitch). A stocking stitch is one row knit and one row purl.

Studio Knit Video

Pros:

  • This video was good to learn from in the sense that she repeated the purl stitch many times, so was a good example of repetition when trying to learn
  • She also slowed down each step, so was great to visually see what was happening
  • Video was short and direct to the point which is beneficial if you just need to see how to make the stitch without needing to know any background information or if just looking for a refresher

 Cons:

  • Only showed the breakdown of the technique and didn’t give any additional information on the purl stitch


Love Crafts Video

Pros:

  • Great visuals for each step along the process of purl stitching
  • Provided general knitting information, including the difference between knit stitch and purl stitch and how to visually tell the difference. Explained that knit stitch are flat ‘V’s’ and purl stitch are bumps.
  • Demonstrated the knit stitch first and then the purl stitch which helped to see the comparison of the two and understand that they are exact opposites of each other. This was very helpful to know when learning about knitting in general and when trying to figure out how the stitches go together.

Cons:

  • Nothing noteworthy


Overview of What I Learned

  • When doing a stocking stitch one side is knits and the flip side is purls
  • Knit and purl stitch are opposites of each other.
  • Knit stitch is right needle goes underneath the left needle and the yarn wraps around the back of the right needle
  • Purl stich is right needle goes on top of the left needle and the yarn wraps around the front of the right needle

Thanks for following along with Amber’s Knitting Chronicles and I look forward to what next week will bring for my learning journey!

Two hands, two knitting needles and a heart in the background of logo for Amber's Knitting Chronicles

Photo by Canva


TikTok Here I Come

Wow! What an adventure I have had this week with my learning! I didn’t do much learning in the aspect of my knitting as I wanted to have the opportunity to practice the basics of knitting (cast on, knit stitch and cast off). I wanted to get a good grasp on those skills before carrying on as I believe if take the time to create a strong foundation with those basic skills, it makes things a lot easier as you go along! Also, this week I knew I had a learning curve coming with the technology side of creating a video and man was it right. Things don’t always go as smoothly as we would like but within it all is a learning opportunity. Lets dive into mine!

Video editing screen on TikTok where you can change the speed of the video playback. Picture of woman knitting

Options to change the speed of playback on video

Well to start, I jumped on the bandwagon and joined the TikTok community! I don’t have much experience with TikTok at all. I had downloaded the app a few months ago just to see what it was all about, but I ended up scrolling for a few minutes and then decided that was good enough. That was the extent of my association with TikTok up until now! I knew I wanted to create a video to document my learning project this week and I was always a bit curious about how to create a TikTok video as I know students at my school often talk about them creating these videos. I figured it can’t be that complicated! Wrong! I found it to be an overwhelming space to navigate especially since I don’t have any prior experience with video creation apps or programs. I found the most overwhelming part was all the options that were available when editing the video. At one point I even found myself Googling “How to change the speed of a TikTok video after recording” and this resulted in me watching a TikTok about how to edit in TikTok!! Another frustrating part was I had the video segments all edited and timed out and was just needing to add music when it all got erased!! I accidentally clicked on a button that I thought would help me with sound but when I tried to cancel it somehow reverted all my work back to the original videos I had started with. Ahhhhh!

Video editing screen on TikTok where you can create captions on the video. Picture of woman knitting

Caption Creation Options

Anyway, after I got those few hiccups figured out and I started to gain more confidence in exploring the editing tools I started to find the fun in the process! I was amazed at all the options available and the creativity that can be used to create these videos. I would recommend taking the time to just have fun exploring and trying the different features without pressure of needing a completed product.

The learning definitely didn’t stop here though! I had to publish the video on TikTok before I was able to save it to my phone. Luckily when you publish you have the option to keep it private, meaning only you can see it. Once this was completed, I then started on the journey to uploading the video to YouTube. Which once again, I had never upload videos to YouTube before but I needed to do this extra step in order to share it on my blog. I found YouTube to have a very user-friendly platform and the process seemed seamless. Too seamless? Yes! A problem arose once the video was published with copyright infringement due to a song I used for the first part. I discovered that although it has been okay on TikTok, on YouTube when a video is less than 3 minutes long it automatically converts it into a “short”. The problem was the song I had chosen wasn’t allowed to be played on a “short” that was longer than 60 seconds. Although, the song I chose for the second part of the video was allowed to remain. This left me with two options:

  1. Go back to TikTok and create the video all over again and chose a different song
  2. Have YouTube erase the song off my video

Due to time restraints and frustration building I went with option #2. The result is a less than perfect video with music starting hallway through the video but what I think this shows is the reality of learning. Learning isn’t perfect, it is a journey that often takes twists and turns and sometimes gets messy. In the words of The Beatles, sometimes you have to start stop fighting the reality and just “Let it Be”.

TikTok in the Classroom

In my connection of TikTok video editing to classroom use I believe this tool is important to experience as a future educator. I believe it will help me to connect to my students as it allows me to understand something that is a part of their everyday life! Also, tools such as this can be used to make assignments more relevant and engaging to students. I may not be able to get them to create TikTok depending on the social polices, but I can have them create a video in a similar style using another approved platform. I feel that incorporating this into an assignment would allow my students to use their creativity and utilize their knowledge to show me their own learning in a relevant way for them.


Welp, Here Goes Nothing

How come even when it is something we are interested in we sometimes procrastinate getting started? Is it fear of failure? Fear of the unknown? Uncertainty? Overwhelm? Who knows but I will say this was me starting this learning project! BUT after finally getting started I had so much fun learning the basics of knitting. I found this really great website called Sheep & Stitch. They have many resources for anyone who is knitting, right from the beginning basics to the more experienced patterns. They also have a Youtube channel full of videos to help!

The Basics I Learned

  • A bulky yarn and larger size needles are recommended for beginners as it is easier to handleNeedle Size Recommendations on Bundle of Yarn
  • I used a 8mm needle and a super bulky acrylic yarn
  • Bamboo or wood needles are recommended for beginners as the yarn is less likely to slip on these needles versus other types
  • The labels on yarn bundles will always tell you the type of yarn & the needle size recommendation
  • When starting a project consider the width of the project you want to make and times that number by 3. Then measure out that much yarn and start your slipknot on the needle at that point.
    • You want to make a scarf that is 6 inches wide (6 x 3 = 18 in). Measure out 18 inches and then start your slipknot from there.
  • The first row you make on the needle is called a “cast on”
  • After learning how to cast on the needle, I learned the basic “Knit Stitch”

Yarn and Knitting Needles

Thoughts on Sheep & Stitch

  • I enjoyed the layout of the webpage as it was in manageable chunks and provided the necessary basics without giving too much information at once, which would otherwise overwhelm a beginner.
  • The videos were easy to follow. The demonstrations were slow enough to follow along and they also repeated every step along the way. So you could easily see it twice in a row in case you got lost the first time.
  • Also, in case you learn better via pictures versus video or just want to look back for a quick reminder, on the webpage below the video, there are step by step pictures of the process
  • It also provided little “Pep talks” along the way. It took a few watches and many attempts before I got the hand of the knit stich. Then just when I thought I got it, it became confusing again and didn’t work. So I went to continue reading on the article for additional support and what I came across instead was a “Pep talk” telling me that it is normal to not get it on the first or second time and to just keep trying. It definitely look me A LOT more attempts than 2, more like 12? I think I stopped counting after 10 but this was the motivation I needed to hear! I had gotten confident when I quickly learned the cast on and assumed the knit stitch would be just as easy!

Stay tuned for more updates on my knitting adventures next week! I feel I have gained some momentum after finally taking the diving into learning and I am excited to build on my foundational skills of knitting! There is no stopping me now! After I finished my first knitting experience, I was motivated to make a logo for my blog on Canva. I used their logo template and just changed the text style & words.


Two hands, two knitting needles and a heart in the background of logo for Amber's Knitting Chronicles

Photo by Canva

Uncovering The Truth Around My Tech Habits

I would like to say that I have good control over my tech habits but let’s be honest. In a society that is now so reliant on technology it is easy to get wrapped up in it without fully realizing. Now don’t get me wrong, I think technology is wonderful and definitely plays an important role in making our lives easier and helps with efficiency in our tasks but I do think it is important to be mindful of the time we are spending on screens.

Before I deep dive into my habits, I know right away that between work, classes and my personal use, my screen time is way more daily that I prefer or think is ideal. To try to counter act this before bed I will try to do some reading if my eyes aren’t too tired. Reading books is my happy place. It helps my mind decompress and allows me for a better sleep!


School Tech Habits

On a daily basis, for academic purposes my technology and websites I am accessing are:

  • UR Courses
  • Zoom
  • Microsoft Word
  • Edusites
  • YouTube
  • Discord
app, software, contour, settings, computer, application, operating system, smartphone, display, os, program, remote control, app, app, app, software, software, software, software, software, application, application

Photo by Peggy_Marco on Pixabay

Personal Tech Habits

My most common tech culprits that take up my personal time are:

  • Snapchat
  • Instagram
  • WhatsApp
  • Facebook
  • Calm


Strategies to Empower Myself Over The Social Media Vortex

I find I easily get lost in the social media world when someone will share something with me and I go to view it and then other items catch my attention and time passes very quickly. To counteract this when I am in classes or working on homework I will turn my phone on “Do Not Disturb” mode. This silences my notifications and I have configured it to only allow specific people’s messages through. It also lets phone calls through.

Another strategy that I have been actively trying to use when I do check social media is to allocate a set amount of time on the app. I will set a timer and when the timer goes off I have to click out of the app and move on. In the past I have also tried logging out of the social media apps, so that if I unconsciously click on the app I have to consciously login.

Overall, I feel I am slowly feeling more in control of my tech habits but I know I still have work to do. I am always open to suggestions while at times I struggle to find a healthy balance!

The Knitting Chronicles

Well here I am about to start this journey on learning how to knit! I have to admit that it seems like a daunting task. I prefer to learn in person with hands on instruction so the idea of learning through online resources seems outside my comfort zone and a tad overwhelming. Luckily, videos can be a great visual tool to help learn a skill online and I feel YouTube will quickly become a friend of mine in this journey. I am relieved to know that at least we aren’t going to be marked based on the quality of our final product. That helps to relief the stress.

Now that I have shared my anxieties around this learning project, lets back things up and introduce the learning project I have chosen, knitting!

Why Knitting?

Growing up I learned how to crochet and really enjoyed the relaxation it had provided me! BUT my crochet skills only went as far as making dish clothes and square doilies. After creating way more of these items than my mom will ever need in her lifetime, I decided to call it quits.

Now fast forward to present day, adult Amber has been curious about knitting and wondering if it will help to provide the same relaxation effect as crocheting. Alternative outcome, it might end up just not being my thing and stress me out more than bring enjoyment but I won’t know until I try.  So lets see what happens! My hope is that knitting will become a hobby I can do to help relax while watching tv, as I have a hard time sitting still and just focusing solely on shows/movies. It is something I have wanted to learn for a while now but haven’t found the time to between work and classes. This gives me a great reason to make the time, which I am grateful for!

My Experience Level

No relevant experience. Unless you classify watching my friend knit while I chat with her, as qualified experience.

Supplies

Luckily my boyfriend recently found a pair of 8mm knitting needles and a brand new bundle of yarn while sorting through stuff in his house and gave it to me right before I started this class. Coincidental or meant to be? I will start with this supplies and then buy more once I have a better idea of what I am doing/needing.

Plans for Learning

This is my plan in the beginning stages:

  • Find out what size of needles and type of needles that I prefer
  • Experiment with different knitting stitches
  • Learn about different types of yarns and their benefits
  • Learn the difference between continental knitting and regular knitting techniques
  • Have fun!

I don’t want to set up unrealistic expectations for a knitting project, since I am starting from the basics and unsure how long it will take for me to knit an item. My short term goal will be to start off with simpler projects. Since my go to for crocheting was dishcloths and doilies, I found a video to help give me ideas for other beginner projects, including a scarf, a mug cozy & a bookmark (Sidenote: I love reading). If all goes well in my knitting journey, my long term goal beyond the time constraints of this semester, will be to knit a baby blanket.

I hope you enjoy following along with Amber’s Knitting Chronicles!

Assorted color yarns on brown wicker basket

Photo by Surene Palvie on Pexels


« Older posts Newer posts »

© 2025 Amber Landels

Theme by Anders NorenUp ↑