Embracing new online tools, I decided to format the last project into a digital book. I found an online tool that provides a free trial. Perfect. It’s called Flipsnackand like a lot of these tools, it was intuitive and the user interface is similar to others, such as Canva.
I want to say thank you to my classmates that took the time to read and comment on my blog, as well as provide support over Discord. I aimed to reply to all of the responses on my blog, which I did not include in the book. I learned a lot about blogging from your experience and your creativity! And thank you to Katia for creating and supporting the classroom community.
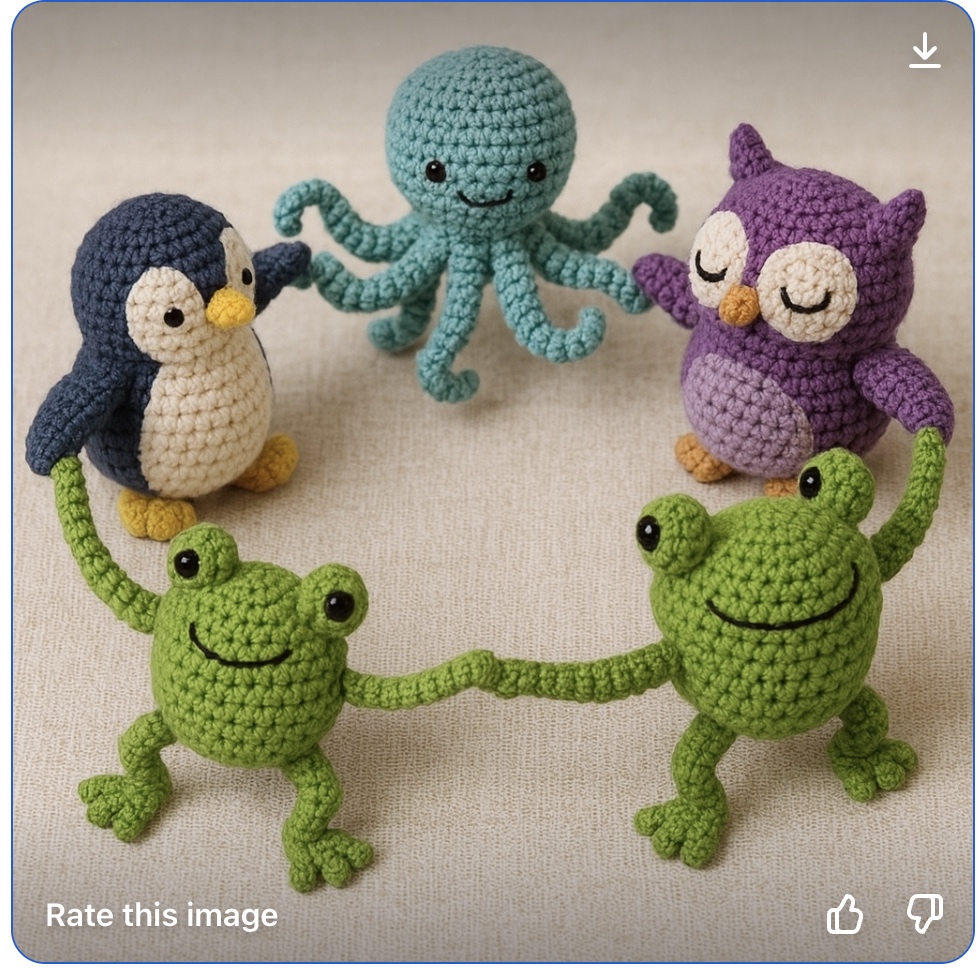
As I have been away for 10 days on vacation with my family, I didn’t put aside any time for crochet. However, I did experiment with ChatGPT image creator.
I used this prompt:
Create image 5 animals dancing in a round. one blue and white penguin, one teal octopus, one purple owl and 2 frogs different sizes and shades of green. The animals are crocheted.
I did customize the prompt to improve the image, however, with the free trial I was not able to prior to this post. Once I am back in The ‘Peg, I should be able to and I will place the updated version here!
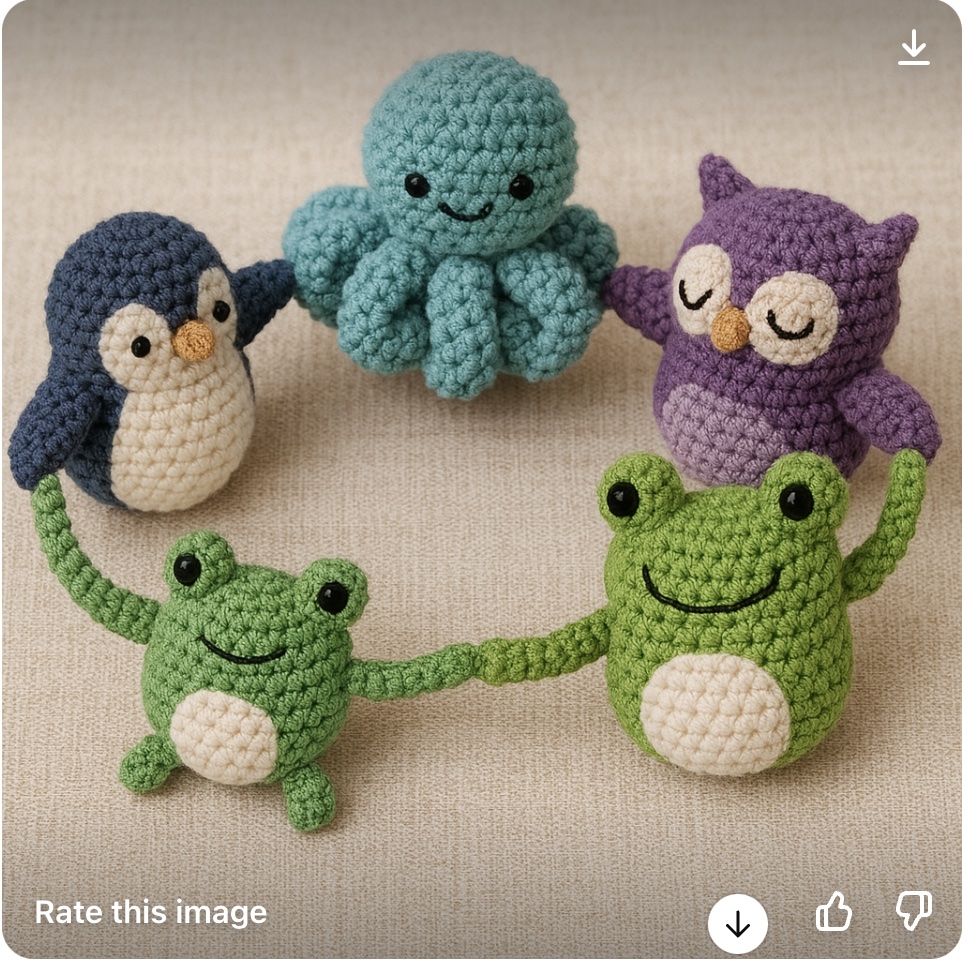
April 2 – 3 days later
I’m not sure why but I couldn’t edit my prompt until today. My goal was to make the yarn buddies look more like they do in real life. My revised prompt was this:
Revise the image with the octopus made with fluffy yarn and bigger stitches. The legs are tightly curled to the body. The larger frog is a lighter shade of green and both frogs have a crocheted white oval sewn to their bellies. The penguin and owl should have no feet.
Previously when making short videos, I have used iMovie and Canva. I decided to try Animoto for the video editing and Stop Motion to bring the crew to life. A couple years ago I watched my son make a stop motion video for school. It seemed quite complicated and I was so impressed with his final product!
Stop Motion App
I can say that creating the short stop motion videos for this mini-project using the Stop Motion App was very simple. I did it all with my phone and some extra lighting. There are many YouTube videos out there for some extra help, but to get started you really don’t need any extra help. The app itself has many built in features to explain how it works, offer some tips and tricks and get you going.
Once I had my 5 little stop motion videos, I decided to try Animototo put together the final video. This is a simple easy to use video editor, with intuitive interface. Animoto has a useful selection of templates and slide layouts available. However, after using Canvaand iMovie I was frustrated with its limitations. One that I came up against quite often is resizing the text box. You can’t. I ended up using <enter> to create a new line. While this worked, it is a klunky work around. I also found the font selection and difficulty with slide transitions.
They seem to have a good selection of stock images, although I didn’t explore this too much.
The free plan has a watermark attached on each slide. I didn’t think to take a screenshot of the watermark before I upgraded, but it does take up quite a bit of real estate. I didn’t mind it so much for this project; however, I ended up paying for one month so I could actually download the video to put on YouTube, rather than use a link to Animoto. I think it is a great app for beginners, which I would consider myself, but I did wish I had more customizable options. While I really enjoyed learning a new app, I think next time I think I will go back to one Canva or iMove.
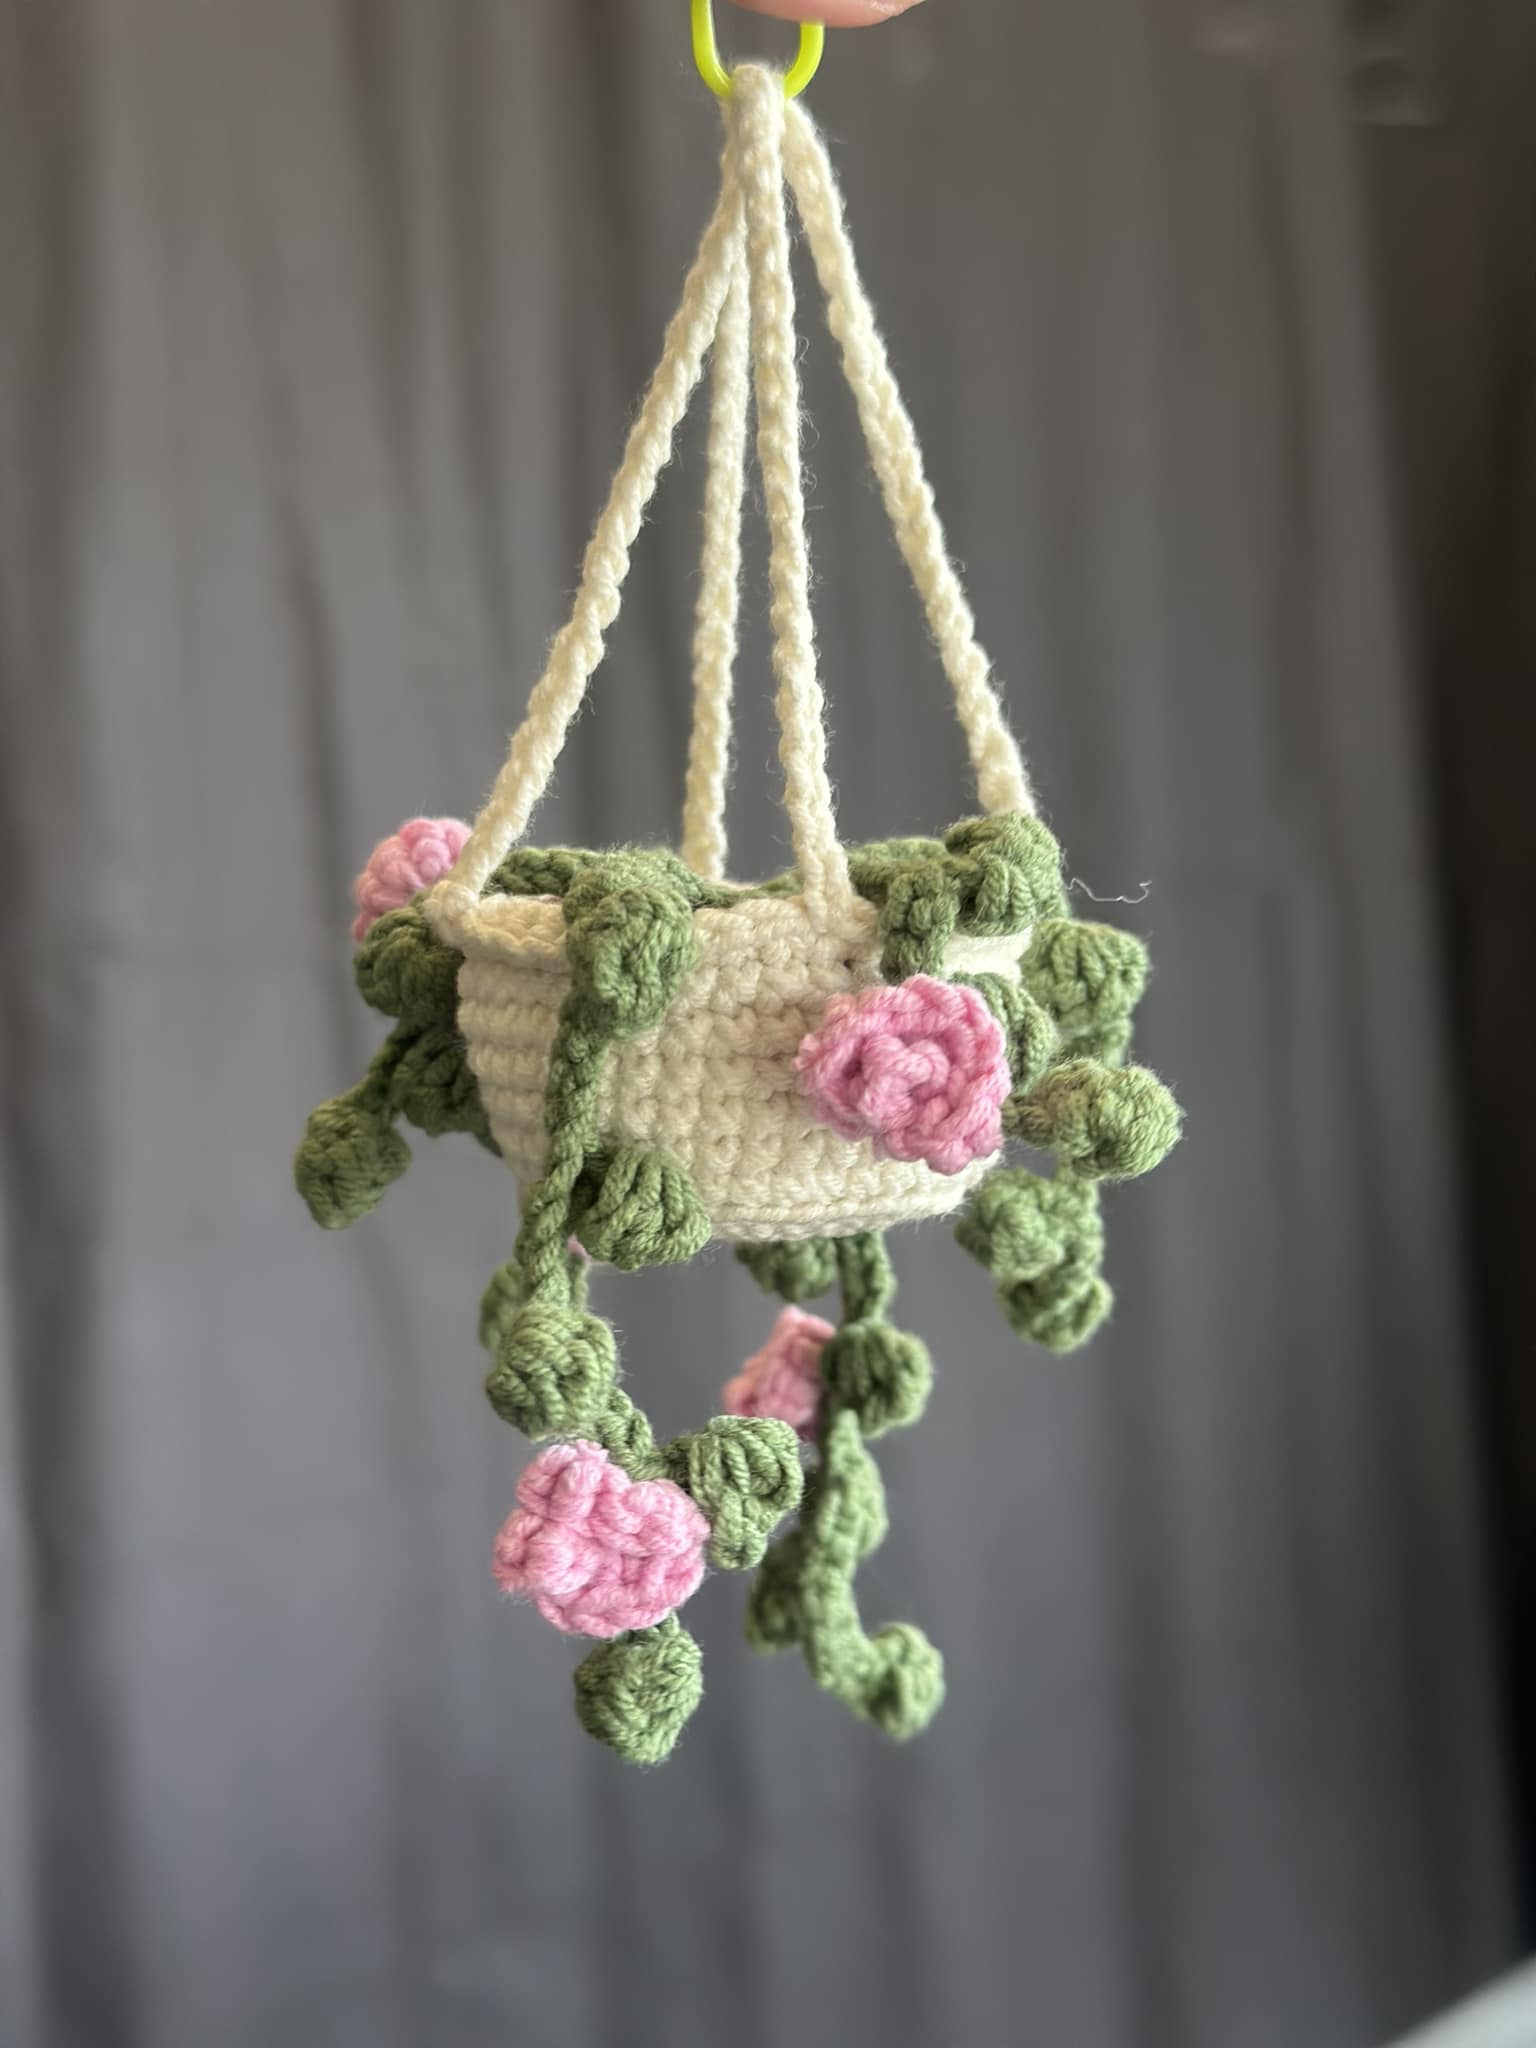
About a year ago, a co-worker of mine, and master crafter of any type, learned to crotchet and created the cutest hanging plants.
Tammy’s succulent
I decided to make some of these cute plants. In the video in last week’s post, I showed 3 different sized pots. These were meant to be pots for the plants, and were much too big for this purpose. I ended up making a 4th pot with even thinner yarn and a smaller hook. It turned out great.
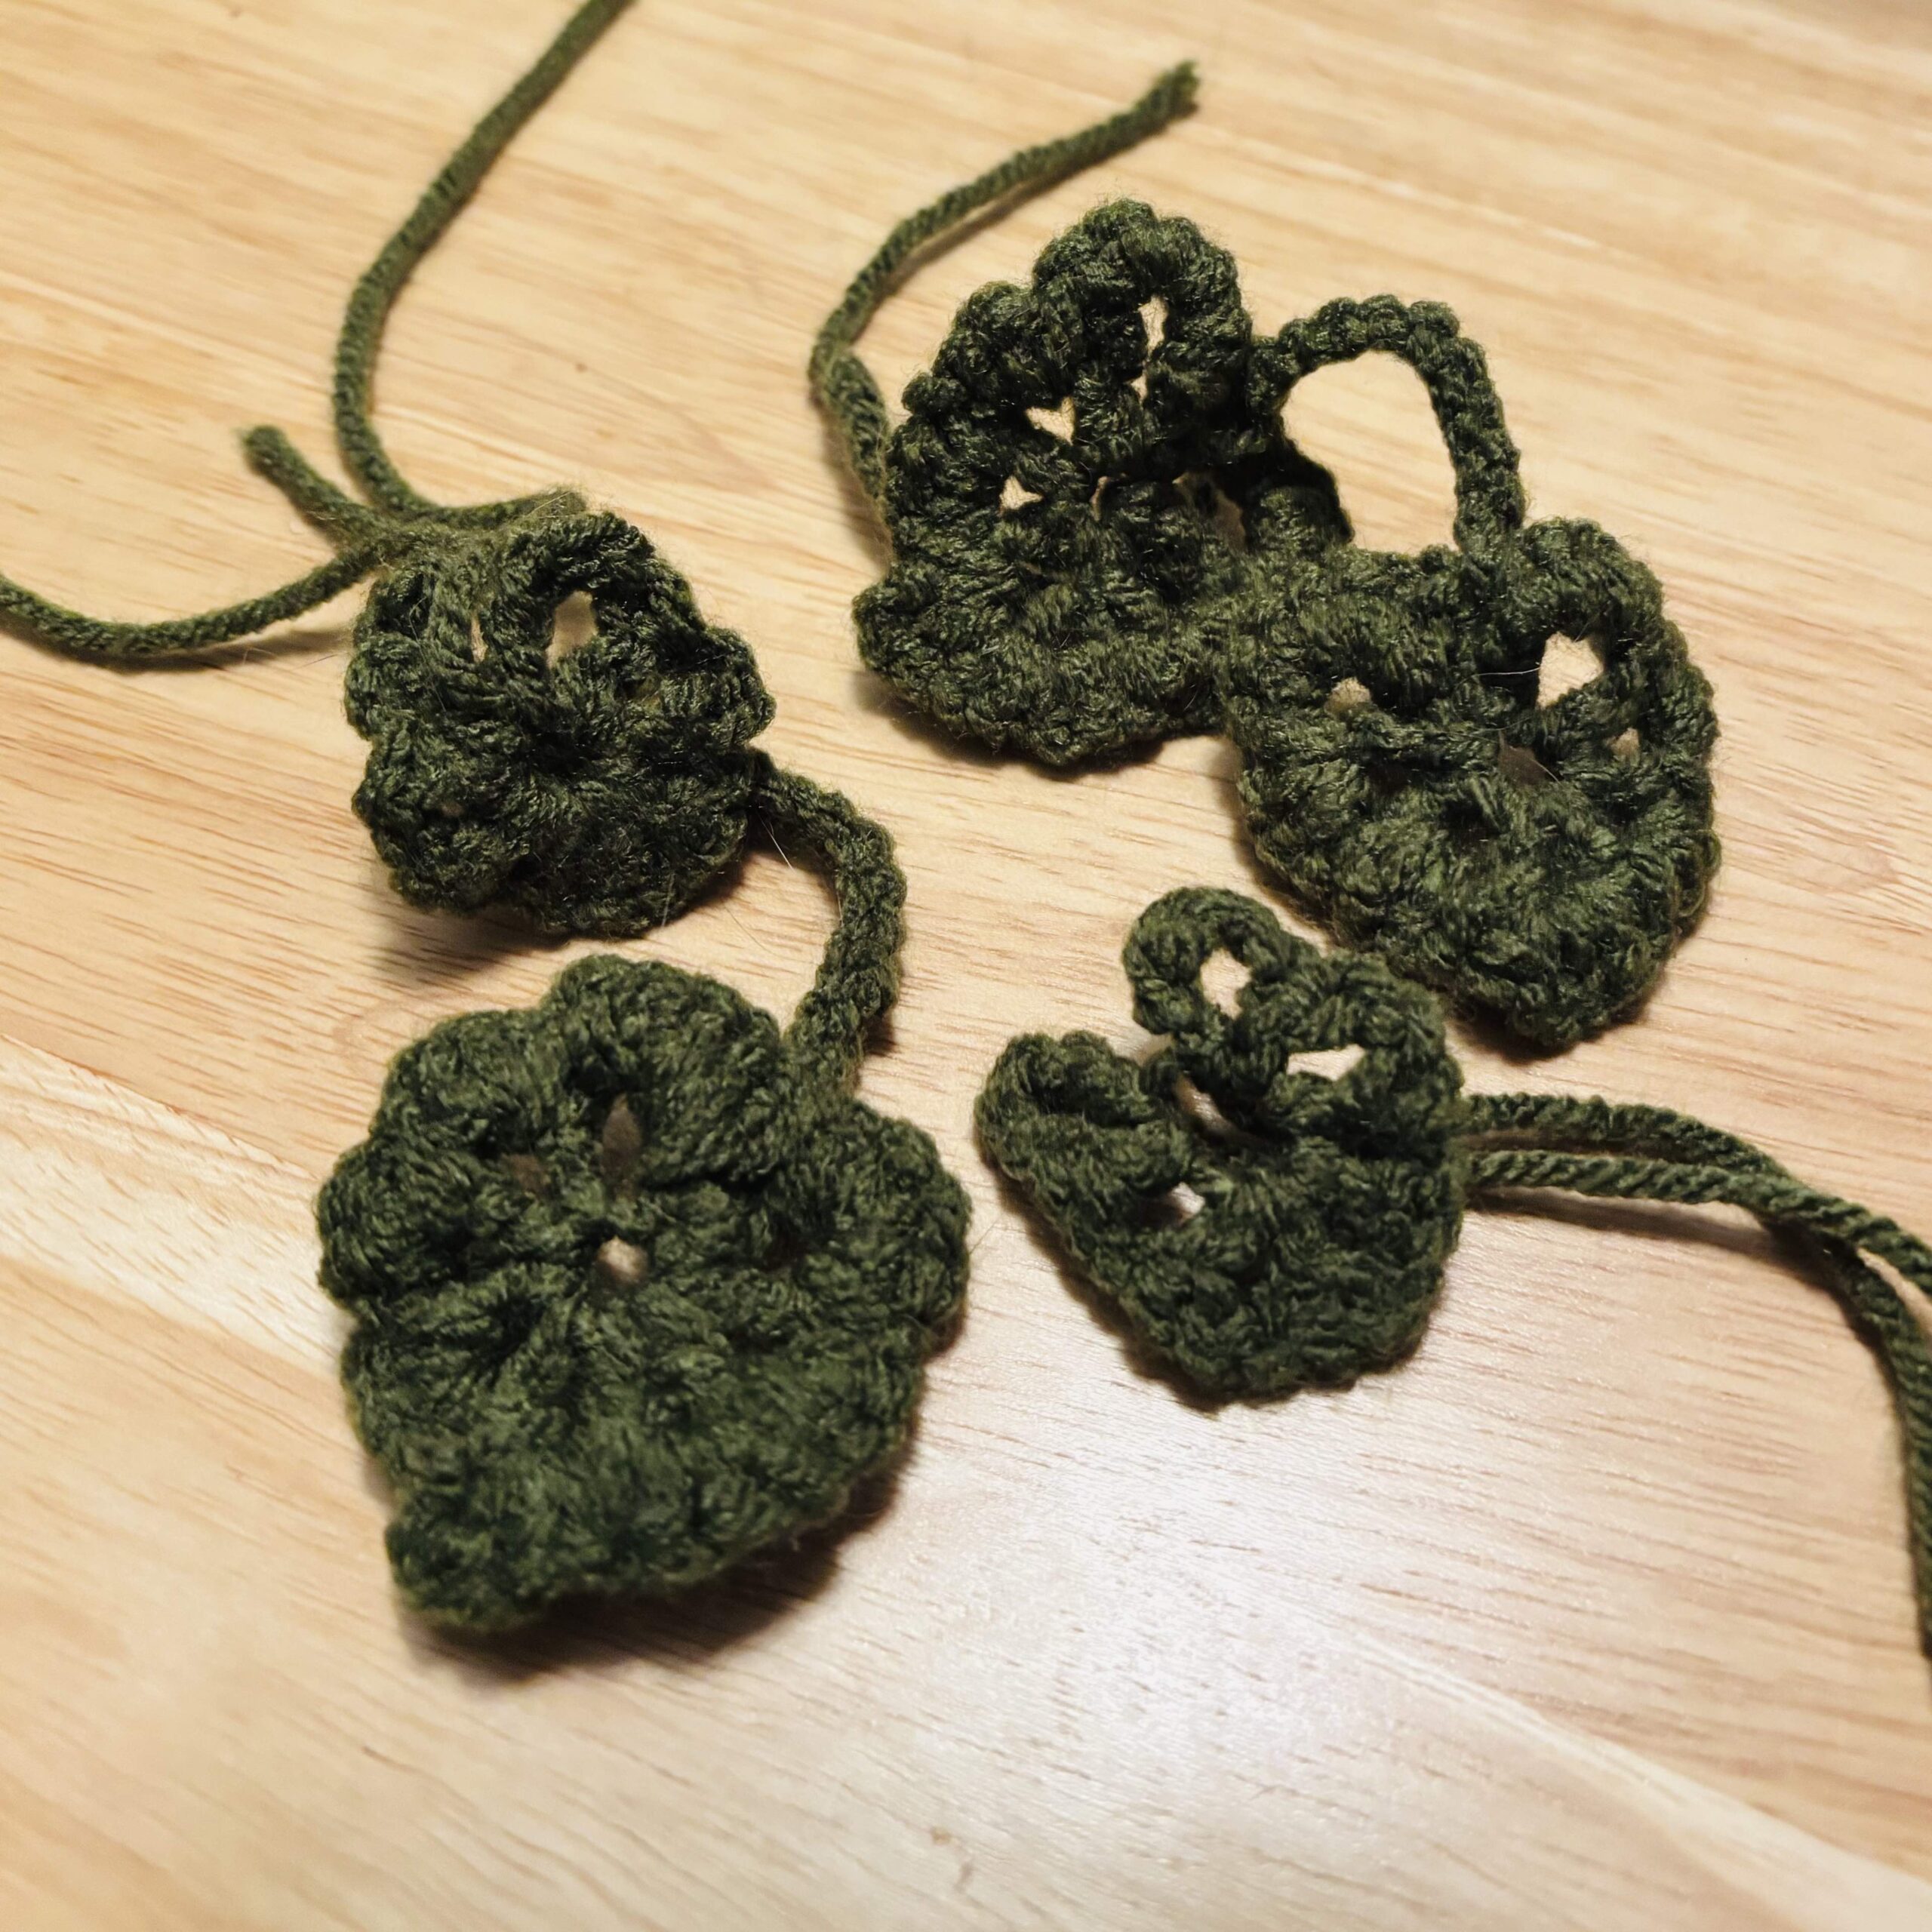
This week I started on the leaves. Monstera plantsare my absolute favourite, so that great place to start. Let your heart guide you!
Loading ...
Fourth attempt at plant potFirst attempts at Monstera leaves
My pot looks different from Tammy’s (above) as she used a single crochet stitch and mine was made with a double crochet stitch. Which do you prefer? I think I prefer the single crochet stitch.
Learning to make the leaves involved some confusion on my part, yet again. I started with a magic ring, but used it in a way I hadn’t come across yet. The written instructions were great, however videos are always more helpful.
This week I continued to learn about how different yarn weights and hook sizes influence the size of the final product.
I started on a new project which required a crocheted basket. I have this jute twine that I thought would look great. Well it did look great. But not only is it thicker it is also stiff, so my basket was way too big. My big frog could fit in this basket LOL. I used the hook recommended in the pattern which is a 5mm hook.
I decided to use medium weight yarn, also referred to as worsted, with the same sized hook. Well, the basket was smaller, but still not as small as I wanted it. My next step was to use the medium weight yarn with a smaller hook (3mm). I ended up with a smaller basket that is a much more appropriate size.
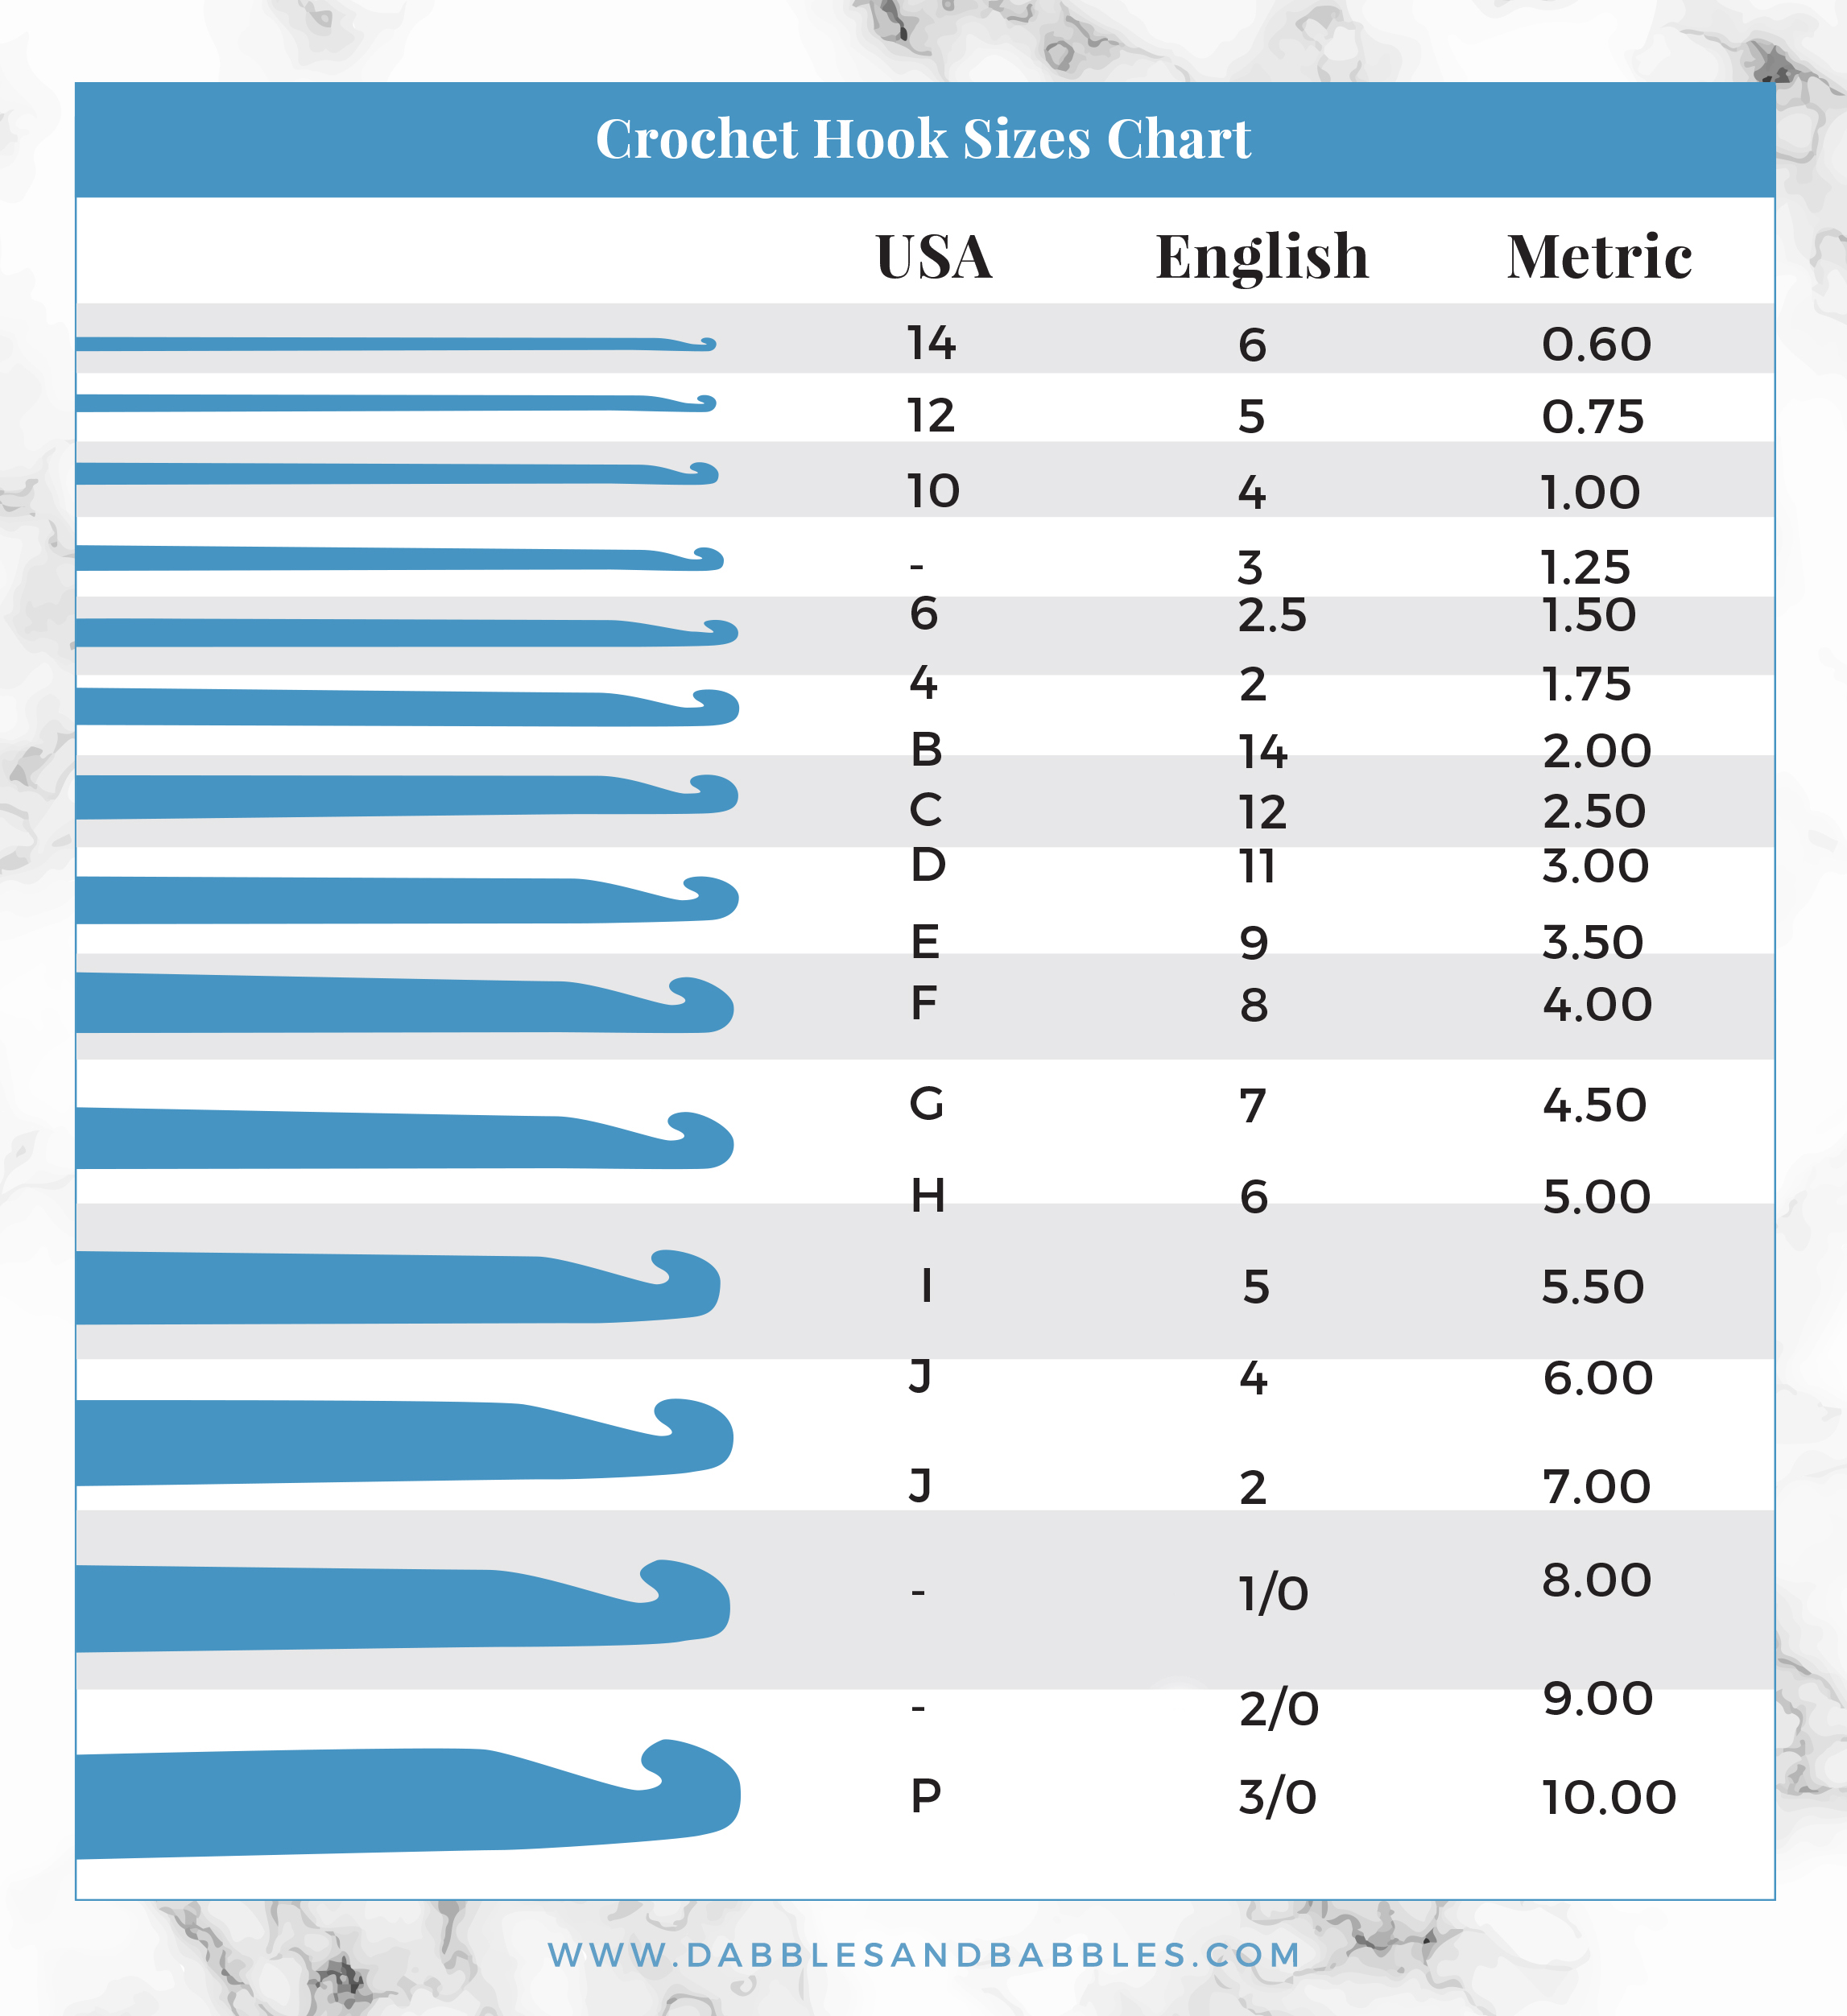
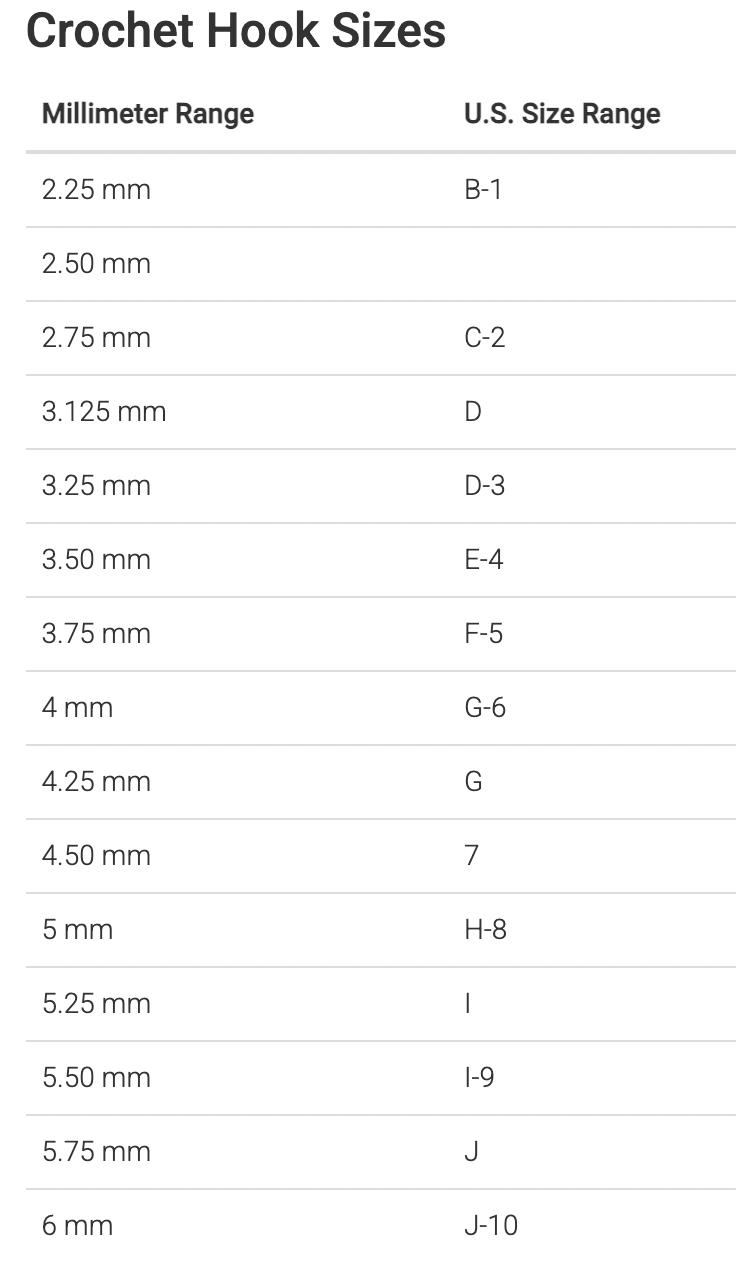
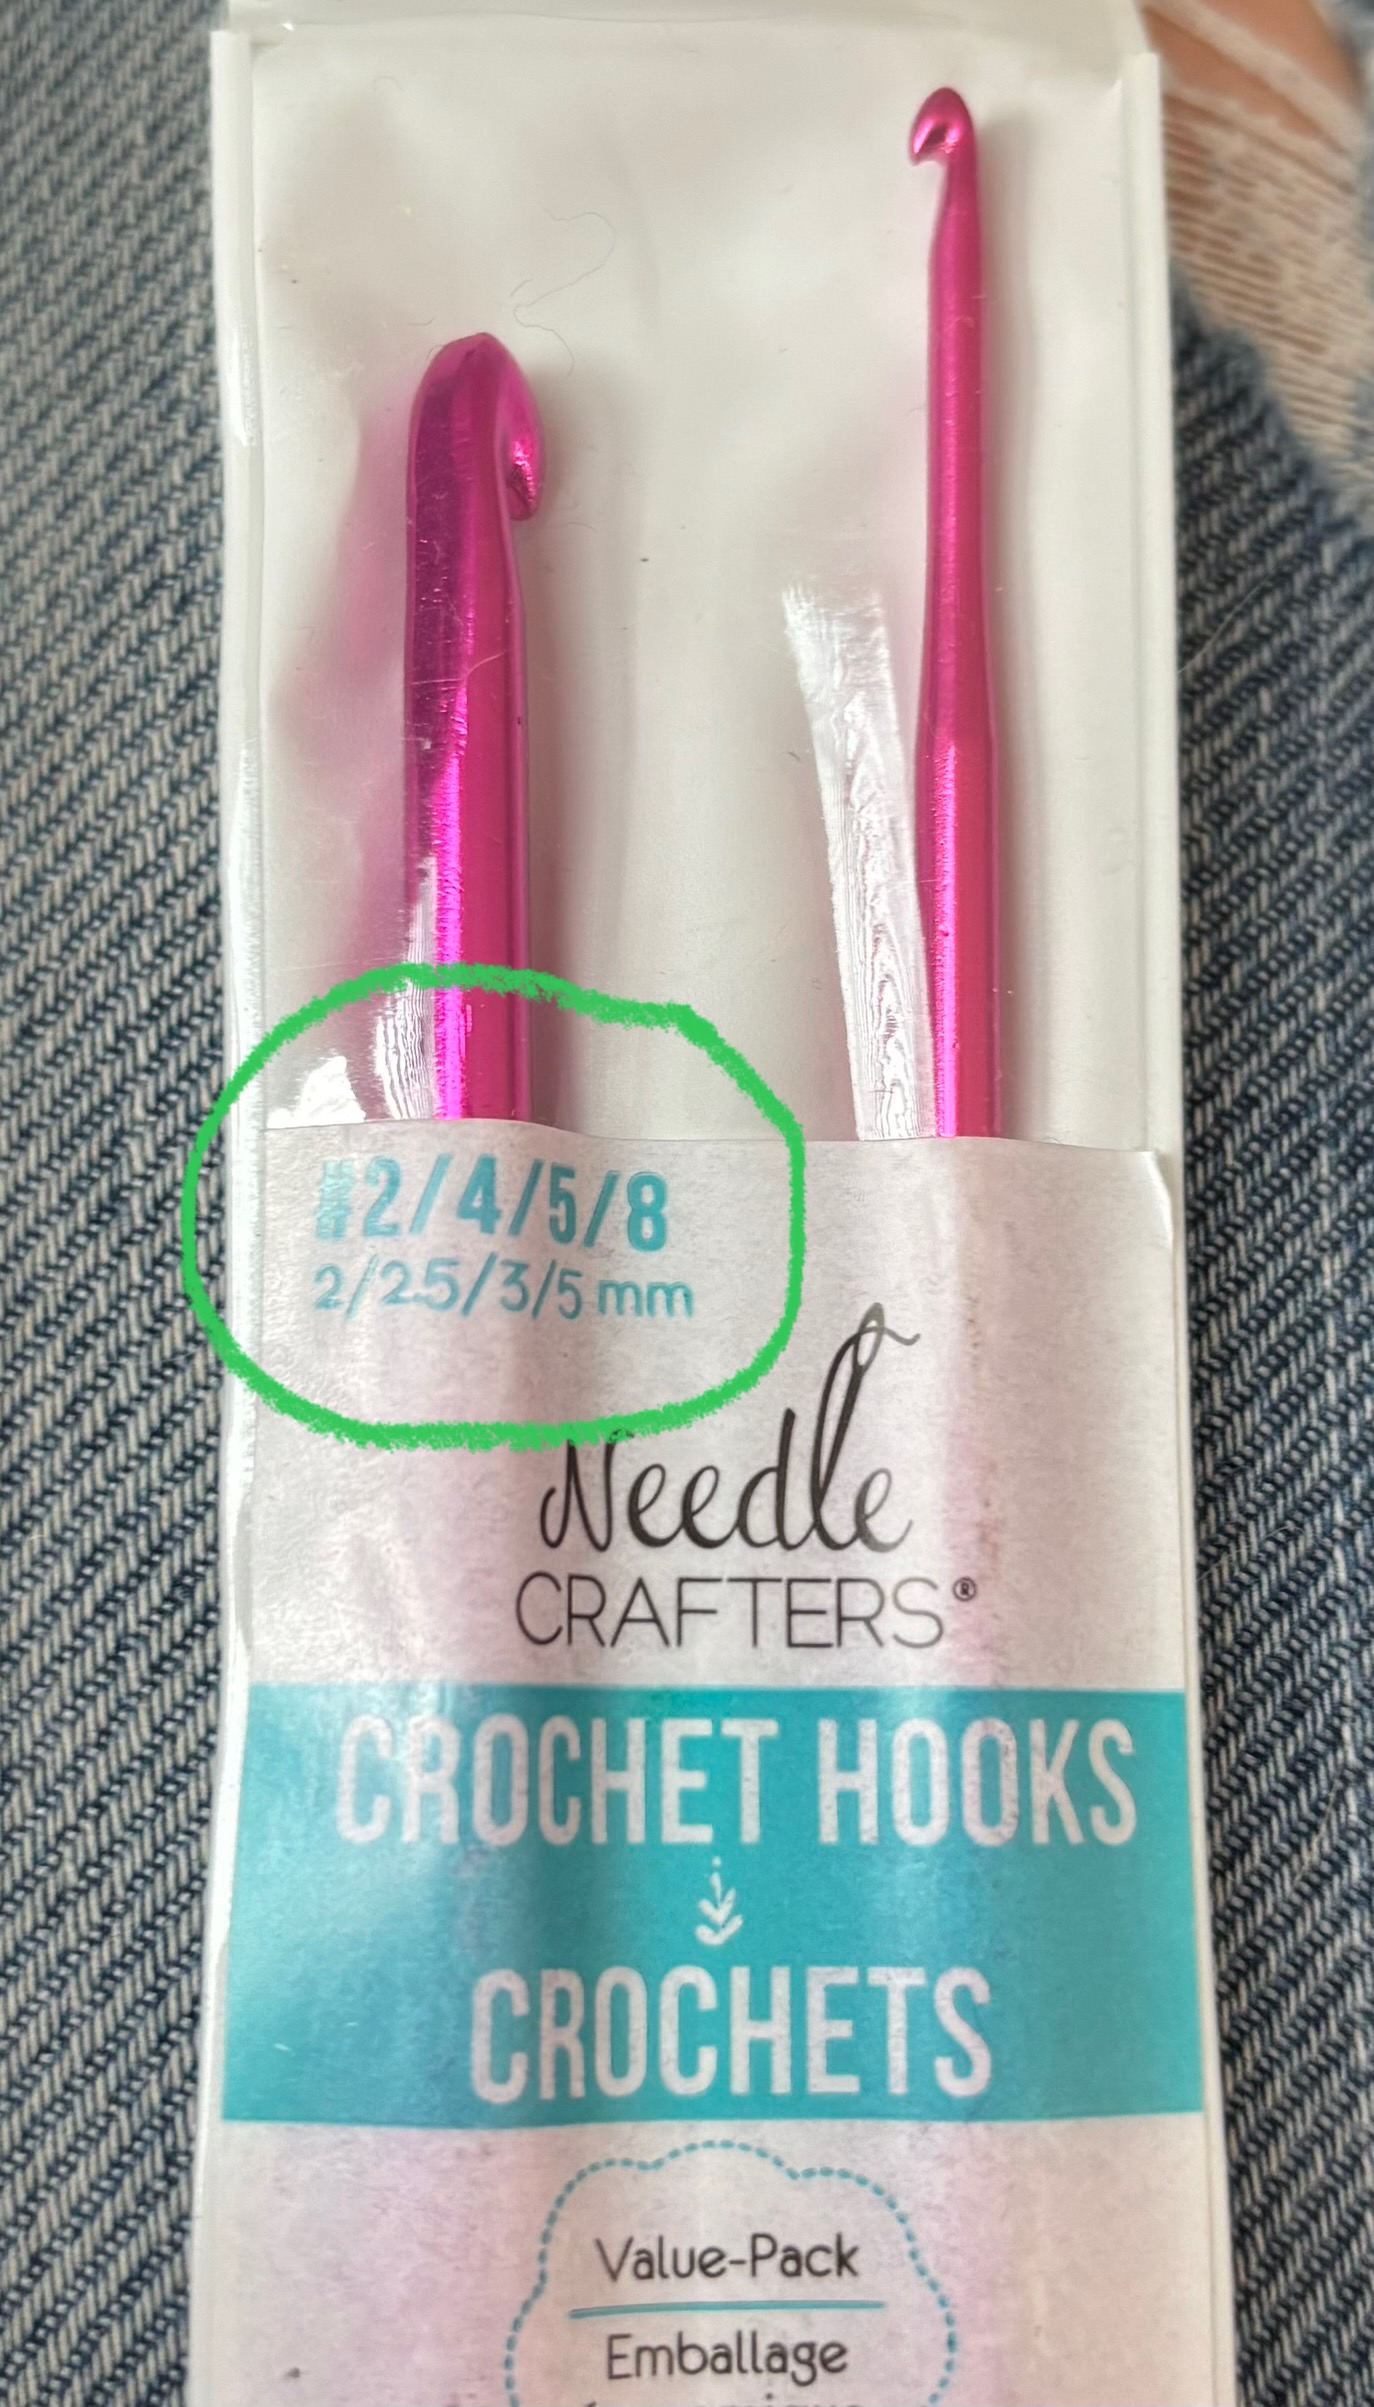
So that brings me to the topic of hook sizes. There is metric, USA and English hook sizes. I wanted to check if the Dollarama hooks were correctly labelled (shown below) as well as find a solid conversion chart that I could rely on moving forward. Here I have inserted 3 sources for hook sizes and conversions. A hook sizes chart from Dabblesandbabbles, the Craft Yarn Council (CYC), and my hook package from Dollarama.
Hook sizes per DabbleandBabble.comHook sizes per Craft Yarn Council
Hooks from Dollarama
I noticed that the 5 mm hook was called an 8 on the Dollarama package and the CYC, while it is a 6 on the Dabble and Babble chart. Some conversions kind of matched but not really, I’m guessing the standards aren’t regulated. I’ve settled on the realization that I will just continue to learn by trial and error. I’ve added a video below that demonstrates how changing the yarn weight or the hook size influences the size of the project.
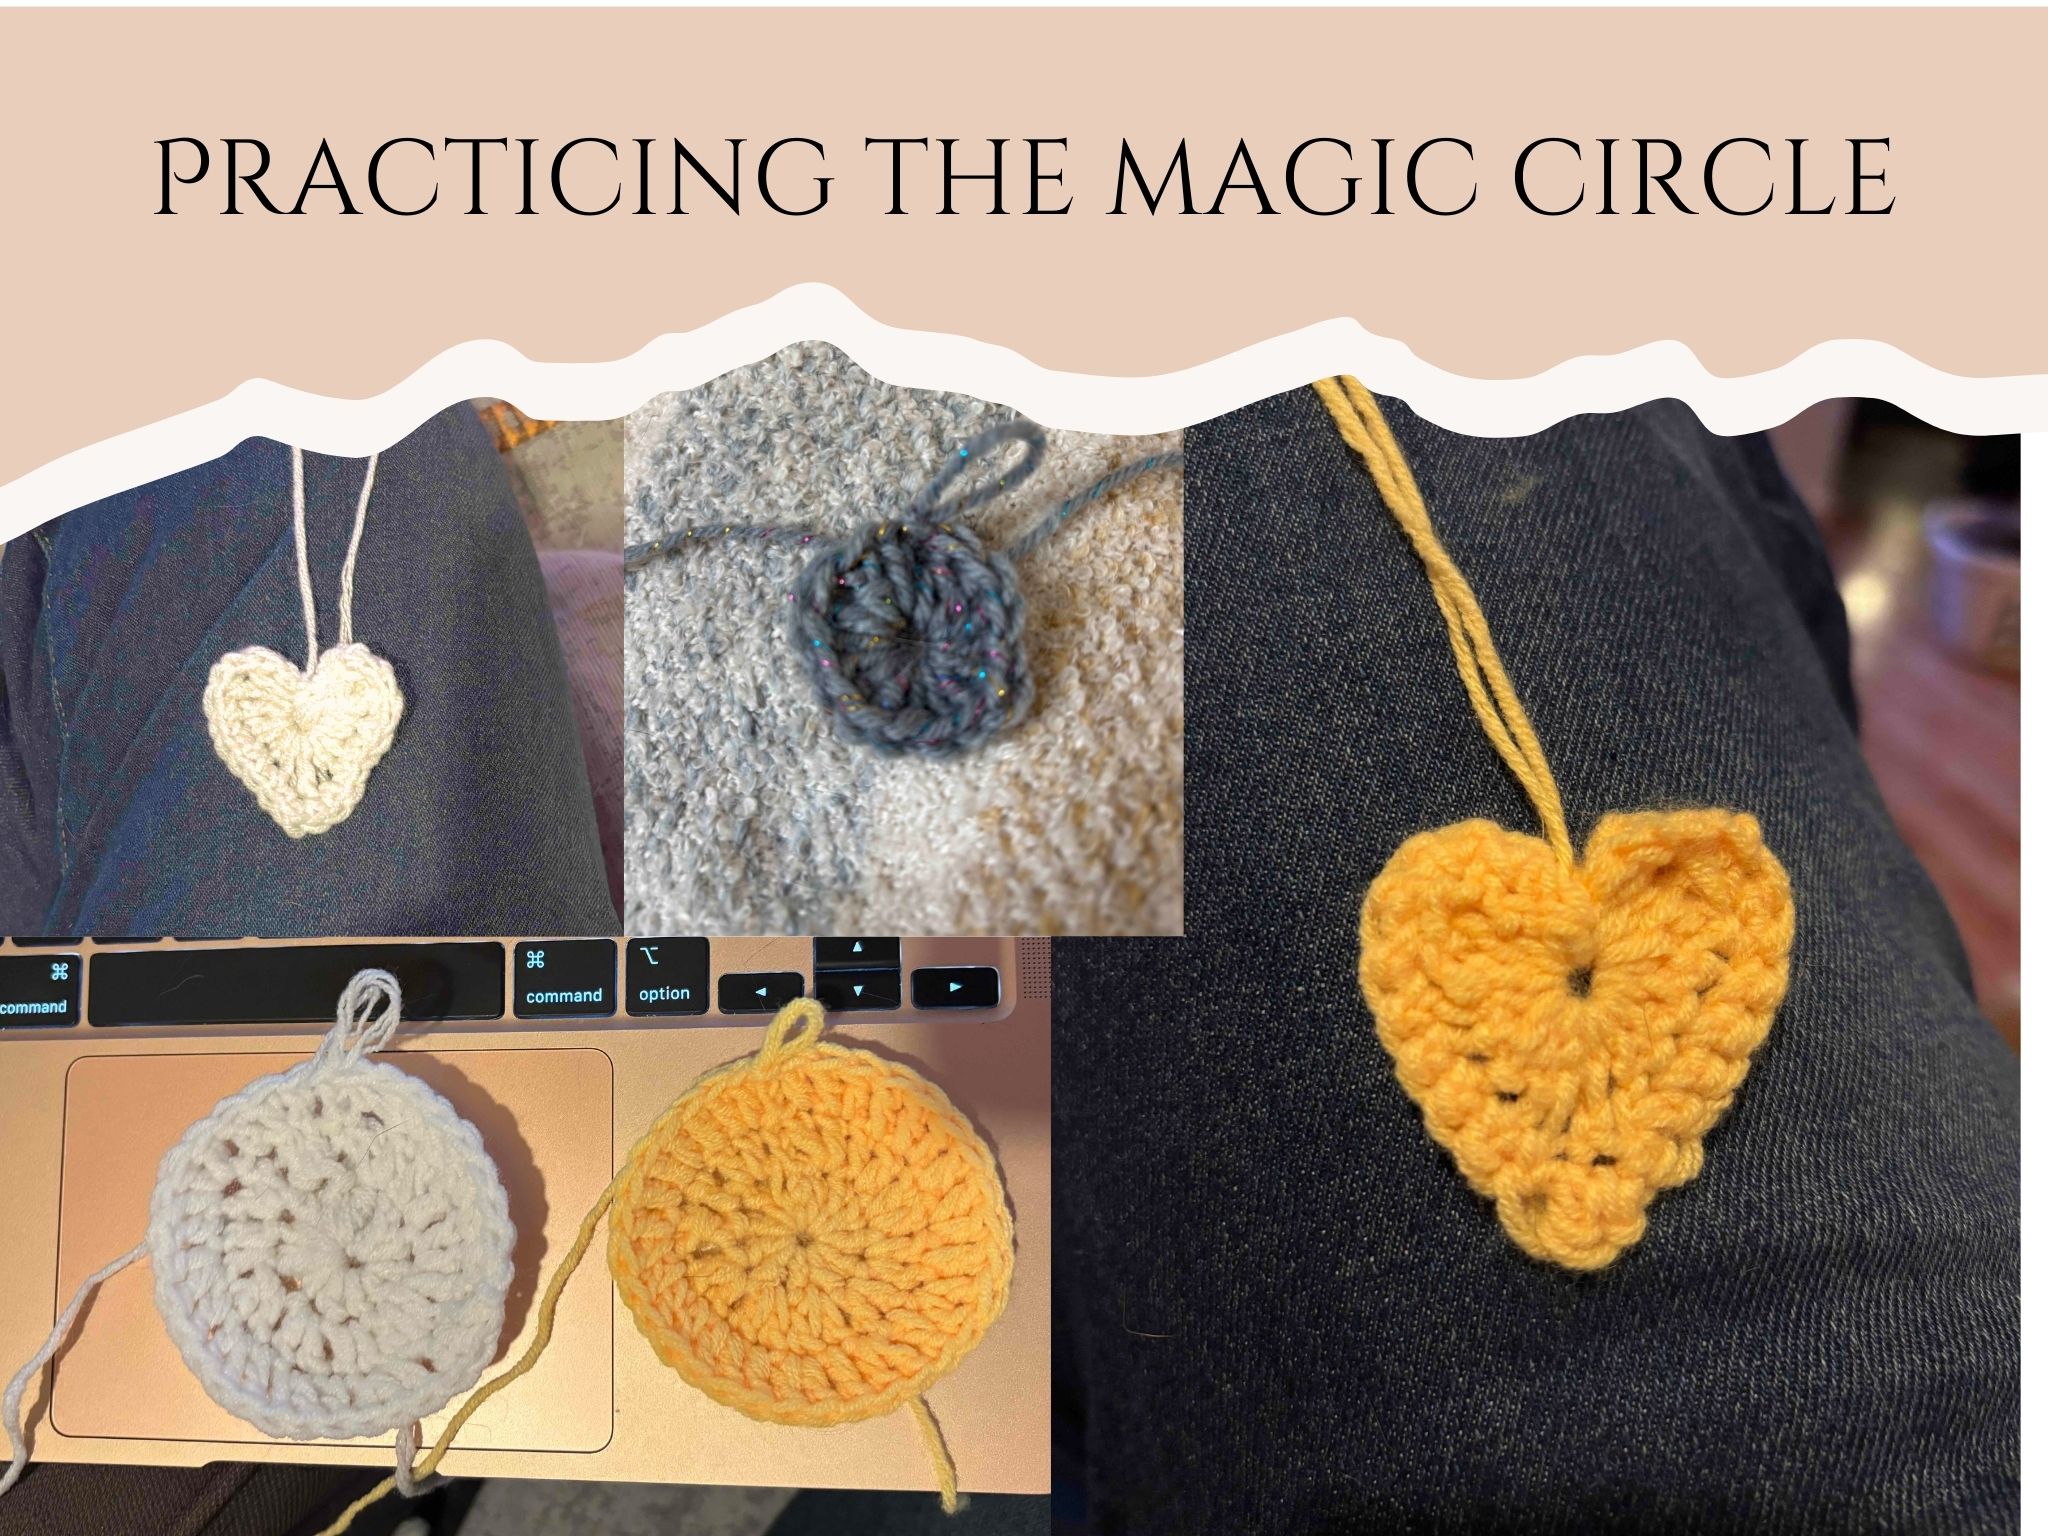
This past week I spent a bit of time getting a handle on the magic circle and I feel fairly confident with it now. I made a few small little projects, including 4 different patterns of hearts that I found on Instagram and TikTok.
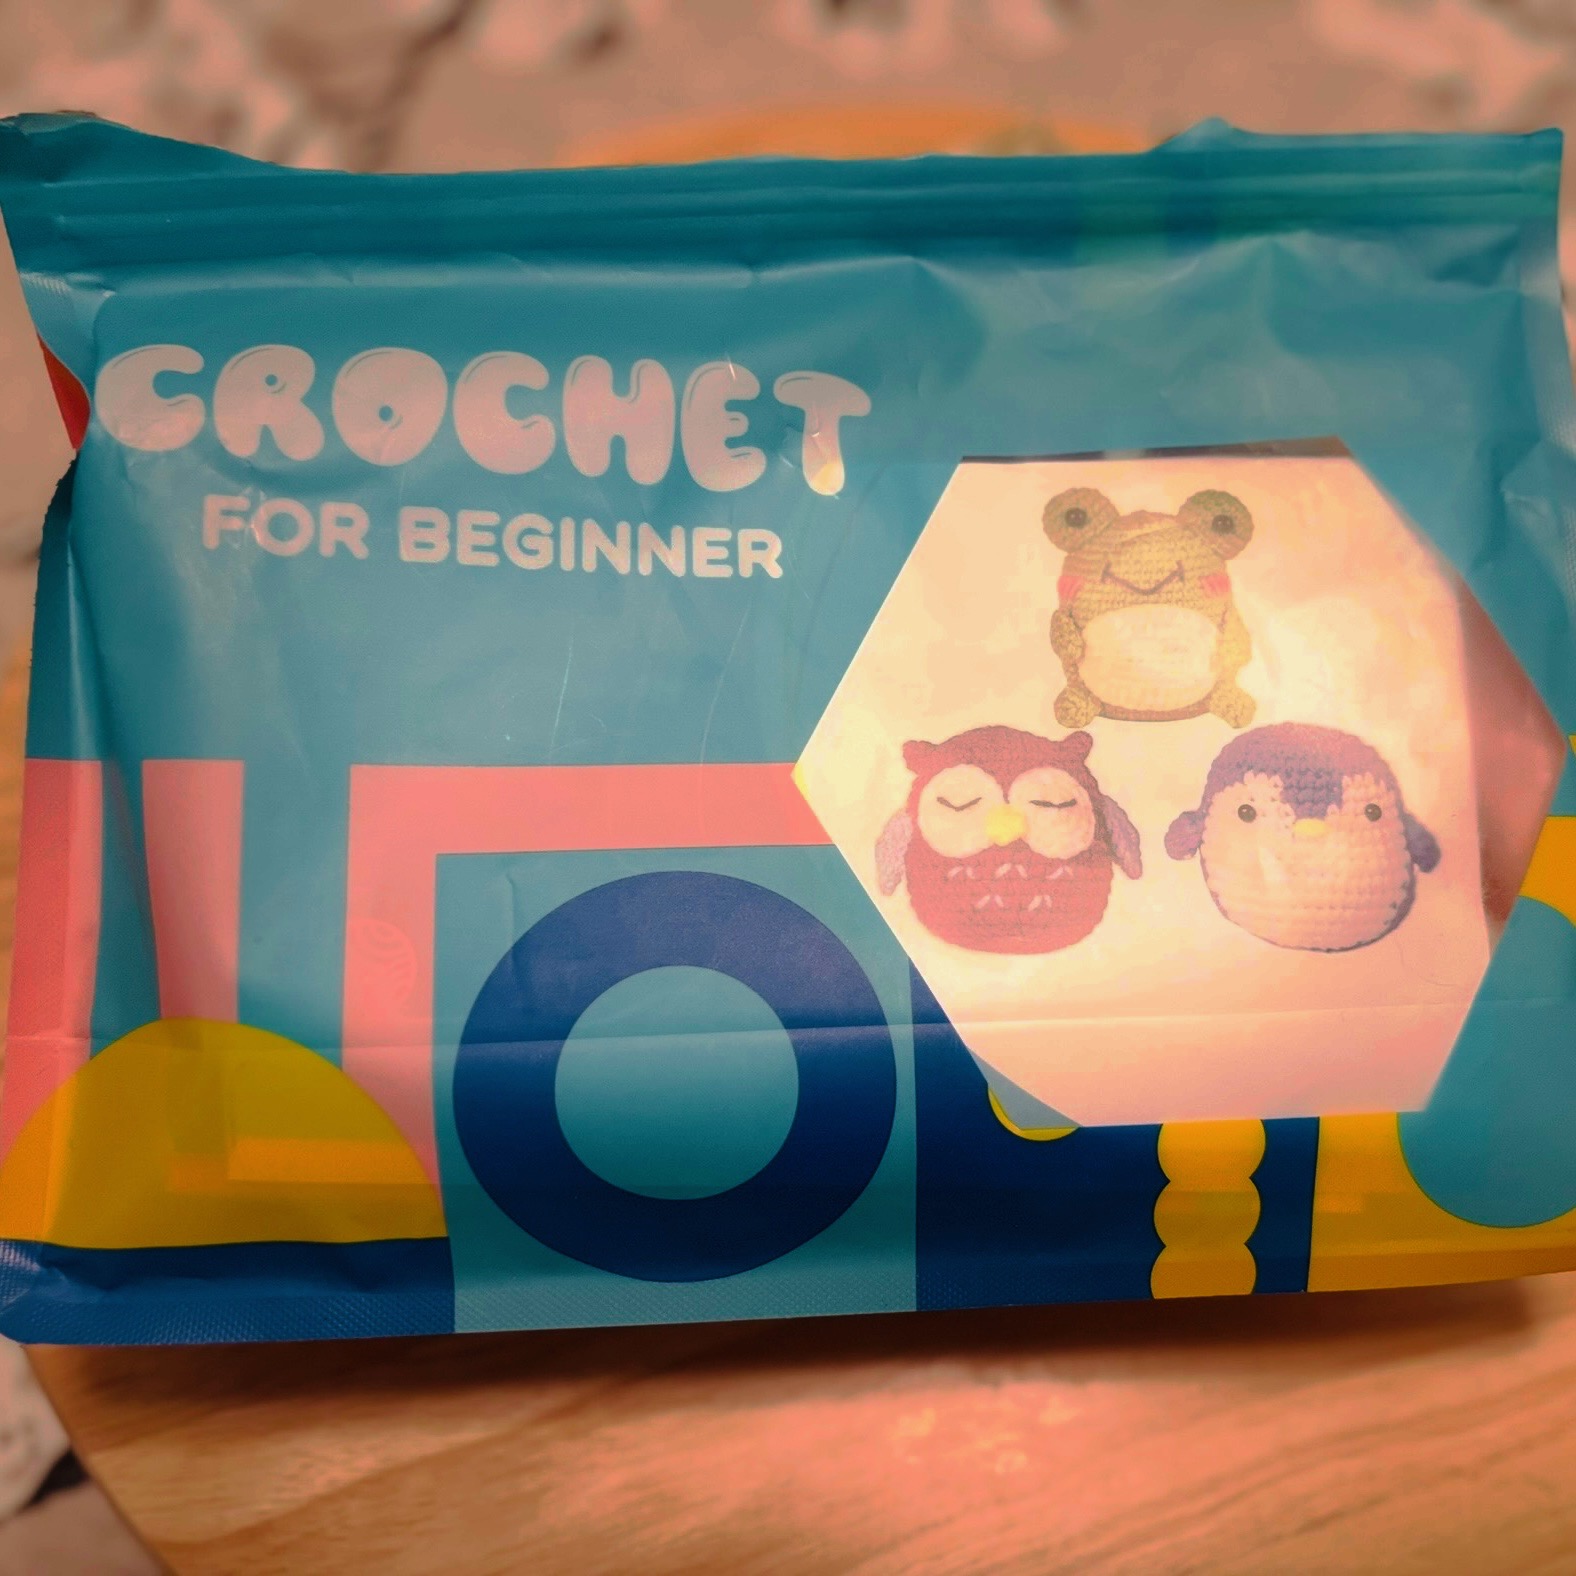
Small projects using the magic circleCrochet bundle kit for Beginners containing materials to make a frog, owl and penguin
At this point I felt like it was time to start my first amigurumi. If you read my first post, you may remember that the kit I have contained 3 animals. A frog, a penguin and an owl.
I decided to start with the frog. Well, truth be told, I had already started the frog over the Christmas holidays. I didn’t want to frog my frog. (Click here for a reminder of what frogging is in crochet). I headed out to Michaels and purchased some more green yarn that I thought was the same weight.
Two (or three) Surprises off the ‘hop’
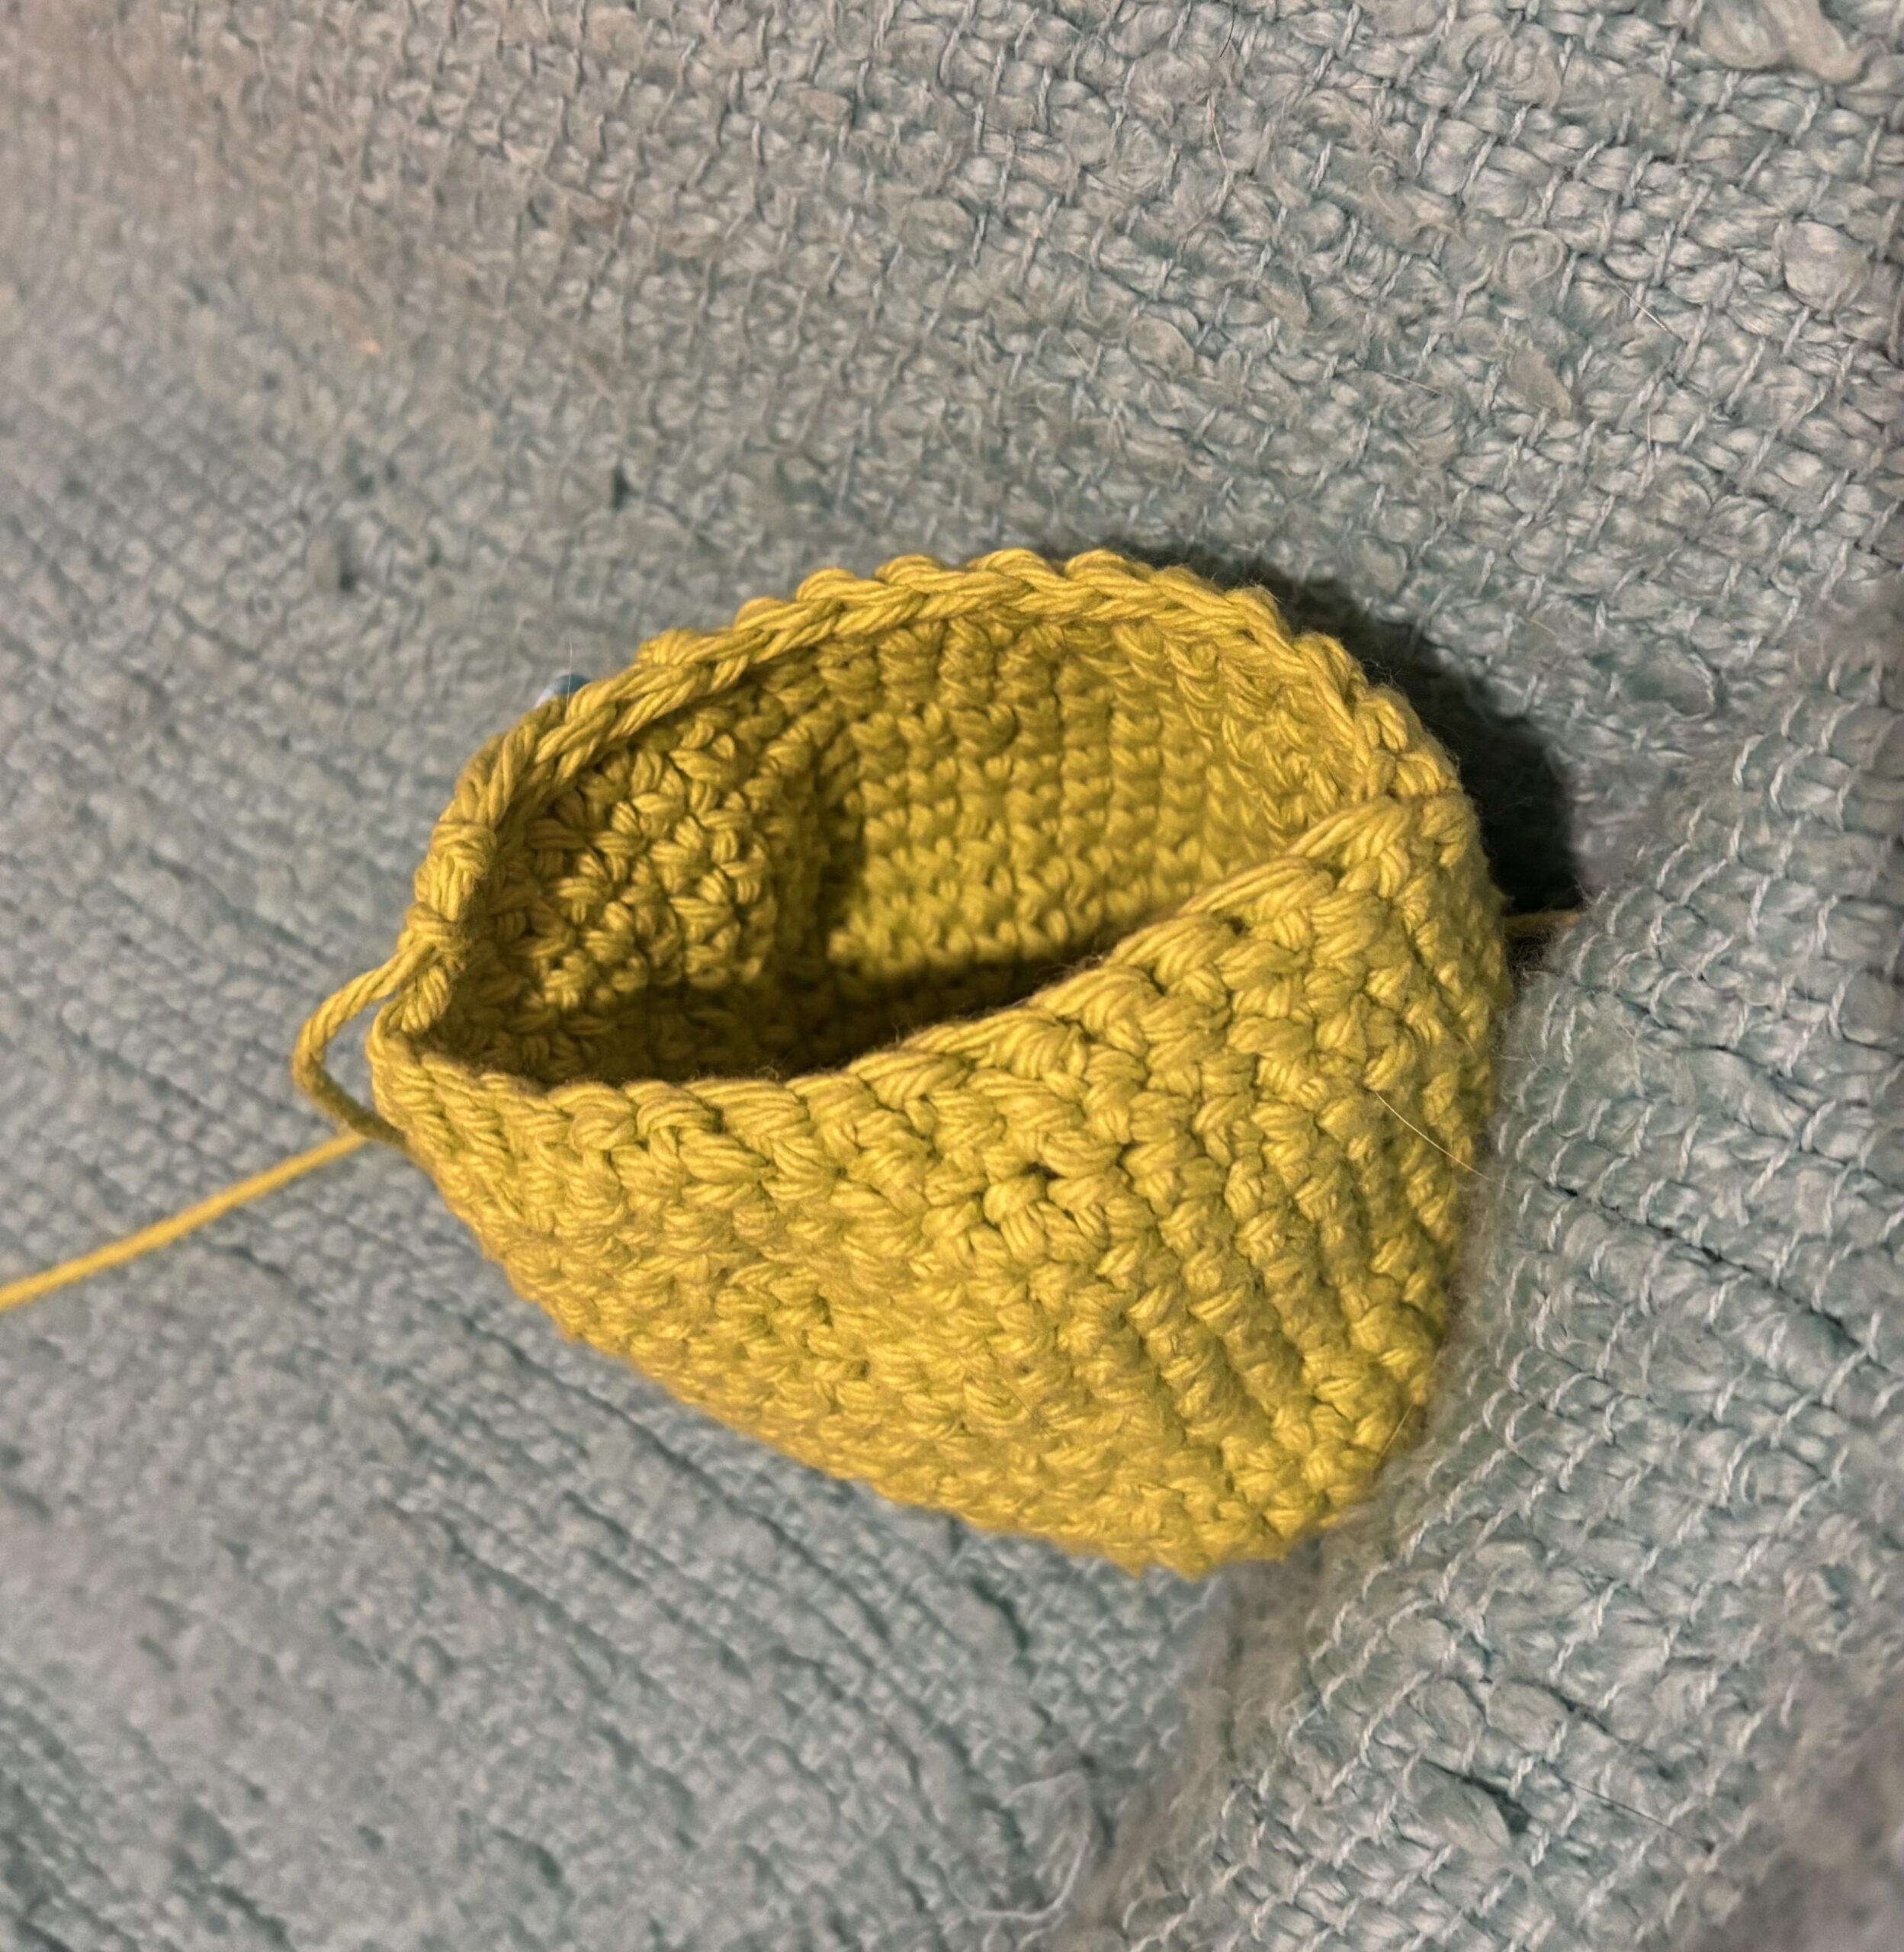
Surprise number one, I discovered that the frog doesn’t start with a magic circle. It starts a different way and continues in something called “crocheting in the round”.
Frog’s body to illustrate crocheting in the round
This was surprise number two. Crocheting in the round is not straight forward and watching many YouTube videos actually doesn’t help cause they all say the same thing in the same way that I still do not understand.
As I crocheted around and around, my frog was getting fatter and fatter. 32 stitches around became 54 stitches around. I frogged this frog. I frogged this frog a lot. Here is an example of instructions:
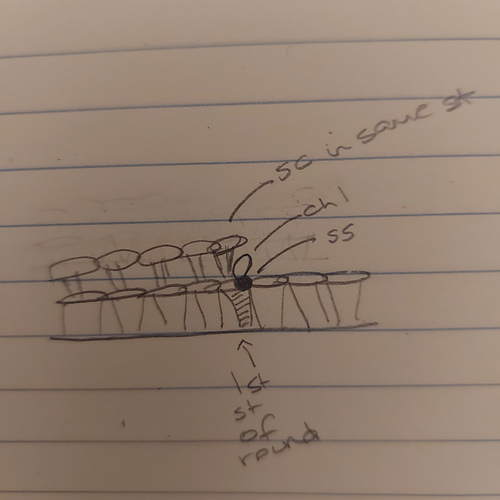
For single crochet (sc), after sl-st join and ch-1, you want to sc into the same space that was just joined with the slip-stitch.
Oh boy. I turned to the Ravelry community which has become the part of my PLN that I lean on the most. Within 30 minutes I had many replies and one lady created this amazing drawing! And (perhaps surprise number three) I actually understand it!
drawing from a reply to my question from the Ravelry community
Reading a Crochet Pattern and Surprise Number Four
In my last post I provided some of the symbols for crochet patterns, and it turns out there is a lot more to it than just a string of symbols.
Here is a screenshot of the pattern that came with my frog. I won’t go into detail about what it means, but I am happy to report I am gaining crochet literacy.
Surprise number four is that the yarn I bought for the frog is NOT the same weight, and despite using the same hook size, this new frog will be massive.
Still cute though.
My plan is to continue on with my little amigurumi buddies and hopefully start to see some straighter rows, more even tension and less frogging.
I’ve decided my next step is to learn some skills specific to Amigurumi. But first, it is always good to look back and see what has been learned so far!
holding the yarn and the hook at the same time
adjusting the tension so it is easy to insert the hook
We can’t forget frogging!I can thank several online sources for teaching me all of the above. YouTube and my PLN are the biggest contributors to my learning. I continue to refer to the 3 resources I have used as my PLN which are the Facebook group, Ravelry and Reddit.
Back to the next set of skills Required for Amigumuri. These include:
dc = double crochet
inc = increase
dec = decrease
mc = magic circle
reading crochet patterns
Most Amigumuri pieces start with the magic circle. What is a magic circle you ask? Watch this from TikTok which explains it better than i could:
I have started to practice, and, not surprisingly, there are many different ways people like to do this. I found a video that I understood. I think I can start the magic circle now, although quite clumsily as I demonstrate here in this video.
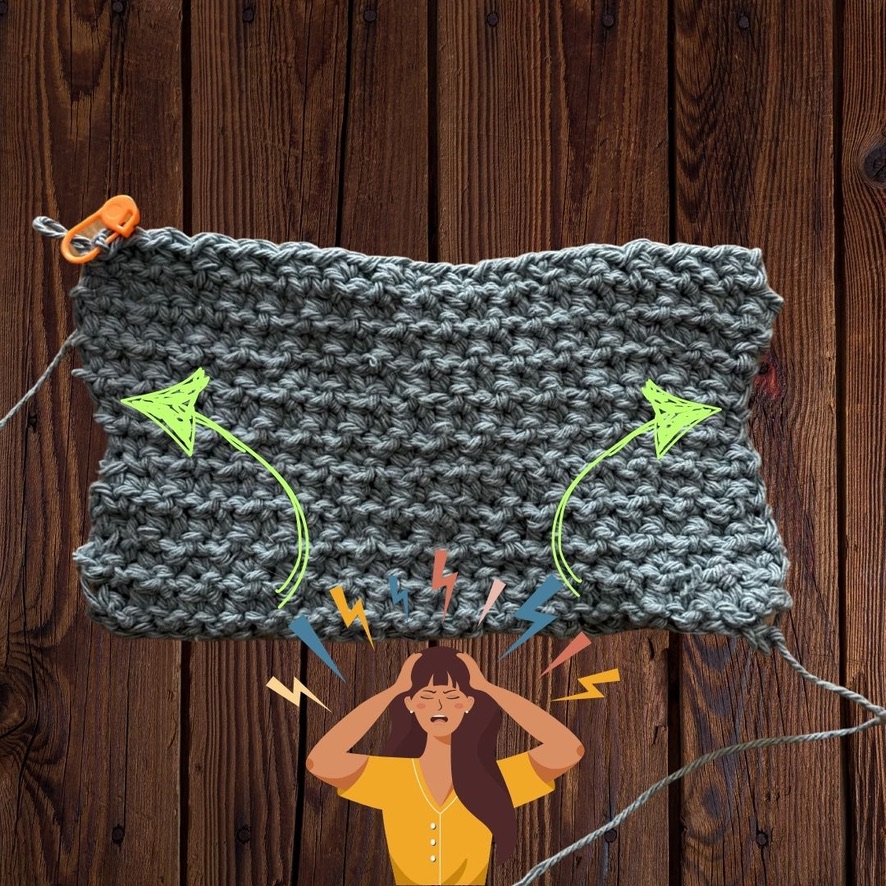
I am feeling impatient to start the amigurumis….. however, I pressed on with the second dishcloth and I am very glad I did. Through this exercise I gained more skills and became more confident with counting and recognizing the stitches.
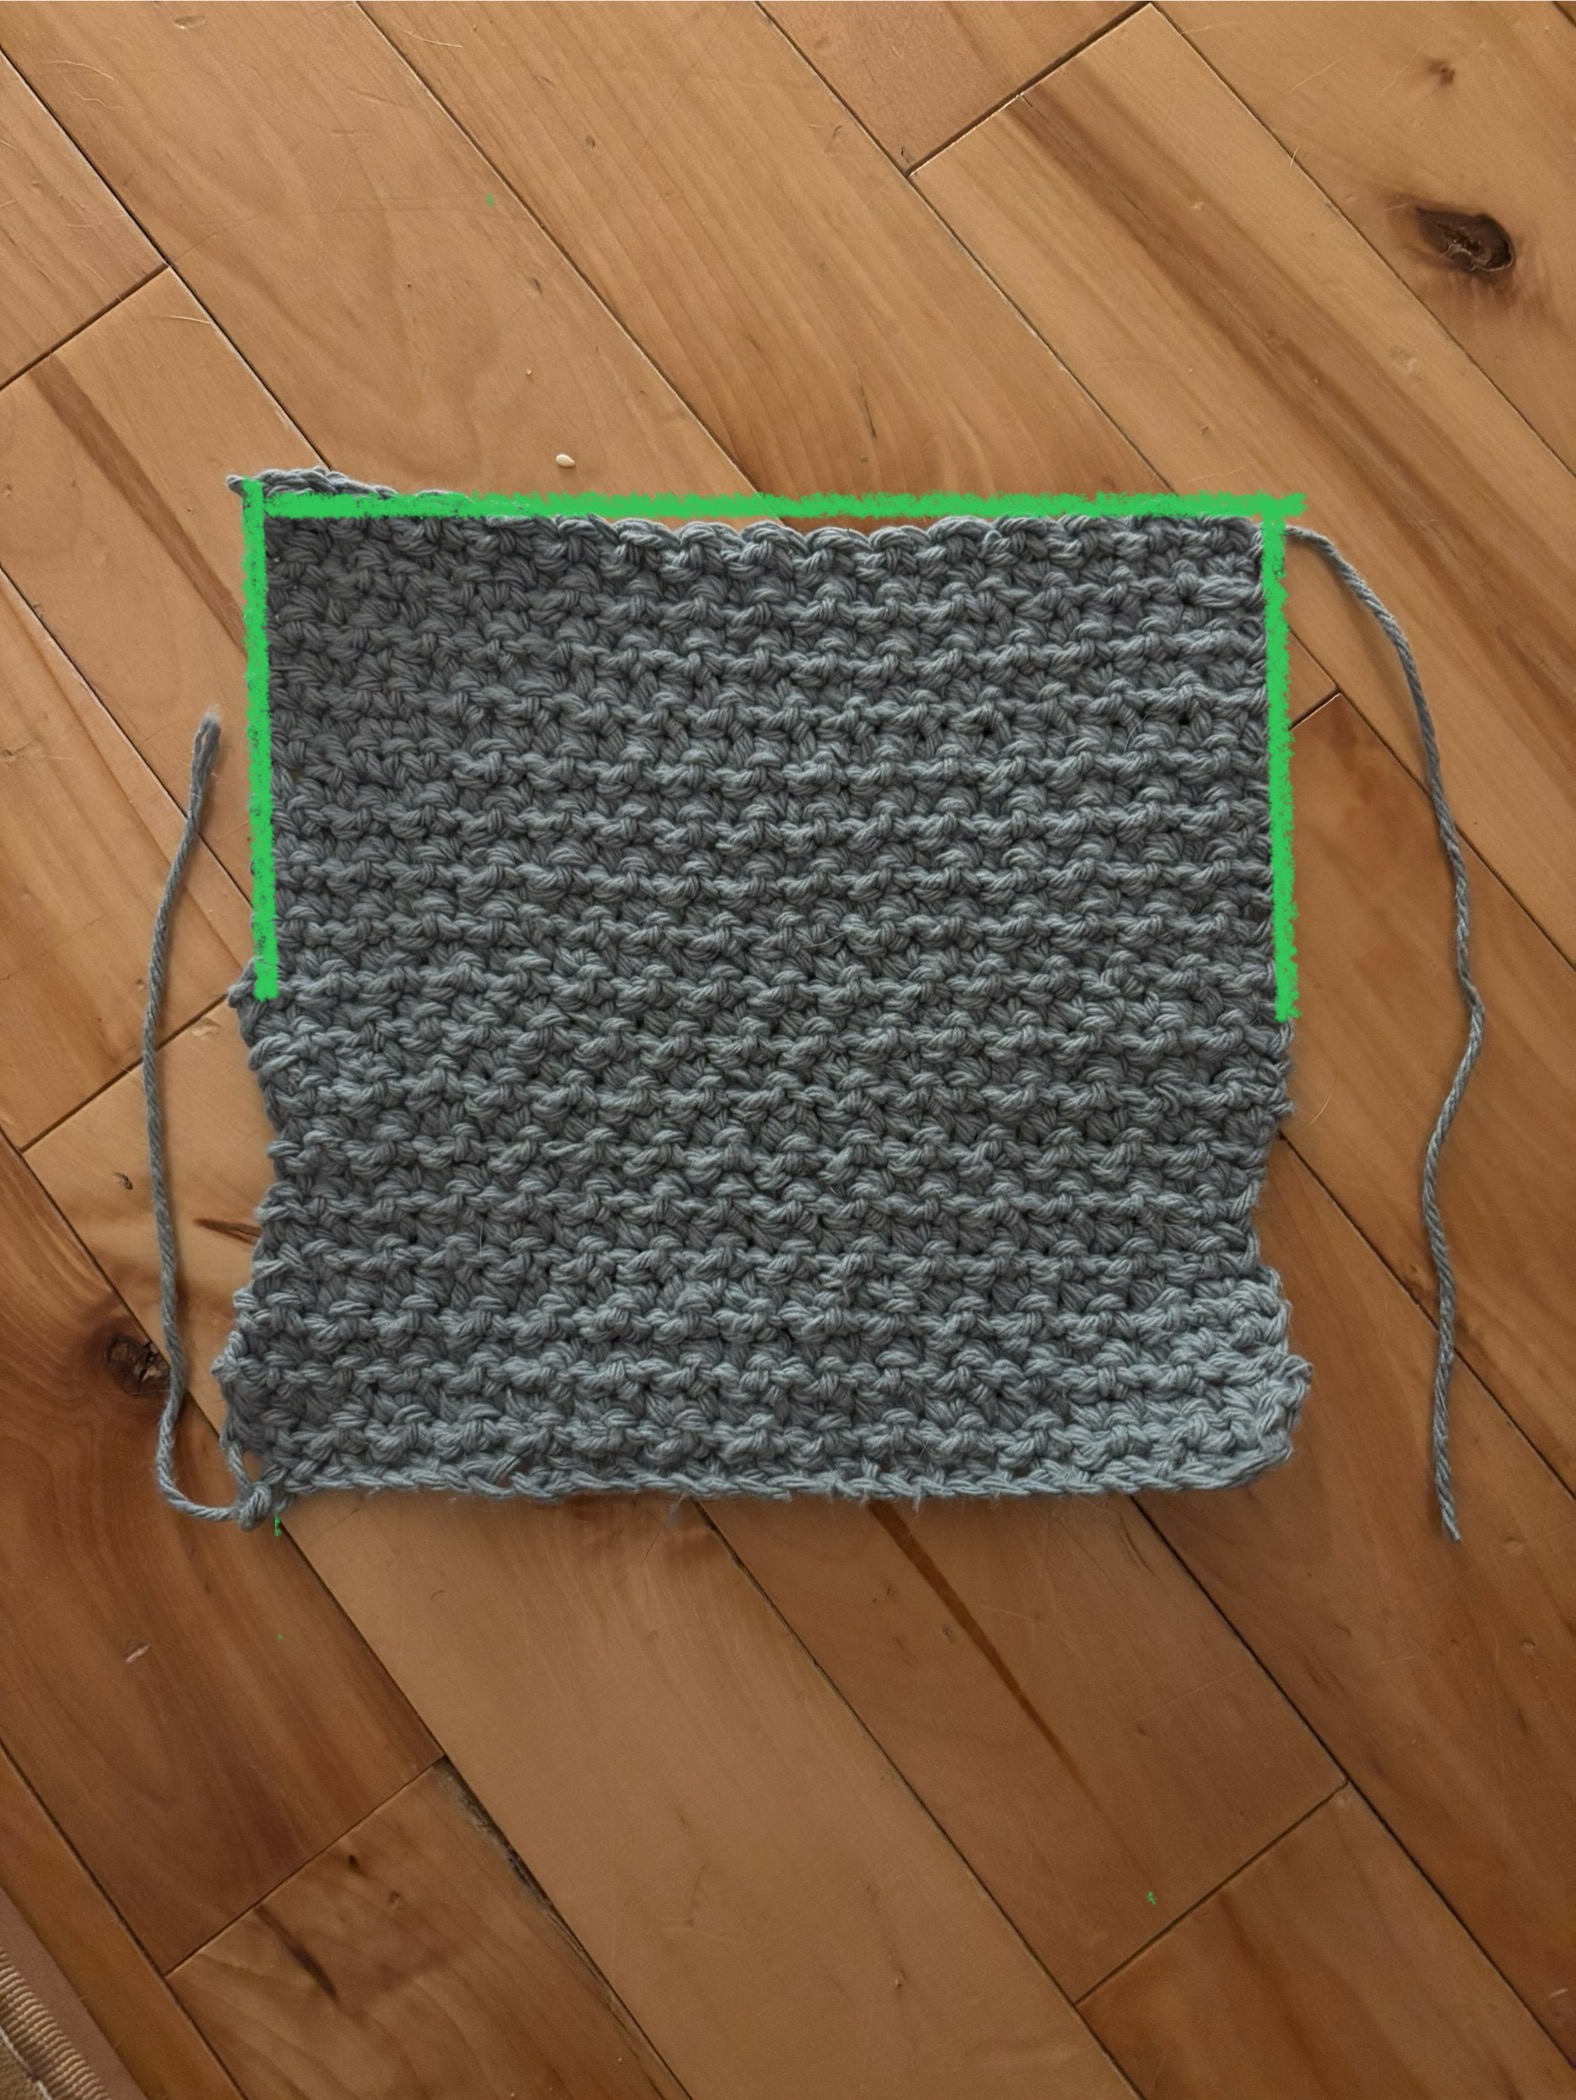
The first dishcloth was done with a single crochet (sc) stitch, and I decided to learn a different stitch for the second one. The idea for the second stitch came from TikTok and it is called a crunch stitch. Although there are 2 varieties, the most common one being a combination of a half double crochet stitch (hdc) and a slip stitch (sl st). Contrary to logical thinking a half double crochet stitch is not a single crochet stitch. I ended up using is a combination of single crochet stitch followed by a slip stitch.
At first I was having the same issues that I had the first time with inconsistent stitch counts which resulted in the skinny part. However, about halfway up, it finally came to me how to begin and end each row properly. Using the crunch stitch really helped as I could see the difference between the single crochet stitch and the slip stitch which allowed me to see if I was landing on an odd or even stitch without counting.
You can see in the picture I’ve highlighted how straight the last half ended up! I think the final row is wobbly due to tension issues, which I continue to work on.
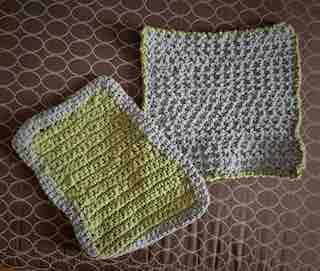
To finish off the dishcloths I wanted to put a different coloured edge around them. I was also determined to learn something from the short-video format of TikTok and Instagram, so I learned to change colour and to edge with these platforms. The first edge technique is a just simple single stitch. The second one, I don’t think has a name, I learned from this video.
Three weeks ago I got a new job and this was my first week on my own. My days are so full that each day at work feels like 2 hours. Needless to say my work has come home with me this week which has resulted in both my crochet hook and I experiencing separation pains. I have quite a few unscheduled hours this weekend so I look forward to reuniting with my new friend.
Saying that, I have been THINKING about my crochet progress which is part of the process for sure.