Pearly Nails 💅✨
Lately, I’ve been experimenting with chrome effect toppers! Since I haven’t tried any chrome application yet, I followed this step-by-step guide from WikiHow to make sure I was doing it correctly. If you’re new to chrome nails, I highly recommend checking it out as it was really simple to follow!
Before committing to a full manicure, I did some test swatches first. I can’t stress enough how helpful swatching was for figuring out how much powder to use and how to buff it in properly. I have found that the chrome topper can be a bit tricky – it needs a smooth, slightly tacky base to really adhere properly. Practicing on swatches helped me avoid streaks and uneven spots for when I was going to apply it to my actual nails.
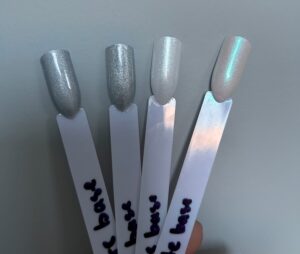
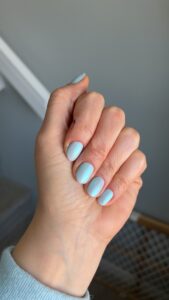
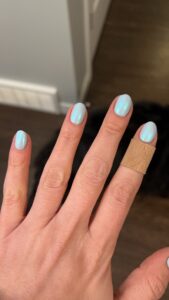
Since it’s starting to feel a little like spring, I chose a pastel blue as the base color for my manicure. Instead of curing the colour under the UV lamp for the full 60 seconds, I only did it for 15 seconds to leave it a little tacky for the chrome powder. I ended up using the far right chrome from my swatch set. The result? A pearly, almost iridescent effect that shifts beautifully in the light. It reminds me of Easter eggs and soft, shimmery seashells – perfect for transitioning into warmer weather!
Here’s how it turned out 😊
I’m already brainstorming more color combos to try with these chrome toppers! Maybe a soft lilac next? Let me know if you have any ideas!
Hello
Good job. It looks amazing. I am eagerly waiting for your next post.
Thank you! 🙂
Wow, Christina – those look beautiful! The colour combo reminds me of moonstones. Also, I really appreciate Wikihow; I forgot (until now) that I used to use it as a resource for students. The fact that so much expert advice is offered freely – in an easy to understand step-by-step way – is a great example of the positive potential of the internet. I think the chrome toppers would look great over any shade of green, in honour of Spring (that I am wishfully dreaming of).
Thank you so much! I love that you see the moonstone vibes! I totally agree about Wikihow – it’s such a gem for learning new things and has definitely saved me more than once. And ooo chrome over green would have been awesome for St. Patrick’s Day! I just did a new green set last night (I will post about them shortly :))