The fourth Stitch!🧶

I have been pretty sick the past few days so I haven’t been able to be online much but here is my post for last week.

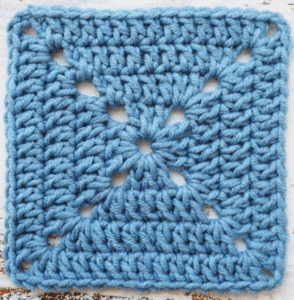
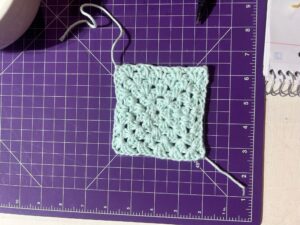
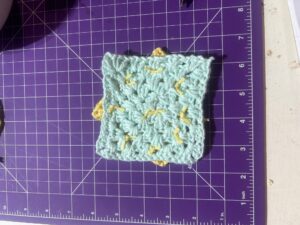
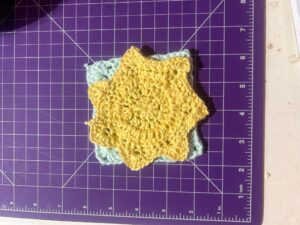
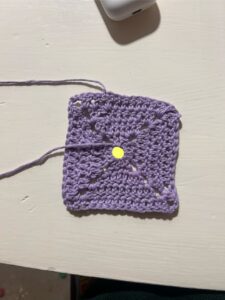
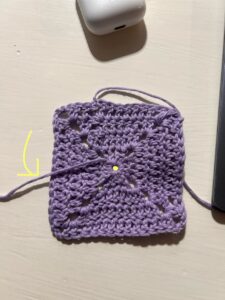
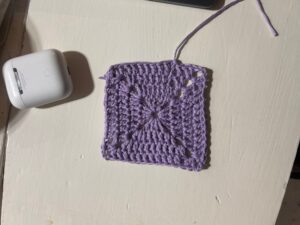
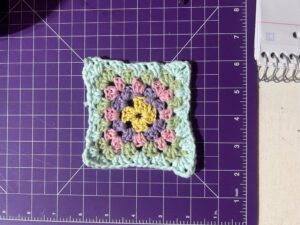
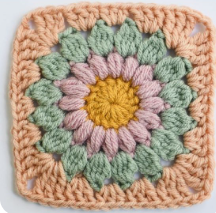
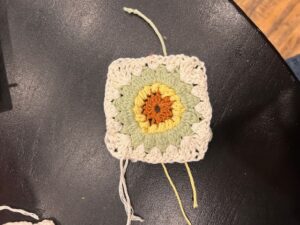
For this week I decided to make this starburst granny square.

I found the original post on pinterest and convenient enough it was a link to a website. So I clicked on the link and started to follow the instructions. 


I found this website extremely helpful for beginners. The instructions were not only very clear and simple to read but there were also pictures as well which made it easier to follow along. My other favourite part about the instructions was the fact that there were two separate sets of instructions. The first set was the basic word for word instructions which at first I was following. I did get lost on the second round when I had to do a puff stitch so I used that special stitches section to help me out. After that I used the step by step instruction that included pictures and a little more explanation. 

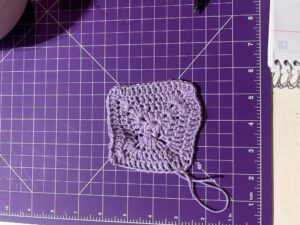
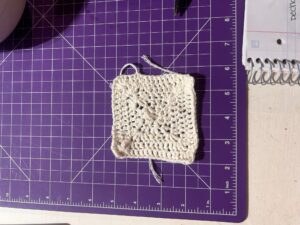
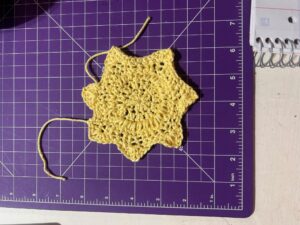
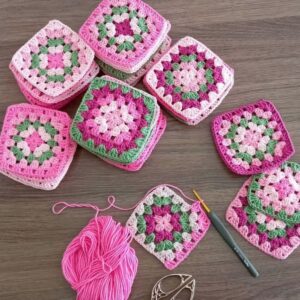
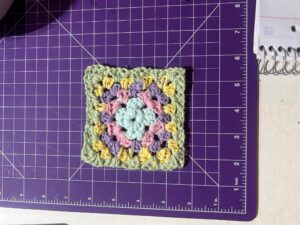
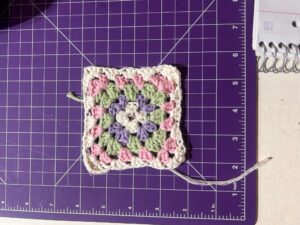
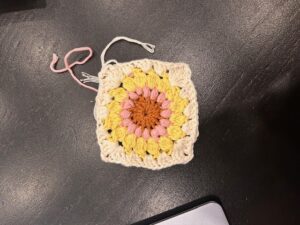
These are the granny squares I made this week using the website. The one with the green looks a little off simply because the size of yarn is slightly larger than all of the other yarn I used. I did see something on Tik Tok however of someone blocking their squares which I think I am going to look into so my squares can be more like squares.

I also really appreciated that they made a separate section for special stitches (like a puff stitch, Partial cluster, and a cluster stitch). Another piece of this website I just loved was the “skip to sections” piece. You could go to any part of the website without having to scroll though trying to find your place. 

The New Digital World.

The new digital world is making so many new opportunities for not only people but also students. Participating in social media, Youtube, and gaming softwares allow people to connect. As with anything else, you learn new things by using these apps that you have never learned before. 

When taking my future classroom in consideration here, I think about all the opportunities students can have with technology and their learning process. Students can make Youtube videos or Tik Toks to show what they have learned or what they are learning. I also think that this will raise students’ participation in class. The majority of students now use Youtube or Tik Tok regularly in their free time. So what better way to get students to want to participate in class than using something they enjoy doing and using. 

This can create a community for students in schools. I know there are school type social media platforms that you could share videos or posts on. I remember when I was in grade 6-8 we used this type of app in my band class. We could post videos, share songs we learned and things like that. Our teacher could see every post but you could watch other peoples videos and comment on them. I believe the app was called Seesaw but I am not 100% sure because it was so long ago.

The Third Stitch!

This week I decided to learn how to make this solid granny square. You should note those little holes that go from all corners to the center of the granny square. 

I used this Youtube video at first. It went horribly wrong. I am not sure what exactly I did wrong at the beginning but the square did not turn out right at all as you can see below. 

I tried making another square with the same video and it still did not look right at all. It looked fine, but it did not look like how it was supposed to. At least this time it was an actual square though. 

I did try to do this square a third time using just what I could remember and it turned out completely wrong. I am honestly not even sure when I realized that this was going haywire but at some point I noticed it was not actually supposed to look like this. I then just started to do my own thing. I was already using the colour yellow, and what goes with flowers like peanut butter and jam? THE SUN! I somehow did this, I hope no one likes it enough to want to make it because I could not tell you how I did it. I also crocheted a basic granny square the attach to the back of it shown on the top right. The bottom left is how I attached them and the bottom right is the final square.  

However I did learn what a magic circle is which I will be using for my future granny square. A magic circle is basically a slip knot that is adjustable so when you finish a granny square you can pull the tail and it will cinch in the center of the granny square. This leaves a small circle in the middle giving it a more clean look. The images below show this. The image on the left below shows the granny square before being cinched and the one on the right shows it being cinched. 

I ended up using this pinterest post to learn how to do the solid granny square properly. I was completely guessing how to do the pattern because I had no idea what any of those lines and circles meant. I made some educated guesses and it ended up working out pretty decent. 

The video I would rate a 6/10. I can see where it could be helpful for others but it just did not work for me. I did learn a couple abbreviations from this video and of course the magic circle which was helpful but I do not think I will use this video again. 

As for the Pinterest image, I’d rate it an 8/10. At first glance my head was spinning looking at it. But once I took a second to actually look at it and use what I already know about crocheting, it was not so bad. 

My Review of Smore.com

This week I decided to review the media creator Smore. I used it to create a fictional classroom newsletter just to see how the website works. It turns out it was quite easy to work with. Here is an image of the one I whipped up:


How to use the app:

Go to smores.com


You can then click on the sign up tab in the middle of the screen and fill out the information. It is also free to start using, although there are certain features you need to pay for.

At the top of the screen, on the left hand side, there are tabs labeled Newsletters, Mailing list, Templates, and Upgrades. To create a newsletter, click on Newsletters, and click start a newsletters. 

Here you can access all of your newsletters. You can either make a new one by clicking on the button: start a newsletter, or you can edit previous newsletters. 

To create a newsletter: 

To edit a newsletter: 

Here is a quick video of how you can add links, change fonts, themes, colours, and edit text for your newsletter.

You are also able to email the newsletter. Here is a video on how to do that: https://www.loom.com/share/4494d3a8e2134407b46e8e8955e114f2?sid=ae76e2f0-b511-408b-995a-d354c26aeb6b 

Smores.com would be a great tool to use for a classroom. I think it would be a perfect way to communicate with parents about what students are doing in the classroom as well as a way to remind students of upcoming events and assignments they have. 

There is only one thing I would change: the subscription. There are quite a few features, that I would say are more on the basic side, that I wish were free. I wish the whole thing could be free but we cannot have everything.

Smore is definitely under the transformative category and I believe it would fall under redinition. It is simply replacing that verbal reminder for students. The features that Smores offers allows you to put links and documents on the newsletter so students can access them at home if needed. The newsletters are also able to be sent to a mailing list which is a lot quicker than typing out each email. 

The Second Stitch!

For my first week I created a Pinterest board that has some granny square ideas and the vibe I am going for for the final project I have planned. Below are a couple of pins I am using as this weeks inspiration for this week. I also realized I put an extra week on my table last week so I adjusted my plan. 

loading slideshow...

I started by doing a basic granny square. This was the Pinterest post that I used as my inspiration. Here are a couple of Inspiration posts I used for this week. 

This may contain: crocheted grannys are arranged on a table with yarn    This may contain: a woman is sitting in the driver's seat of a car with her hand on the steering wheel 

This square was fairly easy to do, probably because I have already tried to do one in the past. Each row is a different colour which was surprisingly easy to do. I also made three of them. 

This is the first square I made. I would say it turned out daily decent but there is definitely room for improvement because I am pretty sure I added an extra stitch on the top left hand corner (which is why it looks bulbus).

This is the second square I made. I made it based on what I remembered from the pattern. This actually helped me a lot because now it feels like a skill that I will never forget, like riding a bike. 

This was the final square I made for this week. I definitely think it turned out the best. At this point I also decided it was in my best interest to keep the tails long until I am ready for assembly. 

I used this Youtube video as my tutorial.

Originally I was using this video below, but I just could not follow along. Quite frankly I hated it, so I changed it to the one above.

The second video I watched worked well for me because I am a visual learner and need to actually see how to do it so I can follow along. My only issue with the video is that it is a little long for me. I like short and sweet tutorials so I did have to put the video on 2x speed so I would not get bored halfway through. Overall, I would recommend this video to someone else who is learning to crochet because it was easy to follow along.