Hello, everyone! Welcome to my second learning project post!
This week I focused on tuning my ukulele and learning how to hold the ukulele, as well as learning about the strings, frets, and plucking. To begin, I downloaded Ukulele by Yousician on my iPhone from the app store. Most of the features on this app require a subscription, but I have just been utilizing the free tools and beginner videos that are available.

Proper way to hold a ukulele. Photo by Emma Robertson.
First, I watched a video on holding and tuning a ukulele, so I could learn the proper way to hold a ukulele before beginning to play. You need to sit up straight, and you need to rest the bottom of the ukulele on your right thigh. It should not feel like it will slide off your leg. Then, you anchor your right hand where the neck meets the body of the ukulele. Lastly, you put your hand under the neck at the top of the ukulele for support. Next, I tuned my ukulele. Ukulele by Yousician has a tuning feature, so you can play each string, and it will tell you if you need to tune up or down until it sounds right. In order to tune up, you must turn the knob away from you. In order to tune down, you must turn the knob towards you.
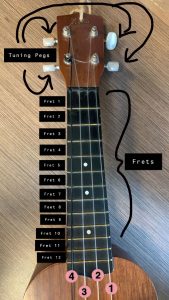
Diagram of tuning pegs, strings, and frets. Photo by Emma Robertson.
Now that I was holding my tuned ukulele correctly, I could begin exploring the different strings, plucking, and frets. Ukuleles have four strings: string one, string two, string three, and string four. When correctly holding the ukulele, string one will be on the bottom and string four will be on the top. With this information, I could begin learning about plucking and frets. Plucking is playing one string at a time with your thumb. Frets are on the neck of the ukulele. To play frets, you need to press your finger down with good pressure, and the placement of your finger must be just above the metal. Then, you pluck the string to create the sound. The top fret is fret one, then fret two, and so on. I practiced using different fingers on different frets this week. For instance, it is easier to play fret one with your index finger and fret two with your middle finger.
Here is an audio recording of me practicing plucking and playing different frets!
That’s it for this week! I’m having lots of fun with the ukulele, and my next step is learning about chords and a few simple songs with these chords.
Hey Emma!
First of all, I love your post title! I cannot wait to hear you play some songs! I feel like the song Ripetide by Vance Joy is a right of passage for someone playing the ukelele. Do you have any songs you want to be able to play at the end of the semester? Also hit me up and we can do a duet some time me on the piano and you on the ukelele (right now I know the musical masterpiece “the itsy bitsy spider” but I’m working to more difficult songs). I look forward to hearing more music from you!
Meghan
Hi Emma,
I can see that you are enjoying your ukulele. I am anxious to see how you will combine the chords that you will learn with the simple songs. Hope to read you soon!
Ukulele actually sounds like lots of fun to learn! I enjoy the sound of it in music.. it is unique. Ps. I also appreciated that you added a sound clip of what you have learned so far.. good luck learning and have fun!
This is awesome Emma. I have students that have done this for a Genius Hour project and their projects always turn out great. Considering that they only work on it for 10-15 hours over a few months and we have so much more time to dedicate to it, I look forward to following your progress and seeing what your final product looks like!