"To teach is to touch a life forever"

Category: Learning Project

That’s a Wrap on the Ukulele!

Hello, everyone! Welcome to my wrap-up post on my learning project this semester.

Outline of my Learning Project: 

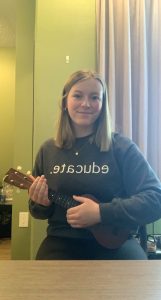
Week 1: An Exciting Journey (Learning to Play the Ukulele)!

This post outlines my goals for the semester, as well as my learning plan for the ukulele. 

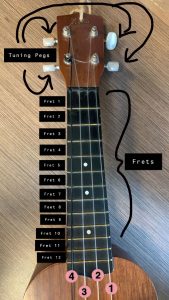
Week 2: Don’t Fret It!

This post discusses learning how to properly hold the ukulele, as well as the app that I used to tune my ukulele. Also, it discusses the strings and frets of the ukulele. 

Week 3: Just Keep Strumming!

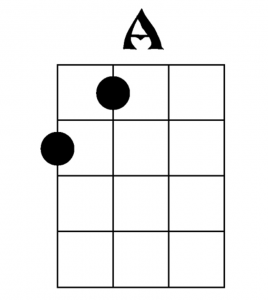
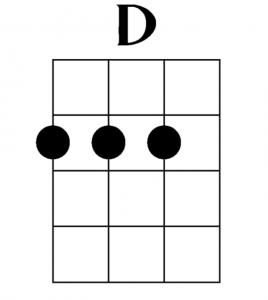
This is the first week that I learned a few chords, as well as some strum patterns. 

Week 4: Just Keep Strumming! (Part 2)

This week was a continuation of learning and practicing the skills from week 4. 

Week 5: Not Great Timing!

This post primarily discusses my hardships with trying to learn timing on the ukulele. This ended up being the hardest skill for me to try to learn!

Week 6: Picking Up a New Skill on the Ukulele

This post discusses my switch from learning how to strum to learning how to fingerpick. I was becoming a bit bored with strumming, so I wanted to try something new to spark some interest!

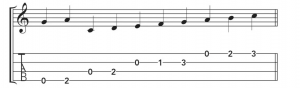
Week 7: Keeping Tabs on Tablature

This week I learned more about ukulele tablature. 

Week 8: Continuation of Strumming and Fingerpicking

This week I continued to use my knowledge of strumming and fingerpicking to learn a few new chords. 

Week 9: Learning How To Read Chords Sheet Music

This week’s post’s title is very self explanatory! For this post, I taught myself how to read chords sheet music. I thought it was going to be much more complex than it was!

I will admit that my learning did not sync up with these weeks perfectly, as I did run behind in the last few weeks of the semester. 

My Reflections:

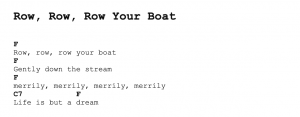
Honestly, I really struggled with this learning project. I am rather disappointed with the result, but that is okay. Every path has a few bumps along the way. At the beginning of the semester, I had outlined a few goals, particularly that I wanted to be able to properly play a full popular song or a full complex Christmas song. I did not meet these goals in the way that I would have liked. In September, I loved picking up my ukulele and trying something new. Then, as the semester progressed, I lost more and more interest with the ukulele with every passing week. It felt like a chore. Reflecting back, I think that I tried to learn harder things than I should have at the beginning without fully covering the basics. For example, I learned the beginning of Stand By Me by Ben E. King before I learned nursery songs. I fell into a rut in the middle of the semester as I did not have the skills to continue progressing, and the thought of trying to move backwards and cover more basics did not cross my mind until the very end of the semester. While I initially imagined that I would learn a complex song by the end of the semester (I did not), I still learned two very simple songs, Row, Row, Row Your Boat and Itsy Bitsy Spider. Not quite the end result that I expected, but it is still a goal accomplished.

Overall, I struggled with the format of learning online and finding the resources for learning the ukulele; however, this struggle was beneficial because it helped my problem solving skills, and as a teacher, I have now had more practice with locating learning resources online. For an instrument, articles with diagrams and step-by-step YouTube videos were the most beneficial for me. There were a few apps that I would have liked to try, particularly Ukulele by Yousician, but this app only had limited free access and many of the lessons required a paid subscription. In the future, it would be nice to find a free app to follow along with the resources for learning nicely in one place.

While I am not sure when or if I will pick up the ukulele again, I am grateful for this learning project and everything it has taught me outside of the ukulele.

Learning How To Read Chords Sheet Music

As mentioned in a previous learning project post, I am unable to read strumming chord sheet music. While the sheets may look simple, I am unsure of how long to play the chord, as well as unsure of how long to count for. So far, I have been learning all of my chords and snippets of songs through videos, so I just follow along with the creator of the video and memorize the chords and snippets. For example, to learn the beginning of Stand By Me by Ben E. King, I watched a video, and then continued to practice until I had a good memory of it. After not playing it for a while, I needed a quick refresher. To do this, I watched an old video of me playing it. I would like to be able to read the music and know how to play a song without needing to use a video or other resource aside from the sheet music. 

The part I find very tricky is thinking about and preparing for the upcoming chord while playing the current chord. 

To help me practice the timing and chord switches, I looked up some very simple songs that only involve two chords. These songs were Row, Row, Row Your Boat and the Itsy Bitsy Spider. 

From my searching, it appears that one simply just plays a chord until the word with the next chord over top of it comes up, then switch! For instance, in the first line of Itsy Bitsy Spider, you start playing F on the word “itsy” and switch to playing C7 on the word “up.” Learning this task was much easier than I thought it would be! I understand the concept, but I struggle to actually do it. The website could have been more informative. I had to draw my own conclusions rather than be exclusively told. 

Here is the website: LiveUkulele

Here are videos of me playing those two songs!

Row, Row, Row Your Boat

Itsy Bitsy Spider

Continuation of Strumming and Fingerpicking

For this blog post, I decided to refresh my knowledge of strumming and fingerpicking! To refresh my knowledge of strumming, I practiced playing Stand By Me, a song intro that I learned earlier in the semester. 

Here is a video of me practicing: Stand By Me

Then, I learned some more chords. These chords are A, D, and E. I found diagrams on AustinBazaar. There were 6 chord diagrams, but I had already learned C, F, and G. This website also includes multiple videos about learning chords, as well as techniques and tips! These would be super beneficial for students to use if they were learning the ukulele. 

Below I have attached some videos of me playing these chords while strumming: 

Strumming A Chord

Strumming D Chord

Strumming E Chord

After practicing some old chords and learning some new ones, I moved onto fingerpicking. I attempted some finger picking using the chords that I learned: 

Here are the videos of my attempts: 

Fingerpicking A Chord

Fingerpicking D Chord

Fingerpicking E Chord

My thoughts on chords: 

A – This one was super easy! It was similar to the other chords that I learned earlier in the semester. 

D – This one was more challenging than A. While I was able to do it, I struggled. 

E – This one was super hard! I found this one the hardest of all three. 

With D and E, I found the hardest part to be pressing one finger down to cover multiple strings.

After this practice, I thought that I would give learning a song with both strumming and fingerpicking a try! Then… I became very overwhelmed with how fast my individual fingers would need to move to play the pattern and change chords. I do not think that I am quite ready for that, yet! Someday I will accomplish this, but I am proud of my work and effort for learning some new chords!

Keeping Tabs on Tablature

Throughout this semester, I have realized that songs are often written using ukulele tablature. So far, I have been learning songs and different patterns from videos as I was unable to read tablature. As I mentioned in one of my initial learning project posts, I am able to read standard notation with a bit of a refresher. This week, I decided it was time to become more familiar with it! With ukulele tablature, the lines represent the strings. Then, on the line, there will be a number. This number represents the fret that should be played. For example, if a line says 0, then no frets should be pressed. However, if the line says another number, then the corresponding fret should be pressed. 

Here is a video of me demonstrating: Learning Ukulele Tablature

I played all of the strings open first, so none of my fingers were pressed on the frets. Then, I played the first fret on the first string with the rest open, then the second fret on the second string with the rest open, and then the third fret on the third string with the rest open. I finished by playing the second fret on the first string. 

I found my information here: Ukulele Magazine. This was a very informative website! It describes what tablature is, as well as how it should be used simultaneously with standard notation. I only looked through the tablature section, but there are multiple different sections on chord diagrams, capos, time signatures, etc. This would be a good website to bookmark to look back on for the other information!

As well as previously being unable to understand ukulele tablature, I am unable to read chord sheet music. That is something to discover in another week coming up!

Picking Up a New Skill on the Ukulele

This week, I moved on to something new – fingerpicking! While I still have lots to learn while strumming chords, I found myself hitting a rut where I was no longer motivated to learn the ukulele. By picking up something new, I feel more refreshed and ready to continue learning. For the rest of the semester, I will be alternating what I learn each week to try to prevent feeling bored and unmotivated. 

Holding the ukulele when fingerpicking is different from holding the ukulele while strumming. When strumming, you want your thumb to strum over the bottom of the fretboard. However, when fingerpicking, you definitely want to avoid coming close to the fretboard with the picking hand! When finger picking, one wants to pick over the sound hole. Also, it is important that one anchors their pinky on the base of the ukulele, down and below the sound hole. This will prevent the fingers from lifting too much, making it easier to fingerpick. 

This week I learned the Travis Pattern where you use your thumb to strum down on the top two strings, your index finger for the third string, and your middle finger for the bottom string. The pattern is Thumb (second string), Index (third string), Thumb (top string), and Middle (bottom string). 

Here is a video of me fingerpicking with no chords: Fingerpicking No Chords

Here is a video of me fingerpicking with chords: Fingerpicking with Chords

As you can see in the videos, I planted my pinky finger down and plucked over the sound hole.

To learn this week, I found a really good video! It is a bit on the longer side (around 18 minutes), so I was not really sure about it, but it flew by really fast. He explains concepts really well, so I followed along with the video easily. My one struggle was transitioning between chords while fingerpicking, but that was a struggle for me while strumming, too! It is something I will be able to practice throughout the coming weeks. Also, I will need to learn a few more chords. Overall, it was a great video that outlined that it is important to go slow when beginning, and continue to repeat until you understand! I would highly recommend using this video. It is the first in a series, so I will be using more videos from him in the future!

Not Great Timing!

Welcome Back! ?

This week is the first week where I have struggled quite a bit with grasping a new concept. It was disheartening after progressing so quickly in other aspects, but that is just part of the learning process! I think it was important for me to experience some struggle and setbacks because some students in my future classroom might experience the same feelings of frustration and annoyance that I felt due to not being able to grasp the new concept quickly and easily. ?

My main focus this past week was looking into timing because I want to be able to have the right timing in future songs that I learn. While the article that I read this week says that one should learn chords of a song first and proper timing of a song second, I would now like to learn how to incorporate timing, so it is an easier process later for learning future songs.

Here is a link to the article that I read this week: How to Improve Your Rhythm and Timing

This article offers different ways and methods of trying to learn timing. It was very informative, and it provided lots of information. I appreciated that at the end there was a reminder that some people will pick up timing super quickly as a natural ability, while others will need to work extra hard and put in lots of effort to learn timing.

Lately, I have been working on song “Stand By Me” by Ben. E. King. The timing in this song is 1 and 2 and 3 and 4 and. For the song and timing, one plays down, pause, down, up, pause, up, down, up. While I am able to play this strum pattern, I have no understanding of how to connect this pattern with timing. Below I have linked a video of me playing the island strum pattern with no chords while trying to count in my head.

Attempting to Count Timing in my Head

I wish you all could read my thoughts while I tried to do this! I had numbers and the word “and” flying around and getting scrambled in my brain. I would be doing okay for a short amount of time, but then my mind would lose track of where I was! It is very tricky. Earlier in the week, I tried to tap my foot and play at the same time, but it felt like too much physical movement happening. I could not focus on tapping my foot and playing the ukulele at the same time.  Does anyone have any tips and tricks for learning timing on an instrument? ?

Other than timing, I practiced chords this week! While I did not learn any new ones, I improved my transition between F and G7 while playing “Stand By Me.”

Here is the link to me practicing switching between F and G7:

Transition Practice Between F and G7

Here is the link to me playing “Stand By Me” with a better transition between F and G7:

“Stand By Me” with a Good Transition Between F and G7

This part of the week was much more encouraging! Overall, this week was an important reminder that students are going to struggle with some aspects of learning a new skill, but they will thrive while learning other aspects.

Over the next week, I will continue practicing timing with the island strum pattern, and I will attempt to utilize a metronome again. Instead of matching the BPM with the song, I will use a slow BPM and work my way to playing the song faster! Further, I will keep using strategies from the article linked above! Additionally, I will learn some new chords!

Thanks for listening and reading! See you next week! ??

Just Keep Strumming! (Part 2)

Welcome back!

I have started to progress on my chord work. Using the same four chords that I learned last week, I am now able to play the Island Strum Pattern while alternating chords. I find this strum pattern to be the most complex. 

Here is an audio recording of me playing this strum pattern while alternating chords:

I have also worked on using my middle finger while strumming upwards. By doing this, I eliminate that nail sound (from my thumb) heard while strumming upwards. 

Here is the same strum pattern and alternating chords as before, but I am using my middle finger to strum upwards in this audio recording: 

Do you recognize the song? 

It’s the beginning of Stand By Me by Ben E. King! I haven’t played the whole song all the way through yet, but it is just a continuing repetition of the audio recordings above. I learned this song from The Ukulele Teacher on Youtube.

Here is the video: 


First, he started with a demonstration of how the song should sound once it is learned. This provided a goal to work towards. Then, I really liked how he showed how to play the chords and the strumming pattern before he started to play. While I knew the chords and strumming pattern already from last week, it was a good refresher. This would also be an easy way for someone to learn the chords and strumming pattern if they hadn’t seen them before! Lastly, I enjoyed that the video was under five minutes long. I was able to quickly learn without losing interest. Overall, I found this YouTube video very straightforward and easy to understand! 

This week, I continued to notice that my timing needs improvement. In the two audio clips above, I am playing the same song at two different speeds. To improve my timing, I attempted to use a metronome. However, the metronome was not the most useful tool without fully understanding timing and how to utilize the tool.

Here is a link to the online metronome I used: https://www.imusic-school.com/en/tools/online-metronome/

I think that this metronome will be a good tool, and it is one that I will likely come back to once I understand more. 

Over the next week, I will try to learn more about timing from a few different websites. I will keep strumming along throughout the week to continue improving my transition between chords. The transition between F and G7 could use some work! If I have time, I’ll try to learn a few more chords this week, too!

Just Keep Strumming!

Welcome back!

This week I have started learning chords and strum patterns on the ukulele. They are harder than they look! I’m going to have to continue working on them throughout the next week, as well as work on my timing. Watch the Powtoon below to see and hear everything that I learned about chords and strum patterns this week!

Powtoon Review:

Powtoon is an online video-making website. Personally, I find this website to be a mix between iMovie and PowerPoint. I have used both of these applications, so it did not take my long to navigate through and understand the website. I found it to be very user friendly though, and it has a website tour, so I think that it would be easy enough for anyone to use.

When making an account, Powtoon asks for a purpose for using the website, so it can personalize the experience. I put that I was using the websitefor education as a student, and my homepage displayed student, teacher, and administrative templates.

For projects, a pre-made template or a personal PowerPoint slides can be used. A blank template can also be used for a completely fresh start! I opted for a blank template for my Powtoon project. If a blank template is chosen, one of three modes are available. These modes are capture, horizontal, or square. For the purpose of my video, I chose the horizontal mode. There are also different looks available for Powtoons. I chose the whiteboard look.

Powtoon can be used for free with lots of options for quality videos. Personally, I would not recommend paying for Powtoon Pro, Pro+ or Agency unless needed for a business or advertisement purposes. These options are quite expensive, and the website is good without paying for extras. The only drawback I found with the free version is that videos are limited to three minutes.

Powtoon videos can have music (there are various free music options to choose from), transitions, voiceovers, characters, text, props, shapes, images, videos, and other special effects! I tried to incorporate as many of these aspects as possible.

Powtoon can be used for group projects, too! All one needs to do is add any partners’ email addresses after hitting the invite button. I like this feature, so everyone can add to the project from their own devices.

In terms of the SAMR model, Powtoon is somewhere in between Augmentation and Modification. It has “functional improvements” to PowerPoint. The video can be played in an easier way. One does not need to search through all of the tabs at the top of the PowerPoint application to adjust timing and transitions. On Powtoon, the timing and video options are all right under the slides, and one just moves items along the timeline in the order they would like. Further, Powtoon mixes PowerPoint and iMovie together for a “task redesign.” The website used a very similar layout as iMovie with the ability to make informational slides like PowerPoint! In my own classroom, I would use Powtoon for projects that I would have originally used PowerPoint to add some variety.

See you next week!

Don’t Fret It!

Hello, everyone! Welcome to my second learning project post!

This week I focused on tuning my ukulele and learning how to hold the ukulele, as well as learning about the strings, frets, and plucking. To begin, I downloaded Ukulele by Yousician on my iPhone from the app store. Most of the features on this app require a subscription, but I have just been utilizing the free tools and beginner videos that are available.

Proper way to hold a ukulele. Photo by Emma Robertson.

First, I watched a video on holding and tuning a ukulele, so I could learn the proper way to hold a ukulele before beginning to play. You need to sit up straight, and you need to rest the bottom of the ukulele on your right thigh. It should not feel like it will slide off your leg. Then, you anchor your right hand where the neck meets the body of the ukulele. Lastly, you put your hand under the neck at the top of the ukulele for support. Next, I tuned my ukulele. Ukulele by Yousician has a tuning feature, so you can play each string, and it will tell you if you need to tune up or down until it sounds right. In order to tune up, you must turn the knob away from you. In order to tune down, you must turn the knob towards you.

Diagram of tuning pegs, strings, and frets. Photo by Emma Robertson.

Now that I was holding my tuned ukulele correctly, I could begin exploring the different strings, plucking, and frets. Ukuleles have four strings: string one, string two, string three, and string four. When correctly holding the ukulele, string one will be on the bottom and string four will be on the top. With this information, I could begin learning about plucking and frets. Plucking is playing one string at a time with your thumb. Frets are on the neck of the ukulele. To play frets, you need to press your finger down with good pressure, and the placement of your finger must be just above the metal. Then, you pluck the string to create the sound. The top fret is fret one, then fret two, and so on. I practiced using different fingers on different frets this week. For instance, it is easier to play fret one with your index finger and fret two with your middle finger.

Here is an audio recording of me practicing plucking and playing different frets!


That’s it for this week! I’m having lots of fun with the ukulele, and my next step is learning about chords and a few simple songs with these chords.

An Exciting Journey (Learning to Play the Ukulele)!

Welcome to my Learning Project Blog!

For my learning project, I am going to learn how to play the ukulele. I have always thought that the instrument has a nice sound, and I have had an interest in learning how to play the ukulele for around four and a half years now. This interest began after taking a guitar class for a semester in grade ten, but I have not pursued this interest until now. It worked out quite nicely that there were a few extra ukuleles at the elementary school in my hometown, and I was allowed to take one for the semester!

Picture by Emma Robertson

As of right now, I have no experience with ukuleles. As mentioned before, I have minimal guitar experience from high school. Also, I took piano in elementary school. Due to these experiences, I am able to read basic sheet music. As I progress in my ukulele skills, I believe that my sight reading skills will improve, too. In order to learn how to play the ukulele, I am planning to rely primarily on YouTube videos, music apps, and online articles. An example of a music app that I can use is Yousician. As of right now, I will record my progress using videos and audio recordings of myself playing, as well as written updates.

My first steps to learn how to play are learning how to tune and hold the ukulele. Then, I will learn the chords, and I will practice transitioning my fingers quickly between chords. Next, I would like to learn melodies, and afterwards, I would like to learn chord melodies. Learning these will help me learn to play songs. My ultimate goal is to be able to play a popular song on the ukulele at the end of the semester, or possibly a more complicated Christmas song since the end of classes is near the holiday season!

© 2024 Miss Emma Robertson

Theme by Anders NorenUp ↑