Unlocking the Secret to Smoother Ink Flow: Heating Your Calligraphy Pen
In my calligraphy journey, I recently stumbled upon a fascinating technique through a YouTube video—”Prepping your nip for calligraphy“_ about heating the tip of my calligraphy pen to remove residual oils. This simple trick has had a noticeable impact on the way the ink flows on paper, making strokes more consistent and precise.
What I like about the video:
The youtuber explains every single step clearly with all needed materials and equipment which assists explorers to follow steps smoothly. She doesn’t introduce any tools or materials that put you in hurdle to prepare them.
What could be better:
I applied both matches and lighters to heat the nib, but the flame of the match lacks consistency compared to the lighter. She could have applied both and check the result to see if any changes happen.
Upon reviewing historical sources I found last week, it appears that 19th-century calligraphy manuals and penmanship guides do not explicitly mention the practice of heating steel nibs to remove protective oils. This technique may have been considered common knowledge among practitioners and thus not documented in instructional texts of that era, to my knowledge though.
Let’s explore why this works and how you can incorporate it into your calligraphy routine.
Why Heat the Tip of Your Calligraphy Pen?
Calligraphy nibs often come with a thin layer of oil from the manufacturing process to prevent rusting. While this protective coating is useful for storage, it can interfere with ink adhesion, causing irregular ink flow or ink to bead up on the nib. By gently heating the nib, you effectively burn off this layer, allowing the ink to adhere better and flow more smoothly onto the paper.
How to Heat Your Nib Safely
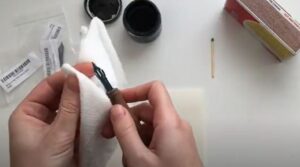
1. Wipe it Down – Before heating, wipe the nib with a soft cloth or a paper towel to remove any residual oils or remaining ink from the previous practice.
 2. Use a Flame – Don’t hold the nib with tweezers but pass it through a flame (like from a match or lighter) from distance as the flame can heat it up and remove the protective coating for just a few seconds. Avoid overheating, as excessive heat can damage the nib’s temper.
3. Test with Water – Before dipping into ink, test the nib by touching it to a drop of water. If the water spreads evenly instead of beading up, your nib is ready to use!
The Effect on Ink Flow
Once the oil is removed, ink flows much more smoothly, creating cleaner strokes with fewer interruptions. This is particularly beneficial for pointed pen calligraphy, where consistent ink flow is crucial for achieving thick and thin strokes effortlessly. Many calligraphers have noticed an improvement in ink adhesion, making this a go-to preparation step before beginning any project.
Now let’s watch how I tried prepping my nib with a huge difference to the result!
Additional Tips for Optimal Ink Flow
- If heating seems too extreme, you can also remove the oil by scrubbing the nib with dish soap and an old toothbrush.
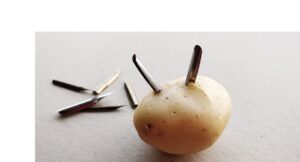
- Some calligraphers prefer to use a potato—yes, a potato! Simply poke the nib into a raw potato for a few minutes, then wipe it clean to remove oils naturally. But I have noticed that many calligraphers do not recommend this technique though!
- Always clean your nib after each session to prevent ink buildup and prolong its lifespan.
If you’ve struggled with inconsistent ink flow, this heating trick might be the solution you need. Give it a try and let me know how it works for you in the comments below. Happy lettering!
I love all this new information! I would love to see more examples of your work!
Very interesting information! Temperature is such a powerful thing in many crafts. This reminds me of when my family got a heated pressure washer to wash our barns. The process became way more effective and efficient. I am looking forward to hearing about what you learn next!
I’ve never tried calligraphy before, but this sounds like such a cool technique! I’ve always been curious about it, and it’s great to learn about these little tips that can make a big difference. Maybe I’ll give it a try sometime soon!
It’s fantastic that you found a way to enhance the flow of ink in your calligraphy by nib-heating. Others would undoubtedly benefit from your thorough explanation of why it works and how to do it securely. Your willingness to experiment and share results will inspire others to try new methods for smoother calligraphy.