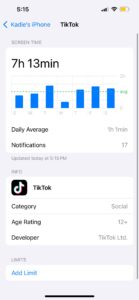
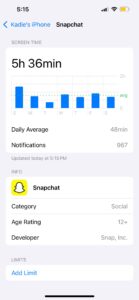
"A Mistake Is Success In Progress" - Albert Einstein

Month: May 2025

Cracking the Code!

My goal this week, I focused on something that once felt like a foreign language to me: reading music notes. At first glance, the staff, lines, spaces, and note names were overwhelming–but once I started breaking it down step by step, it all began to make sense.

Tools I used 

For this week, I explored watching lessons on a YouTube channel and used an app to practice placing notes on a staff. After working with the digital video explanation I used an app to practice identifying notes on the music staff and matching them to the correct piano keys. This helped me start recognizing where each note belongs both visually and on the keyboard. The tools I used were:

What I Learned

In this above video, the Youtuber Pianote taught me many valuable lessons on how to read notes and what each individually means. Through this video I learned:

The Staff:

  • Music is written on 5 lines called a grand staff. At the beginning of a grand staff you will either see a treble clef, which is a swirly note, this is sometimes known as a G clef as well. Or you may see a note called a bass clef, sometimes known as a F clef. This is called the bass clef because it’s played lower on the piano.
  • On a grand staff, music has a five-line staff. It also has 4 spaces between the lines. Notes can either sit on a line or in a space, and their position tells you what note to play.

The Treble Clef (Right Hand):

  • The treble clef is often associated with the right hand.
  • An easy way to identify this is a treble clef is because the line that runs through the centre treble clefs curl is the note G, aligned with line 2. When we want to identify the following notes. In my last week’s learning I learned the note are A, B, C, D, E, F, G. This means, after the note on the second line, the next note is in the space which is A. This continues through the piano alphabet through the following notes through the line and spaces.
  • Notes don’t only go up the grand scale, but they can go down the scale too! However, you need to create Ledger Lines.

    Source: Pinterest. Musical Notes 101. https://ca.pinterest.com/pin/3307399696884899/

The Bass Clef Notes (Left Hand):

  • The bass clef is often associated with the left hand
  • The bass clef is instead using the lines starting at G-B-D-F-A and the spaces are A-C-E-G

    Source: Piano Keyboard Guide. https://www.piano-keyboard-guide.com/bass-clef.html

Ledger Lines:

  • Notes above or below the staff use small lines (kind of like floating platforms) to keep the music readable.

Middle C: 

  • This is the bridge between the treble and bass clefs–it’s now my home base!

TIPS!: 

  • A great tip she gave to remember the treble clef notes is practicing remembering the saying Every Good Boy Deserves Fudge, which is how to remember the lines for E-G-B-D-F. As well for the spaces to remember the saying for the notes, F-A-C-E. 
  • A great tip she gave to remember the bass clef notes is practicing remembering the saying, Good Boys Deserve Fudge Always, which is G-B-D-F-A. As well for the spaces to remember the saying for the notes, All Cows Eat Grass, for the notes A-C-E-G. 

On the App Notevision I practiced identifying what the notes on the grand scale are and the sounds they make. What I love about this app is it provides real time feedback of how I am doing in my process. For example, In the video I provided I messed up a couple of times. The app stopped me and let me try again before I could continue on. Having this feedback actually helped me recognize every time I messed up, what these key notes were. As I did this practice over and over again, I eventually got the hang of where the notes are. What I also love about this app is theres different ways to practice learning these notes. The app provides lessons on the treble clef with small range of note hints and keyboard notes, this is what I show in the video. It can even show the same note range with no visual aids. This is shown in the second video. What is also super cool about this app is it shows how fast you go when practicing. You could practice over and over again until you beat your score. There is many other cool features on this app such as learning keyboard lesson basics, bass lessons, and grand staff lessons. You can also practice songs, free play, and create your own custom music! I would recommend this for all first time learners when getting to know your notes on a grand staff!

(videos are screen recorded from my iPhone)

My Reflection

This week really boosted my confidence in understanding the language of music. At first, looking at all the lines and symbols on the staff felt confusing, but breaking it down into simple parts—like learning about the grand staff, treble clef, and note patterns—made it feel much more manageable.

Using educational technology tools, such as a YouTube video from Pianote’s page, was super helpful. The instructor explained everything clearly and simply, which made it easy for me to understand.

The most helpful tool this week, however, was the NoteVision app. I liked how it gave me immediate feedback and became more challenging as I improved. The only downside is that it focuses more on memorization than deeper understanding. If you’re someone like me who learns better through explanations or visual patterns, this app might feel a bit limited unless it’s used alongside other learning tools or videos.

Overall, I still have a lot of practice, but I’m proud of how much I’ve learned and I’m excited to keep building on these skills next week!

NEXT WEEK GOALS: Learning note values, how to count them, and how to draw them on a music staff

Meeting the Keys!

This week I focused on the absolute basics of the piano, learning the names of the white keys, finding Middle C, understanding finger names, and a easy song with 4 notes. My goal this week was to get comfortable finding notes quickly and using proper hand positioning to prepare for playing simple songs.

Main Resources Used This Week:

This Weeks’s Process:

 This week I decided to use my tech tool for my weekly blog post called Flowkey. This website/app provided a simple easy to use introduction to the piano. Through this I learned:

  • To start by proper posture. When sitting at a piano, you should be sitting up in an upfront comfortable position. Your fingers should be parallel to the keys when you place your hand in middle of the piano. Your elbows should be pointed slightly outward. When you move your arms outward, your elbows can work together with them so your arms can open up.

    Source: Lessons on The Web. Does Posture Make a Difference in Your Piano Playing. https://www.pianolessonsontheweb.com/blog/does-posture-make-a-difference-in-your-piano-playing

  • It gave me a great tip on hand posture. When I first tried playing I noticed I would play notes with my hand slightly straight. Flowkey taught me to slightly bend my fingers and hand. Pretending to hold a small ball!

Source: Pdm piano http://www.pdmpiano.org/prelim_p004_1_hand.html

  • There is a key called Middle C that is the main starting point when playing. It’s the white key just to the left of the group of two black keys near the middle of the key
  • The white keys are named after the first 7 letters of the alphabet: A, B, C, D, E, F, G. For this process, I first learned C, D, E, F, G.

    Once I learned these incredible tips on Flowkey. I switched my learning to SimplyPiano. Through SimplyPiano I learned:

  • Playing rhythm of the keys I learned to get the hang of how to move my fingers to different keys. On SimplyPiano it asked for me to play the rhythm CC, DD. Than progressively got more challenging, DD, C, DD. My first couple of tries it it took me a while to figure out how to read the written notes while looking at the keys where my C or D was. However, I eventually got the hang of it.
  • SimplyPiano encouraged my to try my first song! Say Something written by A Great Big World


    This screen recording is SimplyPiano listening to me play. Below is my Piano it is listening to!

Thoughts of Learning Process This Week!

This week I learned a lot about the basics of the Piano! Both apps Flowkey and SimplyPiano has made this week learning the piano way more engaging and accessible. I liked the break down complex concepts into bite-sized, interactive lessons that I can follow at my own pace. It felt as though I was being taught a lesson by an actual teacher. I loved how SimplyPiano gave me instant feedback when I played, helping me correct mistakes right away, while Flowkey offered a more relaxed, visual way to learn songs with real-time guidance and sheet music.

Learning the piano online can work and I encourage for everyone to try! Both educational apps this week made practicing feel less like homework and more like a game – and that’s kept me motivated. Technology has definitely made learning piano from home easier and more fun than I expected.

NEXT WEEKS GOALS: Learning how to read notes and draw them on a staff!

Bringing Learning to Life with Flowkey : A Creative Classroom Tool Review

This week, I explored a new to me tech tool called Flowkey, a platform designed to help learners of all ages and skills levels play the piano through interactive, online instruction. Since my learning project this term is focused on learning piano using online resources, Flowkey was the perfect tool to try out.

flowkey app logo

Source Photo: The Smarter Learning Guide: Your Guide to Better at Home Learning https://smarterlearningguide.com/flowkey-review/

What is Flowkey?

Flowkey is a web –based and mobile app that teaches piano through a combination of video tutorials and interactive work sheet. As you play, the app/website listens through your device’s microphone and provides real-time feedback. It also provides feedback and techniques on how to improve.

This app/website is free to try. There is a premium subscription you may use if you wish to unlock all lessons and songs on the app.

Step-by-Step Instructions Using Flowkey

  1. Sign up: Start by signing up by going to flowkey.com or download the app.Sign up for app
  2. Choose your skill level and set up your keyboard or piano
  • Tip: the app will ask you a couple of questions before beginning such as your skill level, your goals, what music you would like to play, if you have a piano.
  1. Click on the first lesson to beginning your journey.


Tips for Beginners

  • Use headphones for better sound detection
  • Start with beginner lessons before starting full songs
  • Practice a little each day and repeat small sections if needed until you get onto the right track


Starting the first video – Introduction to the Piano Guide

  1. When sitting at a piano, you should be sitting up in an upfront comfortable position. Your fingers should be parallel to the keys when you place your hand in middle of the piano. Your elbows should be pointed slightly outward. When you move your arms outward, your elbows can work with them so your arms can open up.
  2. Your fingers should be slightly bent, like you are holding a small ball in your hand.
  3. The black keys come in groups of 2’s and 3’s. This pattern makes it easy to originate yourself on the piano
  4. The first and important note is the C. The C is always located to the left of the two black keys. A special C is the Middle C. You can find this one to the left of the two middle black keys. The C position is the starting key to other key positions called D, E, F, G.
  5. You will start your first simple song called, Ode to Joy, written by Beethoven, using these 4 first key notes we just learned.


How I’d Use Flowkey in the Classroom (SAMAR Model)


Flowkey can be a great tool for teaching piano in a music classroom, especially if you have access to keyboard or tablets. If a pandemic were to ever happen again, this would be a great tool to help students through online learning learn the piano. Especially by getting accurate feedback. As an online teacher may not be able to give there full potential on feedback. If it was used in an in person classroom this tool can be used as a homework practice to continue learning and practicing at home. If I was a music teacher I would use all of these strategies including using it as a way for students to record themselves and write or talk about what they found easy or hard, what they improved on, and what they want to try next. Having students examine if a tool such as this works better than in person piano lessons.


Following the SAMAR Model it could be super beneficial in these ways. You may view diagram I made or written version below:

  • Substitution: Students use Flowkey instead of regular sheet music
  • Augmentation: The app gives feedback and guides students as they play
  • Modification: Students can learn at their own speed with teacher support
  • Redefinition: Students can record themselves playing and reflect or share their progress online such as through a digital portfolio—something not easily done in traditional piano class


Strengths and Weaknesses of Flowkey

Strengths:

  • Beginner-Friendly: Provides clear instructions and step-by-step lessons making it easy to start
  • Interactive Feedback: It listens to your playing and waits for you to hit the right notes
  • Huge Song List: Offers a wide range of songs
  • Flexible Learning: You can learn at your own pace, anytime and anywhere. Will not go forward until you master each step
  • Visually Appealing: The app/website is visually appealing and easy to navigate

Weaknesses:

  • Limited Free Content: Only provides a few lessons and songs for free—you require a subscription to use full access
  • No Personal Feedback: It does not correct technique or posture how an in person would
  • Needs a Quiet Environment: If using a microphone, background needs to be quiet or it will pick up background noise and not give accurate feedback
  • Not for young children: May be hard to navigate as a young child. Aimed for at least 9 year olds.

My final Verdict on Flowkey

Overall, I found Flowkey to be a helpful and easy to use tool for learning piano. It offers great easy to the point instructions with a wide range of song libraries, and real-time feedback. My only downfall with this tool is to go any further in a learning journey of learning the piano you will require a subscription estimating from $149.99 per year ($12.49/month). There is however a 7 day trial you may wish to try before purchasing. Overall, I would recommend this tool for both beginners and teachers looking to add tech to music education. When I tried the free beginner lessons it gave me great feedback. When I messed up on my piano, it told me to go to the beginning to try again. Teachers should definitely try it out!

Tech and Me: Navigating Digital Tools, Distractions, and Balance in Daily Life

In today’s world, technology is deeply woven into nearly every aspect of our live—whether we realize it or not. I’ve noticed that a large portion of my day is spent engaging with technology, and lately, I’ve become more mindful of how it impacts my habits, productivity, and overall wellbeing. This week, I made a conscious effort to reflect on how I interact with technology, and here’s what I discovered.

My Most-Used Platforms: Academic and Social Blends

On a typical day, I found myself bouncing between a few core apps and platforms. Unsurprisingly, academics take up a significant portion of my screen time. I’m enrolled in classes at the University of Regina year-around, except during the summer semester. Because of this, I estimate that around 60% of my daily screen time is dedicated to schoolwork—outside of work hours and time spend resting.

The academic platforms I frequently use is Google Docs to complete assignments, and occasionally Canva for creating visuals and presentations for certain classes. Ur Courses is also a key platform I use for accessing course materials and submitting work.

iPhones offer a handy screen time feature that tracks app usage daily and weekly. According to last week’s report, I spent an average of 13 minutes per day—or 1 hour and 32 minutes per week—on Google Docs via my phone. However, I primarily use my laptop for academic work, and I estimate I spend about 3 hours per day on Google Docs there. Similarly, while Safari logged 31 minutes per day (3 hours and 42 minutes per week) on UR Courses via my phone, I actually spend closer to 3 hours daily on this site through my laptop as well.

Outside of academics, I spend time on apps like TikTok, Snapchat, YouTube, and Instagram—mostly for entertainment and connecting with friends. While platforms like Snapchat and Instagram are purely recreational, I do occasionally find educational content on TikTok. I follow several teacher accounts that share helpful resources for the classroom. One of my favourites is Education to the Core, which offers affordable teaching materials through a promoted website I’ve bookmarked for future use.

Staying Organized: Digital Tools That Keep Me on Track

To stay organized, my go-to tool is Google Calendar. I use it to keep track of work shifts, class times, assignment deadlines, and appointments. What I love about it is that it’s accessible on any device and allows for colour coding—purple for appointments, light blue for work, and individual colours for each class. It also sends me timely notifications, which help me stay on top of things.

When I first started University, I used Google Sheets to track my assignments, inspired by someone on TikTok. While that system was helpful, I’ve since found that Google Calendar works better for me. It helps me visualize my week and reduces the anxiety that comes with worrying I’ve forgotten something.

Tackling Digital Distractions

As much as we like to think technology only benefits us, it can also be one of the biggest obstacles to productivity. One of my biggest distractions is TikTok. I’m not sure if it’s the habit of endlessly scrolling or falling down rabbit holes, but I often find myself saying, “I’ll just watch one video,” and suddenly, an hour has passed. I’m especially guilty of this at bedtime. That said, I’ve never submitted a late assignment or let my distractions significantly affect my academic performance.

One strategy that’s helped me is learning to distinguish between intentional tech use and mindless scrolling. When I sit down to do homework, I try to create a focused environment. Since the weather has warmed up, I’ve started working in my backyard, away from people and the TV. I also turn on “Focus Mode” on my phone to silence notifications and restrict access to distracting apps.

Recently, I discovered a platform called LifeAt.io through TikTok. It’s a virtual workspace that creates calming, customizable environments designed to help you focus. It includes simple to-do lists, customizable timers, and background scenes. My favorite is Mount Shuksan—a serene view of mountains and a lake, complete with birds chirping and water flowing in the background. I highly recommend trying it out!

Source: Luminex. Top 5 Aesthetic Virtual Study Spaces to Instantly Boost Focus. Medium. https://medium.com/@Luminex/top-5-aesthetic-virtual-study spaces-to-instantly-boost-focus-52a6d9a589ea

Final Thoughts

This week has helped me become more aware of how I use technology—both the ways it supports me and the ways it can get in the way. With the right tools and a bit of self-awareness, I believe we can all strike a healthy balance in our digital lives.

Introducing Kadie!

Hello everyone!

My name is Kadie Harris, and I’m currently finishing my third year as an Elementary Education student at the University of Regina. I will be completing my pre-internship in the fall of 2025, and I’m incredibly excited to begin working more directly in the classroom!

Alongside my studies, I work in a before-and-after-school program at both St. Joan of Arc and Ruth M. Buck schools. Most of my time is spent at St. Joan of Arc, where I’ve had the pleasure of working with wonderful students. This experience has only deepened my passion for teaching and reinforced my desire to be a positive influence in children’s lives.

I am especially passionate about the arts—whether it’s visual art, music, or literature, they bring me immense joy. I’ve been fortunate to incorporate the arts into my programming at work, and it’s shown me just how powerful and beneficial the arts can be in a child’s development and daily life.

(Art I created in 2021) 

Outside of the arts, I also have a deep love for nature. Since I was a baby, my family has gone camping across Saskatchewan in places like Cypress Hills, Rowan’s Ravine, and Buffalo Pound. About four years ago, we settled on a seasonal campsite at Rowan’s Ravine, which has become our home away from home. Being at the lake brings me a unique sense of peace and joy that I truly cherish.


( Left Photo – Dad on the left, I am in the middle, my sister is on the right, my mom is taking the photo!)

(Right Photo – This photo was from when I was 5 years old – Far left is me, sister, mom, dad)

I graduated from Martin Collegiate in 2022. At the time, technology in classrooms was still relatively limited. Most of our classrooms used traditional whiteboards and projectors, although a few had SMART Boardsinteractive whiteboards that allowed users to write or navigate directly on the screen using a special pen or even a finger. These were typically found in newer parts of the building.

We also had a designated computer room for student use, especially when classroom computer carts weren’t available. In high school, we frequently used Google Docs, Google Slides, and Google Classroom for assignments. Technology played a significant role in our academic work, especially compared to elementary school, where I noticed tech was used less frequently. That said, in the elementary schools I now work in, I see more use of computers and iPads than I expected. It’s clear that education is shifting toward a more technology-integrated approach.

Throughout high school, I took photography from Grades 9 to 12 with two different teachers. In one of those classes, we created personal blogs using Google Sites to share our photography with classmates. Unfortunately, I no longer have access to my original blog due to losing access to my school email, but I still have the outline of the site, which I’ll link here for reference.

I also remember using fun educational tools like Kahoot, which made learning more interactive and engaging. Beyond that, however, we didn’t use much other technology.

Despite this, I learned the basics of blogging during that time and found that I really enjoyed it. I’ve always been someone who loves journaling, and blogging feels like a digital extension of that passion. It provides a creative platform to share ideas, reflections, and personal work.

I’ve also started exploring social media tools like Twitter (X). While I don’t post much myself, I enjoy following teachers who use the platform to share their teaching journeys. It’s something I’d like to become more comfortable with, especially as I move into my internship and professional teaching career.

Thank you for following along with my journey—I’m excited to continue learning, growing, and sharing with all of you!

Introduction to my Piano Learning Journey!

My interest in learning the piano began at a very early age—around 11 or 12 years old. At the time, our new neighbours had just moved in next door, and they had two daughters who were about my age. After school, I would often visit their house and watch them play on a beautiful old piano that had been passed down from their grandparents. Its wooden casing was worn and weathered, having been filled with generations of timeless music. Despite its age, the piano’s soundboard whispered rich, resonant tones that drew me in. I would sit and watch my neighbour for hours as she played songs she had learned in piano class. Her talent inspired me, and I dreamed of becoming just as skilled one day.

As I’ve grown older, my love for the piano has only deepened. For my 16th birthday, I convinced my parents to get me a keyboard piano so I could start learning. I played casually for a while, but as life got busier, I didn’t make time for it and eventually tucked the keyboard away in my closet. Recently, I’ve realized that my love for the arts—whether it’s visual art, dance, or music—was born from those childhood moments. Music has always held a special place in my heart because of the beauty it brings to others.

Now, as a future teacher, I’m inspired to use this learning project as an opportunity to reconnect with music by learning the piano. I also hope to bring my love for music and the arts into the classroom in meaningful ways. I believe these tools can enhance all subject areas and help students manage stress, offering peace and calm through the power of music.


My Learning Goal

My overall goal for this project is to learn the basics of piano and play a simple song by the end of the semester. To achieve this, I plan to:

  • Begin by experimenting with the piano keys and familiarizing myself with the sounds they make.
  • Learn the layout of the keyboard, identify the pattern of black and white keys, locate Middle C, and memorize the names of the white keys.
  • Understand finger numbers and hand positions (assigning numbers 1–5 to each finger) and practice proper posture.
  • Learn basic rhythms, starting with whole, half, and quarter notes.
  • Begin playing simple songs with one hand—starting with Twinkle-Twinkle Little Star.
  • Progress to playing with both hands.
  • Start reading easy sheet music, with the eventual goal of learning a popular song to share with others.
  • Practice ear training to recognize notes and chords.

Resources I’m Using

To support my learning, I will be using two apps: Simply Piano and Skoove. Both are beginner-friendly and provide real-time feedback by listening to the notes you play. I’ll also be using the website Tone Gym, which offers excellent ear training for beginners. Additionally, I plan to hang a printed diagram of piano keys on my wall to help with memorization throughout the semester. If I discover any new resources along the way, I’ll share them here on the blog.

Getting Started

Currently, I know little to nothing about the Piano or how to play it. I understand that a Piano goes from low notes to high notes. I also understand the Piano notes are A, B, C, D, E, F G, and some areas of these notes have sharp notes and flat notes. However, I am unsure on what this exactly means.  In the video below, I share my very first experience experimenting with the piano keyboard—exploring the sounds, identifying where the higher and lower notes appear, and where my A, B, C, D, E, F, G notes appear. In the video below, I share my very first experience experimenting with the piano keyboard—exploring the sounds and identifying where the higher and lower notes appear. Next week, I’ll continue my journey by finding Middle C and learning the keynotes across the keyboard.

Follow along as we learn together on this exciting musical journey!


© 2025 Kadie Harris

Theme by Anders NorenUp ↑