Why I Am a Strong Fit for the Regina Public School Division

When I think about the kind of educator I want to be, I think about classrooms where students feel safe to ask questions, where identity is celebrated, and where learning feels meaningful and connected to real life. The Regina Public School Division’s mission—“to instill the value of knowledge, the dignity of effort, and the worth of the individual”—resonates deeply with me. These are not just words to me; they reflect what I believe every student deserves and what I aim to bring into every space I teach in.
My approach to teaching is rooted in relationships. I take time to learn who my students are—what lights them up, where they feel unsure, and what stories they bring with them. I know that learning doesn’t happen in isolation, and that’s why I’m committed to building communities of care in my classroom. The Regina Public School Division’s dedication to inclusion and anti-oppressive education gives me confidence that I can be part of a professional team that shares this same mindset. I am especially drawn to the division’s emphasis on student voice, culturally responsive pedagogy, and its strong commitment to Truth and Reconciliation.
What makes me a strong candidate is not only my formal training, but also the everyday experiences that have shaped my growth—working closely with children in a before and after school program, learning to adapt in real-time, and leading activities that support both academic learning and social-emotional growth. I bring a calm, grounded energy to the classroom, and I believe in the power of listening, reflecting, and creating lessons that meet students where they are.
I am eager to join a school division that values collaboration, professional learning, and responsiveness to student needs. Regina Public Schools is a community where I know I can grow, give back, and make a difference. I see this not just as a job, but as a calling to serve students with purpose and compassion.
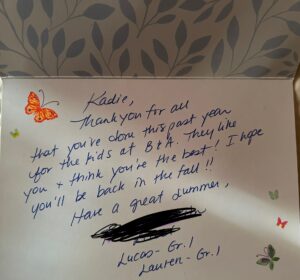
Here is a heart warming message from one of my B&A parents – their one child is someone who has autism and ADHD. He spent a lot of time with me when it came to self regulation.
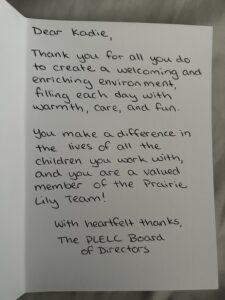
Here is a card from my work company’s board of directors: