Category: EDTC300 (Page 1 of 2)
As EDTC 300 comes to an end, I’ve been reflecting not only on what I’ve learned but on how we’ve all helped each other along the way. When I first heard that part of this course was about “contributing to the learning of others,” I’ll admit, I felt unsure. I’m still building my confidence with technology—how could I possibly help others?
But this class showed me that learning is a shared experience. You don’t have to be an expert to make an impact. Sometimes, asking questions, encouraging others, or sharing a helpful tool can make all the difference. And over the past few months, I’ve tried to do just that—whether it was through blog comments, or our Discord class communication platform. Here’s how I contributed to the learning of others:
Supporting Classmates Through Blog Comments
Through this semester, I’ve made it a habit to regularly read and comment on my classmates learning projects and assigned blog prompts. I aimed to offer encouragement, relatable feedback, and practical resources when possible. Additionally, as it was assigned to comment to 3-5 blog posts per week, I believed it was important for me to comment on at least 10 if possible. It was important for me to interact with as many people as possible. To see different points of views, to see where others were at in their learning projects, and to get to know other peers in my class.
Here are a few examples:
On Kyler Flahr’s blog about learning how to cook different culture dishes, I shared a a possible dish idea for his next week’s Indian dish on butter chicken or chana masala as I heard they were both super popular flavourful dishes.
On Payton Pugh’s blog post learning how to crochet, I shared my experience and love of crocheting. I shared a helpful resource I used for beginners I found on Tiktok by a lady creator “Ladaknotts”.
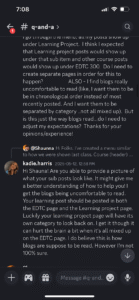
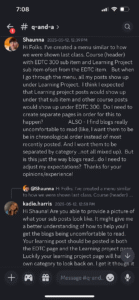
On Shaunna Dunn’s blog post on learning how to create digital images, I shared my connection on how frustrating learning something new online can be.
Supporting Through Discord
Our class Discord server was another space where I tried to be helpful. I may have not had all the answers, but I always happy to share my experiences or cheer people on.
Ways I contributed on Discord:
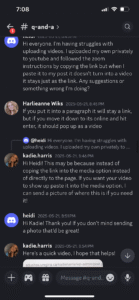
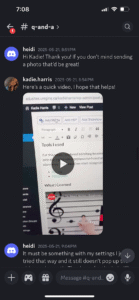
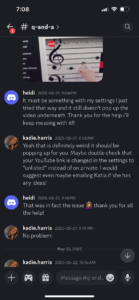
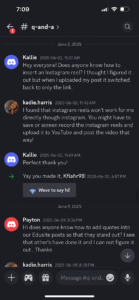
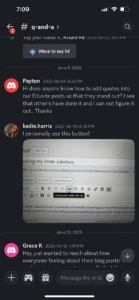
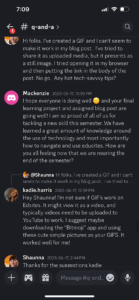
- Answered classmates questions when I could on tech, evening providing videos with my answer:

- Helped with tech issues:
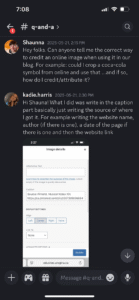
- Answered simple questions:
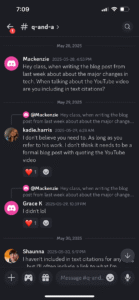
- And, additional resources:
Final Thoughts
Looking back, I’ve realized that contributing to others’ learning doesn’t mean having all the answers–it means showing up, sharing what you can, and building a space where people feel supported. I’m proud of the little ways I was able to do that this semester, and I’m so grateful for the way others contributed to my learning too.
EDTC 300 reminded me that learning communities, both online and offline, are built one small interaction at a time–and those interactions matter.
Thank you to everyone in this course, including my professor Katia, for the encouragement, resources, and conversations along the way. I’ve learned so much from all of you, and I hope I was able to give a little of that back.
My Piano Learning Journey Has Come To An End..
This semester flew by–and so did my piano learning project. As part of my EDTC 300 course, I was tasked with choosing a skill to learn using online tools and documenting my journey through weekly blog posts.
For my learning journey, I decided to learn how to play the piano–a goal I’ve always had in the back of my mind, but never really fully committed to. My piano keyboard was sitting in the back of my closet collecting dust, and I thought it was the perfect time to put it to use. I had zero formal training, and while I knew a few basic notes, such as the Major C in the center of the keyboard. I started from scratch when it came to technique, rhythm, and music coordination. I also wanted to explore how accessible learning a new musical instrument could be using digital resources–no private lessons, no books, just me, the keyboard, and the internet.
So how did my piano learning journey go? Was it everything I thought it would be? Not exactly. Was it full of trial, error, restarts, and stumps? Definitely. Some weeks felt incredibly rewarding, with awesome various resources, and others made me want to throw my keyboard away. As I could find little to no resources to some, and they were significantly challenging to learn. But through it all, I saw real progress. I learned a ton about persistence, and discovered just how powerful online learning can be.
Here’s a quick recap of my piano learning journey:
- Week 1: Introduction to my Piano Learning Journey!
- I introduced my learning project of choosing to learn the piano.
- My love for piano began as a child, inspired by watching my neighbour play a beautiful old piano filled with history and music.
- Now, as a future teacher, I’m using this learning project to reconnect with that passion and explore how music can support well-being and creativity in the classroom.
- My goal is to learn the basics and play a simple song by the end of the semester, starting with apps like Simply Piano and Skoove and sharing my progress along the way.
- Week 2: Meeting the Keys!
- This week, I focused on the piano fundamentals: identifying white key names, finding Middle C, learning finger positions, and trying out a simple 4-note rhythm.
- I used Flowkey to improve posture and hand placement, and Simply Piano to begin reading notes and even play my first beginner song, Say Something.
- Week 3: Cracking the Code!
- Focused on reading notes on the grand staff, including treble and bass clef, and identifying Middle C as my starting point.
- Used Pianote to learn the basics of reading lines, spaces, and ledger lines, with helpful memory tricks like “Every Good Boy Deserves Fudge” and “FACE.”
- Practiced with NoteVision, an interactive app that gave real-time feedback and helped me match staff notes to the correct piano keys.
- This week made reading music feel less overwhelming and gave me a strong foundation to build on for future songs!
- Week 4: Counting the Beat
- Focused on learning note values (whole, half, quarter, eighth, sixteenth) and how long to hold each when playing, using the Music4Kids YouTube channel.
- Practiced identifying note parts (head, stem, flag) and how they relate to beat counts in 4/4 time signature.
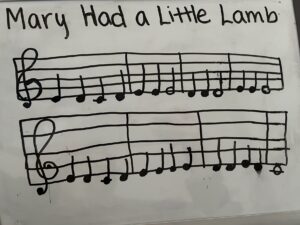
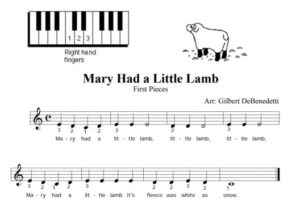
- Used Pinterest to find beginner sheet music (Mary Had a Little Lamb) and practiced drawing each note on a music staff.
- Gained a deeper understanding of rhythm as the heartbeat of music, and started connecting note shapes to sound duration—next week’s goal: time signatures + clapping with a metronome!
- Week 5: Clap. Count. Play.
- Learned how to read time signatures (like 4/4, 3/4, 6/8) using “Crack the Code” and practiced clapping them out using metronome tools and the “Rhythm Clap Along” YouTube video.
- Discovered how time signatures affect the feel of music (e.g., 3/4 for waltzes, 6/8 for jigs, 5/4 for jazz), making rhythm more understandable and musical,
- Practiced clapping rhythms with an online metronome, starting with quarter notes and building to eighth notes—challenging but helped me internalize steady beats.
- Gained confidence by feeling rhythm in my body, not just counting, and found rhythm clapping to be a powerful step before playing actual music!
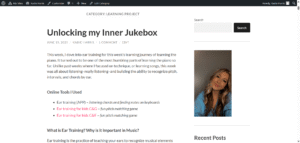
- Week 6: Unlocking my Inner Jukebox
- Focused on pitch recognition through daily ear training using beginner-friendly apps and YouTube games (C&G, C&E) to match notes like C, E, and G by sound.
- Practiced identifying chords by ear using a virtual keyboard and my own piano for reference—challenging but rewarding with daily 10–15 minute sessions.
- Learned that ear training builds gradually through repetition and failure, helping me begin to “feel” notes rather than just memorize them.
- Found kid-friendly tools especially helpful and accessible, though noted a lack of strong digital ear training resources, making this one of my toughest weeks yet.
- Week 7: My Piano Journey has come to an end..
- I wanted to end this project with a piece that meant something to me. I chose “Hallelujah” by Leonard Cohen—a song that has always made me feel something deep and indescribable. Learning it felt like a full-circle moment. It challenged me with its pace, arpeggios, and transitions, but also reminded me why music is so powerful.
- Summing up my Learning Journey
Here’s the final video of me playing Hallelujah
(Played off the sheet music from musescore and Youtube channel Betacustic)
Reflections on Learning Online
What did learning online make possible?
- Unlimited Access to Resources Anytime, Anywhere
-
- Learning online gave me countless 24/7 access to tutorials, interactive tools, and beginner sheet music. Whether I was practicing at home, watching videos on the go, or reading articles on study breaks, I always found something new to support my online learning. At times, it was challenging to find the correct resources that worked best for me. In the end, I found my way through resources I had.

2. Learning from random experts
-
- YouTube teachers like Piano Lessons on Pianote made complicated ideas feel simple and engaging. Their step-by-step tutorials and visual tools helped me understand everything from hand positioning to note values to playing full songs. It felt like having a personal teacher in my room.

3. Control over my own Pace
-
- One of the biggest benefits was the ability to pause, rewind, or rewatch lessons as often as I needed. If I missed something or felt confused, I didn’t have to wait for help—I could replay that section until it clicked. This flexibility made learning less stressful and more supportive of my pace. Especially when it came to the pace of when I learned and when I felt like it was time to move on. In normal classes with a teacher, I wouldn’t have the chance to learn lessons on my own time and practice over and over again until I learned the next lesson. It helped my anxiety tremendously.
4. Opportunities to Share, Reflect, and Connect
-
-
Documenting my progress weekly allowed me to reflect on what I was learning and where I was growing. Sharing videos, reflections, and challenges through blog posts connected me to others and gave me encouraging feedback that helped keep me going. It felt like being part of a learning community.
-
What was difficult about learning online?
- Lack of Real-Time Feedback
-
- Without a live teacher watching me play, it was easy to miss mistakes—especially with posture, hand position, or subtle rhythm errors. Sometimes I didn’t even realize I was doing something wrong until I rewatched my own videos or stumbled in a lesson later on.
- I did have my peers feedback to reflect on my learning journey. However, not all of my posts got commented on. If they did, it was never in the moment. Typically almost a week later. It was up to me to decide if my mistakes were caught or if I was even doing something particular correct.

2. Lack of Structure and Direction
-
- With so many resources available, it was sometimes overwhelming to know what to focus on next. I had to build my own learning path, which meant constantly deciding what I should be practicing, what skill to build, or when to move on. That flexibility was great—but also a challenge.
3. Balancing Practice with Documentation
-
- I noticed that a significant amount of time went into preparing my blog posts—writing reflections, recording videos, organizing thoughts, and editing content. While this was meaningful and helped me learn, it sometimes cut into the time I could have spent actually practicing on the piano.
Final Thoughts
This project stretched me in unexpected ways. I thought I’d just be learning a few notes and calling it a day, but I ended up developing a whole new appreciation for what it takes to stick with something hard, especially when no one is making you do it.
One of my biggest takeaways? The importance of celebrating progress over perfection. There were moments where I was frustrated, slow, and full of self-doubt. But there were also breakthroughs, joy, and a sense of peace in seeing improvement over time.
When I have my own classroom, I want to give students the space to try, struggle, reflect, and grow—just like I did through this project. I’ll definitely be encouraging them to try learning something online, document their process, and be proud of how far they come.
Thank you to everyone who followed along on this journey. Now, if you’ll excuse me, I’ve got a few more songs to learn…
Today, I decided to explore an AI tool I hadn’t tried before: Google NotebookLM . Unlike chat-based tools like ChatGBT, Google NotebookLM is designed as a personal AI “research assistant”. Individuals, especially students, can upload their own documents–articles, notes, PDFs–and then ask the AI questions about their content. It can summarize, explain, organize, or even create podcasts based on your materials. 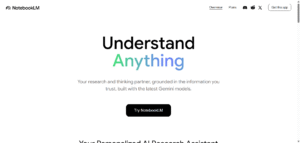
For the purpose of experiencing this AI tool I decided to use a document we used from class, watching the Amanda Todd documentary. 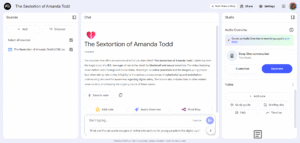
I decided to ask a simple question about the document: What was the main message or goal of the Amanda Todd documentary?
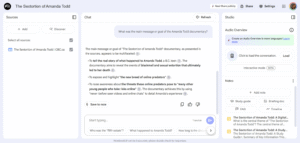
The answer that came back was:
Enhancing Teaching and Learning
The educational possibilities with NotebookLM are huge. Teachers could use it to:
- Summarize long readings into student-friendly language
- Create study guides or quiz questions from uploaded lessons
- Compare multiple sources and generate discussion prompts
- Finding research projects by guiding students through complex texts
Challenges to Consider
Like all AI tools, NotebookLM has its challenges. If students rely to heavily on AI to do the “thinking,” it could limit deeper engagement. Teachers also need to verify the accuracy of AI summaries–NotebookLM can sometimes misinterpret ideas or miss content. I’ve noticed a lot through AI tools of misinformation spread. It is sometimes super hard to even realize when ideas are wrong.
My Perspective on AI in Education
The future of AI in the Classroom
I see tools like NotebookLM becoming core tools in student research, especially in middle years and high school. As AI continues to progress in video, audio, text, and take over our technology. It can either go the way of being super helpful for future students such as building portfolios, research, or reflect on learning. Or it can take over students ability to be creative, have critical thinking, and be able to actually do their assignments without the necessity of technology. With this said, in ways, I am afraid of what AI will look like in future classrooms. However, as a future educator, I am willing to learn as technology progresses and do my best to protect my students digital literacy and how they use AI through their life. 
This week, I dove into ear training for this week’s learning journey of learning the piano. It turned out to be one of the most humbling parts of learning the piano so far. Unlike past weeks where I focused on technique, or learning songs, this week was all about listening–really listening–and building the ability to recognize pitch, intervals, and chords by ear.
Online Tools I Used
- Ear training (APP) – listening chords and finding notes on keyboards
- Ear training for kids C&G – fun pitch matching game
- Ear training for kids C&E – fun pitch matching game
What is Ear Training? Why is it Important in Music?
Ear training is the practice of teaching your ears to recognize musical elements like pitch, intervals, chords, and rhythm. This week, I focused on pitch recognition, which is the ability to name a note (like C, E, or G) just by hearing it.
Through my digital videos and apps, I learned to listen closely to small differences in sounds. I learned that:
- C sounds like a strong, grounded note–it often feels like “home base.”
- E is higher, a bit brighter
- G has a rounder, warmer tone that’s deeper than E
Practicing
First I practiced starting each session this week with the C & G and C & E youtube videos. These were simple, but very effective. They played a note, and I had to match it to the correct pitch. The repetition and friendly tone made it easier to focus, and the feedback helped me recognize patterns faster.
Once I completed this warm up everyday this week, I went onto my ear training app, and listened to chords and tried to find the ones on the virtual keyboard. To help me with this I also would have my physical keyboard for support and reminders of which chord sounds like what. This part of my learning journey was challenging, but I could feel myself improving each time.
I practiced for 10-15 minutes a day. The key was consistency–not cramming, but building up my listening “muscle” slowly. Some days were easier than others. I had to fail multiple times in order for the sessions to add up and succeed.
Goal Reflection
This week’s goal was challenging and very different from past piano sessions. I honestly wanted to at some points to give up. It was hard for me to identify each key. A lot of the keys sounded very similar. I had to fail a lot in order to get into the rhythm of processing sound to key. Although, I am proud I didn’t give up.
The most useful tool this week I would say is the ear training for kids. They gave me am approachable way to start listening more intentionally and trusting my ear. I’d recommend them to anyone starting out, especially young learners and teachers. It’s super accessible to all ages. I made sure to check if it was available on youtube kids if younger students can access it and they definitely can. My only down side of learning online this week was the lack of digital education for ear training. Yes, there is resources. However, not all are reliable or super helpful. This made my learning journey this week a bit more challenging.
NEXT WEEK
My goal is to learn a simple beginner-friendly song that uses both hands together. This will be my first time coordinating melody and harmony, so I expect it will take patience and lots of slow practice — but I’m ready for the challenge!

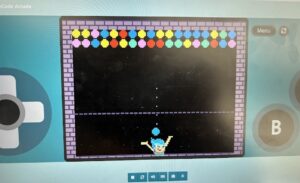
For my Code of Hour experience this week on coding, I chose “The Joy of Popping Bubbles” from Inside Out 2. I was a bit nervous about beginning this coding journey. However, it was a super fun and creative way to learn basic coding, and it’s designed for kids in Grade 2 and up, which makes it a perfect fit for me to explore coding simply and joyfully!
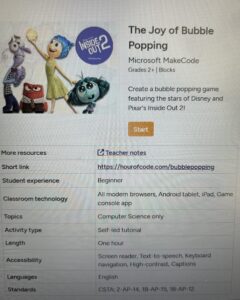
In this activity, I got to help Joy pop bubbles using code blocks. Each level challenged me to figure out the right sequence of code to make her move, pop bubbles, and even react to different emotions. It combined storytelling, logic, and problem-solving–all with familiar characters from Inside Out!
For the purpose of this activity, I decided to just keep Joy as my character. However, for students who may do this coding game, they have the option to choose other emotions from the movie.
Process
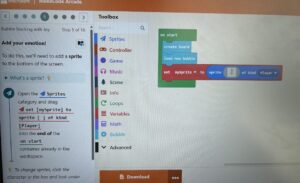
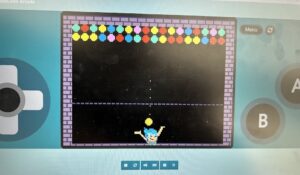
At the beginning of my process of creating my Inside Out game. It asked me to start by creating “core memories” to the game board. It had simple instructions on the left hand side asking me to click onto the Bubble category in the toolbox and grab create board then snap it inside the empty start block already in the workspace. This created my two rows of “core memories”. 
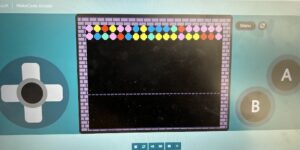
Next, in the same category as the Bubble, I was asked to drag the option load new bubble onto the end of the start block. This would create the ball that shoots at the other balls. This is shown below.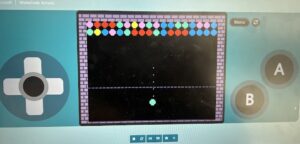
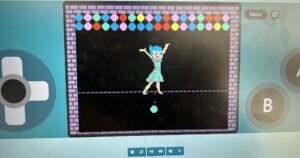
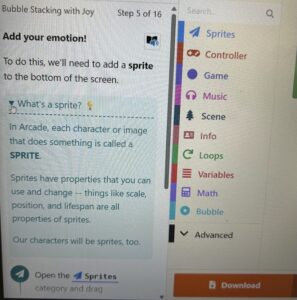
Following this, in the Sprites category, it asked me to drag “set [mySprite] to Sprite [Joy] of kind player” into the end of start container in the workplace. This created character Joy onto my game.
A section in this part was really interesting to me. I didn’t know what a “Sprite” was. On the side of the instructions, it actually had a description of what it meant. This is perfect not only for me, but students who are curious on what some of these options mean.
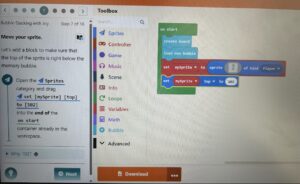
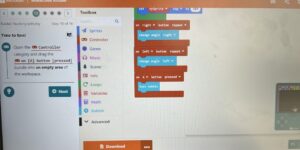
After I added Joy onto my game board. I needed to move her down so she wasn’t in the center of the board. To do this, the instructions listed for me to open Sprites again and drag “set [mySprite] [top] to [102]” into the end of the start container in the workplace.
Now that everything was lined up. I needed to aim my shot. I did this by opening the controller category and drag the “on [right] button on [repeat]” bundle into an empty workspace.
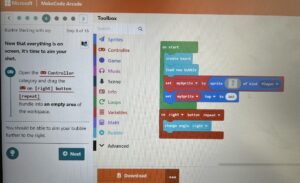
Finally, I needed to create the coding for tossing the ball. I did this by opening the controller category again and dragging the “[A] button [pressed]” bundle into an empty space on the workspace.
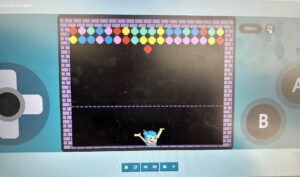
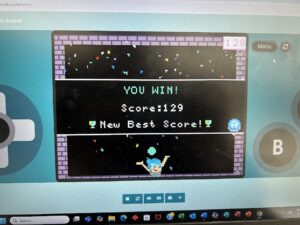
It was finally time for me to try out my game! Here is a quick video of me aiming at my core memory targets and showing my best score on my game!
What I Learned
Even though the game was playful, I still learned some important coding concepts:
- Events – I used blocks that told Joy what to do when something happened.
- Loops – Instead of giving lots of separate commands, I used loops to repeat actions.
- Order Matters – If I put the steps in the wrong order, things didn’t work right, so I had to slow down and think carefully.
I also realized that making mistakes is part of learning how to code. If the bubbles didn’t pop, I would go back, change something, and try again. That felt really rewarding when I figured it out! However, this specific coding game was super easy. It is the perfect age level for Grade 2, I believe they would all enjoy it a lot. I can’t wait to use this program in my future teachings!
Why Coding Matters
I think coding is important because it helps you become a creator instead of just a user of technology. It teaches you how to break big problems into small steps and solve them one at a time. And it doesn’t have to be boring or hard–activities like this one make it fun and meaningful to each students life in some way.
Coding is also a wonderful way to express creativity and build confidence, especially when you see something work that you built yourself!
Final Thoughts
The Joy of Bubble Popping made my first Hour of Code experience exciting and enjoyable. I loved learning in a way that connected to a movie I already like, and now I want to explore even more coding games!
I would definitely recommend this activity to anyone new to coding, especially younger students. It proves that learning something new can be joyful.

Source: Beder, S. (2018). Clickbait. Business Managed Culture Democracy. https://www.herinst.org/BusinessManagedDemocracy/culture/socialmedia/Clickbait.html
This week, I’ve been thinking about how increasing our digital literacy is one of the most powerful tools we have to protect ourselves–and our students–from the dangers of fake news. I can confidently say myself, I have been caught believing way to many stories online or images/videos that were not real or completely fake news. Now with the power of AI profound in our generation, their tools they are able to trick us by progressively continue to become more real looking then they should be. As fake news can trick almost everyone, especially in young learners like those in grade 2, it’s possible to lay foundational skills that can help them think critically, ask questions, and begin the navigate the digital world with curiosity and caution.
What Might Digital Literacy Look Like in Grade 2?
Teaching digital literacy to seven and eight year old’s might not involve deep dives into bias charts or new source databases like it would with older students. However, it can begin with simple, age appropriate activities that introduce key ideas:
“What makes something true or trustworthy?”
“Who is the author, and what do they want us to believe?”
“Can we find this same information else where?”
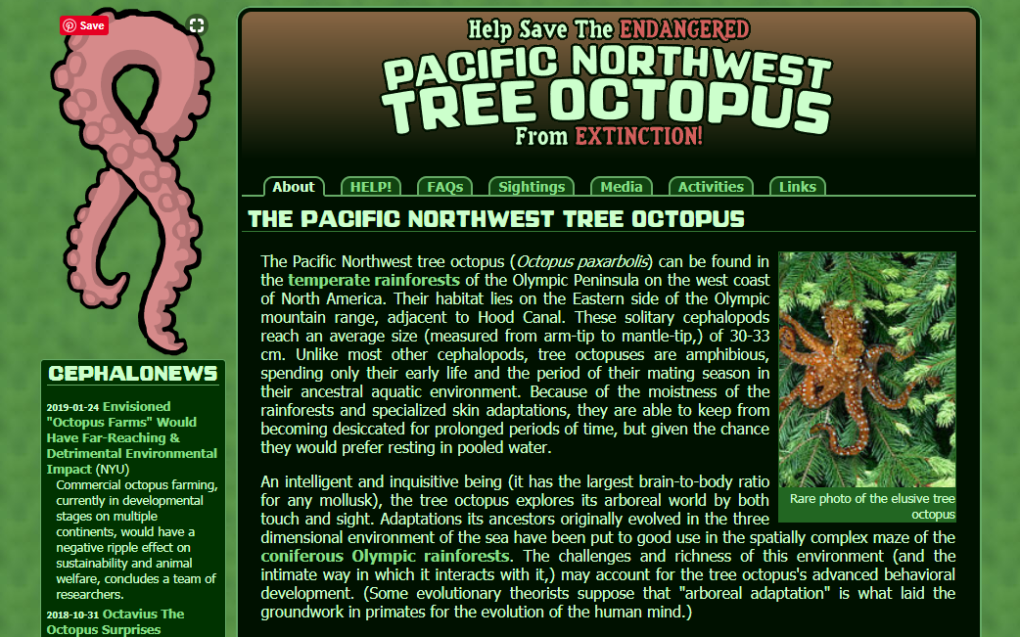
One of my favourite ideas from Mike Caulfields’s Web Literacy for student fact checkers is lateral reading–teaching students to open new tabs and check what others are saying about a claim. For Grade 2, this could look like comparing two kid-friendly sources about an animal or science topic, or looking up an unknown word or picture in more than one place. The tree octopus site is a perfect example of this idea.
Source: Fester, J. Save the Tree Octopus! Helping Students Develop Critical Thinking Skills. KQED. https://www.kqed.org/education/531201/save-the-tree-octopus-helping-students-develop-critical-thinking-skills
Ties to the Curriculum
In the Saskatchewan Grade 2 curriculum, I see strong connections to:
- English Language Arts (ELA):
- CR2.3 – Listen and retell (with support from the text) the key literal and inferential ideas (messages) and important details heard in small- and large-group activities, and follow oral directions and demonstrations.
- CC2.2 – Use a variety of ways to represent understanding and to communicate ideas, procedures, stories, and feelings in a clear manner with essential details.
- AR2.1 – Reflect on and assess their viewing, listening, reading, speaking, writing, and other representing experiences and strategies by participating in discussions and relating work to a set of criteria (e.g., “What did I learn?”).
- Health Education:
- USC2.5 – Recognize potential safety risks in community “play areas” and determine safe practices/behaviours to identify, assess, and reduce the risks.
- Social Studies:
- DR2.1 – Investigate stories of significant events and persons in the local community’s history to describe the contribution of those who lived in the community in earlier times.
Incorporating the NCTE Framework
The NCTE Framework for the 21st Century Literacies emphasizes:
- Building critical thinking and problem-solving
- Creating, analyzing, and evaluating multi-media texts
- Developing social responsibility and ethical participation in digital spaces
In Grade 2, this might look like:
- Evaluating short articles or videos to discuss who made them and why (e.g. using “The Smell Test: Educators can counter fake news with information literacy” as a model to simplify bias discussions)
- Doing a hands-on activity with real and fake headlines (e.g., from Can You Spot the Fake News Headline? Quiz).
- Creating class anchor charts on “What makes a trustworthy source?”
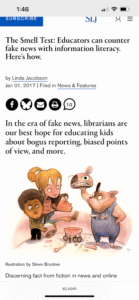
Source: Jacobson, L. (2017). The Smell Test: Educators can counter fake news with information literacy. School Library Journal. https://www.slj.com/story/the-smell-test-educators-can-counter-fake-news-with-information-literacy-heres-how
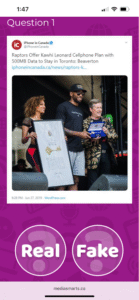
Source: Media Smarts. (2025). Can you spot the fake news quiz. Media Smarts. https://pressbooks.pub/webliteracy/
Why This Matters to Me
In a world where children are growing up surrounded by screens, I believe it’s never too early to start teaching them to think critically about what they see online. Even at work recently, a student told me she saw a Youtube video where someone claimed the Titanic was fake–crazy, right? But to her, it was believable because it was presented confidently and looked like a real video. That moment really stuck to me. It reminded me that if we don’t help children learn to pause, questions, and verify, they’re vulnerable to believing anything they see. Teaching digital literacy isn’t just about media–it’s about protecting their curiosity and helping them grow into thoughtful, responsible citizens. 
This week, I focused on on something easily overlooked but so important when learning the piano: time signature and rhythm. My goal was to better understand how time signatures affect the way we count, plat music, and start practicing rhythm by clapping alone with the metronome.
Tools that Helped me this Week:
- Metronome Online – a free, simple metronome
- Rhythm Organizer – great for practice
- Rhythm Clap Along – great for beginners/kids clapping rhythms
- Crack the Code: Learn Time Signatures – learning time signatures
- I also tapped our rhythms with my fingers on the table when I didn’t have the piano near buy
What are Time Signatures
Using my educational online platform, “Crack the Code: Learn Time Signatures,” I learned at the beginning of most pieces of music, you’ll see two numbers stacked like a fraction (for example, 4/4 or 3/4). That is the time signature. This tell us how many beats are in a measure and what kind of note gets the best.
Here is my I found:
- 4/4 is called “common time” and means four quarter-note beats per measure. It has this rhythm as most pop songs. (Count – 1-2-3-4)
- 3/4 has three quarter-note beats and gives a waltz-like, swaying rhythm. It has this rhythm in classical music or folk songs. (Count – 1-2-3)
- 2/4 feels like march, a perfect simple strong walking beats. It has this rhythm in dancing music. (Count – 1-2)
- 6/8 this is called “Compound Time”. This means it has technically 6, but grouped as 2 main beats, each split into 3. It has the rhythm of R&B, Irish jigs, and love songs. (Count – 1-la-li, 2-la-li)
- 5/4 has five beats in each measure, and each beat is a quarter note. This rhythm is known as being irregular or an odd meter because most music uses even numbers like 2, 3, or 4 beats per measure. This rhythm is usually used in jazz music. (Count – 1-2-3, 4-5)
- 7/8 means there are seven eight note beats in each measure. This rhythm is also known as being jerky and uneven. This rhythm is also known being in prong rock music as well. (Count – 1-2, 3-4, 5-6-7)
Understanding these time signatures helped me feel more confident when reading music and finding out how to read them.
Clapping with a Metronome
To strengthen my rhythm skills, I used an online metronome and practiced clapping these different rhythms. At first, I kept it simple, clapping quarter notes at a slow tempo (around 60 bpm), once I felt steady, I tried eighth notes and further challenged myself as I got the hang on it.
What I noticed:
- A metronome is super helpful but also challenging. It took me a while to get the hang of counting my beats without counting the metronome. It showed me where I rush or slow down.
- Clapping the rhythm before playing helped me internalize the rhythm before touching the keys.
- I started “feeling” the beat more than just counting it–like dancing with sound.
I additionally used this Youtube video to guide me on clapping beats. It was super easy to use and It honestly made me feel like I knew what I was doing.
Here is a quick video of me trying out these clapping rhythms for the first time!
Goal Reflection
This week I was able to complete my goal successfully. I explored different time signatures, learned to count them, and practiced clapping along with a metronome. It was a big of a challenge as did harder time signatures that went faster than expected. However, practice makes perfect and redid my rhythm claps until I was on the right track. I found that all my online digital tools this week were easy to use especially for beginners like myself. The tool I found the most helpful this week was the Youtube video called, “Rhythm Clap Along- Level 1 to 3”. It provided my with notes I learned last week into a measure. I was provided with different time measures to practice clapping. What I loved about this video was it would clap the beats first for me to listen than it would do it with me. I highly recommend this video for any future teachers in music or future piano learners.
Next Week
Next week, I’m shifting my focus from rhythm to ear training–learning to recognize sounds in music without looking at my sheet music. I’m excited (and a little nervous) to try this kind of musical training because it’s new for me, but I know it will make me stronger, more well-rounded piano player. See you then!
This week, I have been thinking a lot about what we leave behind– not just in real life, but online. In class, we talked a lot about cyber-vigilantism, and digital footprint. At first, I didn’t think I had much to do with these topics personally. However, as we learned more throughout discussions, I realized that each of us carries an invisible trail– one we create every time click, post, and share.
What We Leave Behind
As we discussed in class discussions our digital footprints are more permanent than we think. Screenshots don’t just disappear, and comments made when we were younger and more naive stay lingering throughout the internet for years. It’s a strange thought that even after we’ve changed, grown, or learned better, something we said years ago might still define us in the eyes of others. I noticed photos I have had years ago I have deleted have been saved on my Google Photos. When I noticed this, I was honestly concerned not only the internet holding so many past information, but our Phones hold more than we want to believe to, in which the Government holds more than we want to believe.
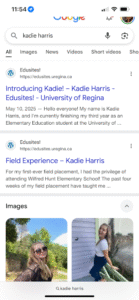
In one class discussion this week in breakout rooms we discussed what our personal digital footprint looks like. What show’s up when we google ourselves. I heard many stories from my peers of material on the internet that they didn’t even know existed or was up on the internet made from their friends they didn’t agree to. Luckily, I didn’t have this experience. When I googled myself material that came up was only my edusites. There was no images of me what so ever. My breakout room and I discussed that possibly since most of our digital apps, such as Instagram, Facebook, and Tiktok, nothing will show up because they are private accounts. On the other hand, people who have the same names as me were also showing up. Luckily for me they were all positive and save images. I am grateful for this image as I would not want future students to search me and see negative or inappropriate material.
Cyber-Shaming
Another topic we discussed this week was Cyber-vigilantism. I don’t think people realize this happens more than we think. Individuals all over the interest who try to take justice into their own hands–sharing personal information, attacking people online, or this generations “canceling” publicly. Sometimes, we see people who really do come from a place of justice. Back in the summer of 2021, a young woman named Gabby Petito went missing during a road trip with her fiance, Brain Laundrie. After she stopped posting online and communicating with her family, thousands of people on social media, particularly Tiktok, became very involved in trying to help find her and solve her case. Many became “cyber-vigilantes,” looking through her photos, videos, and online clues to find answers. Some even searched her travel route on Google Maps and shared theories. While the attention helped bring awareness and eventually led to finding her body, it also caused harm spreading false information and targeting innocent people.
We also see a side found very often on Tiktok too of individuals who made a video in the past and people on the internet finding it and causing harm to their entire life, including leaving them with nothing left, not even a job.
There’s a fine line between accountability and cyber-shaming. People should be held responsible for harmful things they do or say– but they should also have room to learn and change. One mistake shouldn’t erase someone’s humanity.
What it Means for Me
This reflection has made me think more carefully about what I post and why I post it. It’s easy to click “post” without thinking, without understanding what it can do to our future. As I further format my digital footprint, I want to ask myself now: Will this hurt someone? Will this follow me later? Am I helping or just joining a pile-on?
As I go further in my digital footprint I want to use some tools to help guide me on the correct path for my future. I encourage you to check these out for yourself and think to yourself how you could guide your future path:
- Google Yourself – Search your name and even where you are from. See what comes up. Is it who you want to be?
- Jumbo Privacy App – This app helped manage and clean up your digital footprint across different platforms
- Wayback Machine – This lets you see how digital content sicks around (even after it’s deleted).
Final Thoughts
We’re all growing up online. Especially children who are growing up currently. Mistakes are going to happen. But, we can be more intentional about how we move through digital spaces– more kind, more cautious, more thoughtful. Out digital footprints are powerful.
This week, my goal was to understand note values–learning how long each note is held when playing music. I also wanted to learn how to count them, and how to draw them correctly on a music staff.
Tools
- To help me learn and practice, I used a few different digital platforms
What I learned
On Music4Kids Youtube channel “Learn about Note Values in Music”. I was taught this basic information:
- What is a Note Value?
- A note value indicates the length of a note. Meaning how long you hold the notes for.
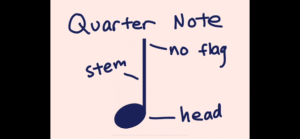
- Each note has three parts. The note head, the stem, and the flag. Each of these parts can tell you the note value.
- The first note I learned is the Quarter Note. The note head is filled in, and there is no flag at the top of the stem.
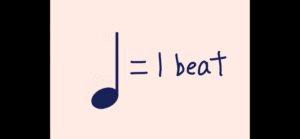
- The note value of a quarter note is 1 beat in a measure
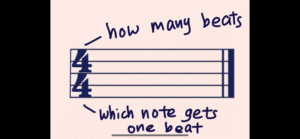
- A Measure is a short phrase in a music piece. The top number of a time signature is, in this case is 4, is how many beats are in a measure. The bottom number, in this case is also 4, tells you the type of note that gets one beat.
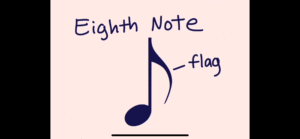
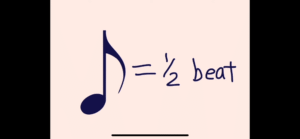
- The Eighth Note looks like a quarter note, however, it has one flag at the top of the stem. Each flag on a stem means it’s half the notes long.
- The note value of it is with the time signature is 1/2 a beat
- The note value of it is with the time signature is 1/2 a beat
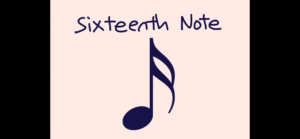
- The Sixteenth Note with two flags, would be half as long as the eighth note. This can keep going in notes, and the notes can become very short in value.
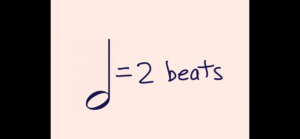
- The Half Note looks like a quarter note, but the note head has space in the middle.
- In the time signature of 4/4 the note value of a half note is 2 beats.

- In the time signature of 4/4 the note value of a half note is 2 beats.
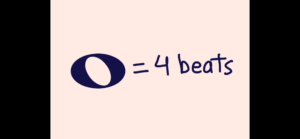
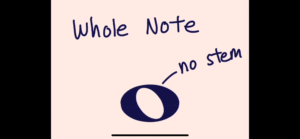
- The Whole Note looks similar to a half note, however, it has no stem.
- In a time signature of 4/4, the note value of a whole note is 4 beats. It takes up the entire measure.
- In a time signature of 4/4, the note value of a whole note is 4 beats. It takes up the entire measure.
I learned that these notes create the rhythm of the song, kind of like a heartbeat of music. Each type of note has a different shape, which helps you know how long to hold it.
To learn/practice writing these note values on a measure. I went onto Pinterest and sound a simple song I could practice drawing. In this case I practiced Mary Had a Little Lamb written by Gilbert DeBenedetti.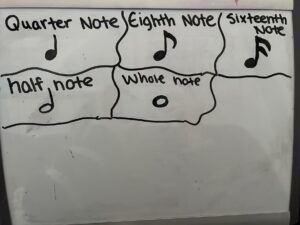
What helped me understand their shapes better was practicing this technique:
- Whole notes are just open ovals with no stem
- Half notes are open ovals with a stem
- Quarter notes are filled-in ovals with a stem
Reflection:
This week helped me better understand how rhythm works in music. I used to think all notes were just symbols, but now I know that each one tells me how long to play a sound. Using these free beginner friendly tools online made this easier to learn at my own pace. I still need more practice counting out loud and drawing from my memory, but I’m proud of how far I’ve come in a few weeks. If anyone is wanting to learn note values I suggest my tools provided above. I watched a couple other videos that were not making much sense, Music4Kids Youtube channel is an awesome channel that is great for all ages that helped me understand in a simple manner. Pinterest also has hundreds of easy sheet music to practice off. Not only for sheet music, but for almost anything you want to learn on the interest.
Next Week:
Next week, I want to explore time signatures and how they affect the way we count music. I also hope to try clapping rhythms along with a metronome to build my timing. I would love any suggestions of any platforms if you have benefited from any in your past learning journeys!
Thank you for following along!