Category: Learning Project (Page 1 of 2)
The semester is coming to a close, and it is time to wrap up my learning project with a bow on top because spring and summer are just around the corner! My learning project, which I decided to explore, was cooking, and throughout this semester at university has been an educational and personal growth experience. I have had the opportunity to develop skills and recognize where I need to work on things. Beyond my prior skills, I have gained some more confidence in the kitchen, and allowing myself to present those skills online has helped me learn to let go of my fears a little more. I have learned how to find resourceful websites, videos, and appreciate “old school ways” to assist me in my learning journey, and my video editing skills have climbed sharply from not even knowing how to post a video on YouTube, to being able to use different platforms, and placing them within my posts.
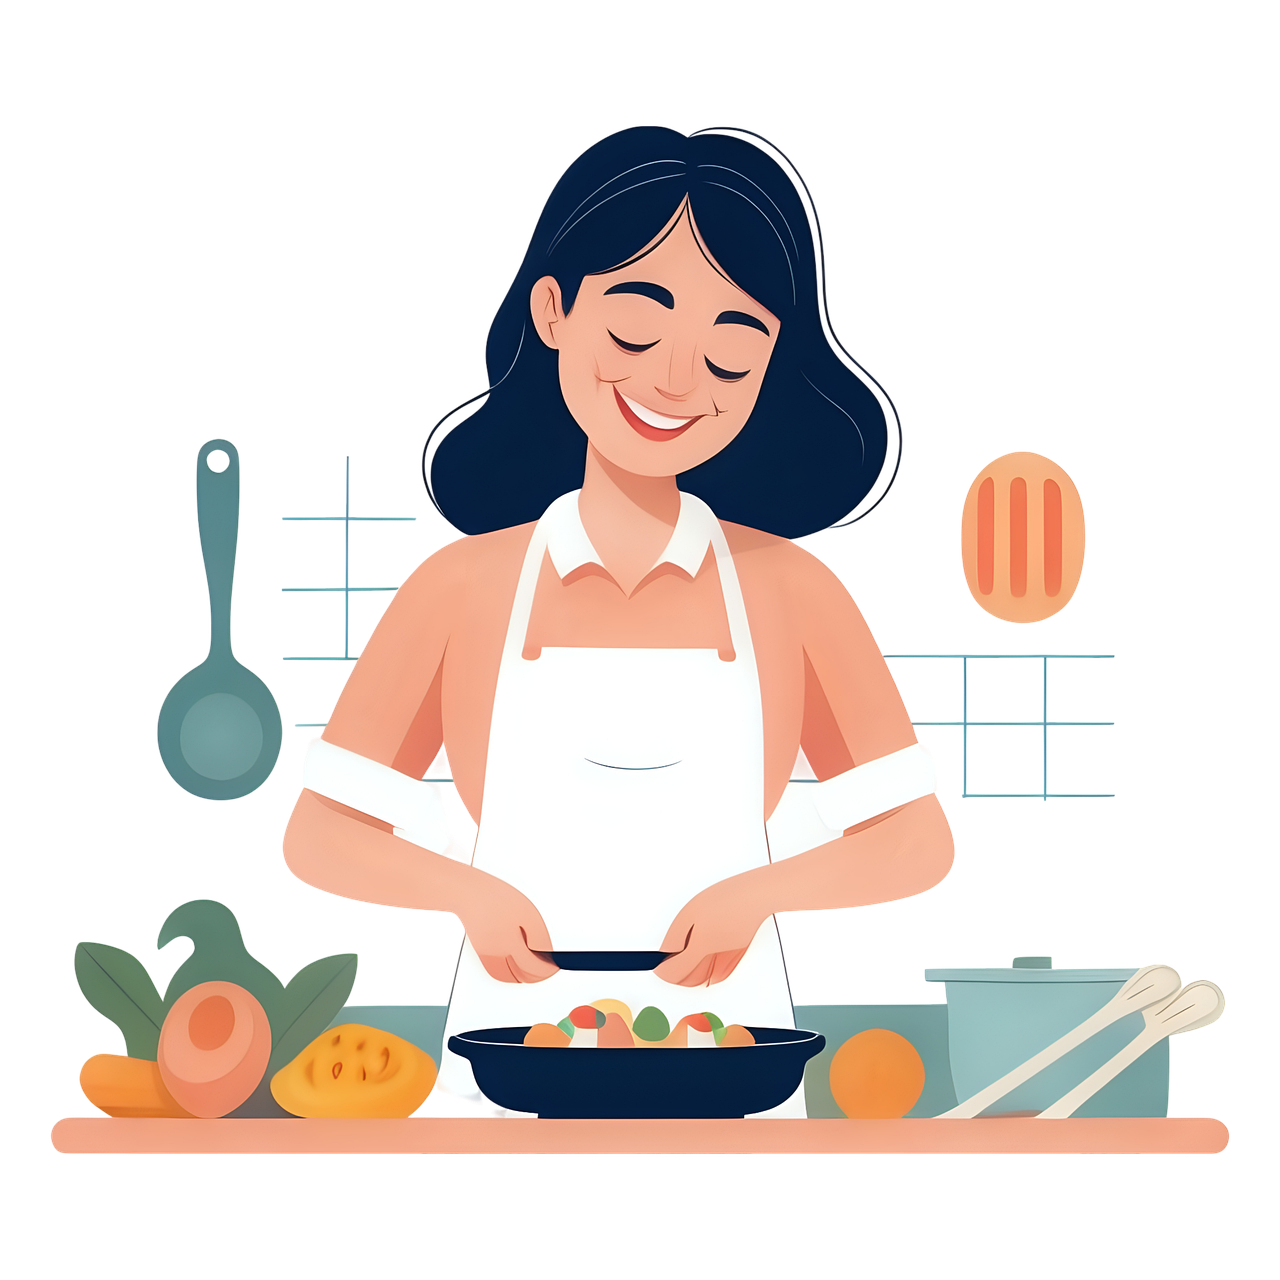
Photo by Mohamed_hassan on Pixabay
Learning Project Week 1 – Getting Started
Week 1, I wasn’t sure what to expect, being new to the blogging world and not knowing how to present myself, and not being completely confident in my skills I had already obtained. I used this week to get used to the blog posting, and learn how to use my own pictures and videos of my learning.
- I posted a video of ways to hide veggies in foods. I had big aspirations on how I wanted to better my palette along with my daughters, as she is a picky eater.
- This week I tried to understand what was expected of me for this project and try not to completely overthink it.
Learning Project Week 2 – Pot Roast and Potatoes
Week 2 was my first week of cooking an actual meal and discussing my process throughout the entire thing.
- Forgot to take pictures of my meal.
- I discussed in this week the stress I had with cooking, and how I do not like to fail when I do it.
- I tried to incorporate the “hidden veggies” for my daughter this week in the scallop potatoes I had made.
Learning Week 3 –French Toast Casserole
In week 3, I decided to do my first YouTube video post about my learning project that week. I decided to make a French toast casserole and share my experience with it.
- I was so incredibly nervous to see myself in a video I posted on YouTube.
- I used a French Toast Casserole recipe I had found on the internet as I wanted to venture into the breakfast prep world, for more options in the morning.
- I did discuss that it had more sugar than I wanted to admit (which becomes ironic almost further down my journey of this project)
- Admitted that I am very technologically behind.
Learning Project Week 4 – Loaded Gnocchi Soup
This week of my project, I wanted to try a soup, as I am a big soup lover. So, what better time to try and learn? I did have my first “whoopsie” this week, and crazy enough, it was a terrible mistake.
- I had made my first TikTok video, which is not as easy as people make it sound.
- I had accidentally bought skillet gnocchi instead of boil gnocchi. It did not wreck my soup, even though it gave me some anxiety. I lived to tell the tale.
- I realized that the recipe made a very large amount of food, and I could possibly modify it to make less, or less waste.
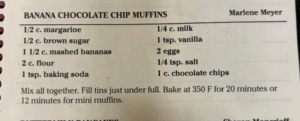
Learning Project Week 5 – Banana Chocolate Chip Muffins
In Week 5, I decided to try a recipe out of a family recipe book with my daughter. I had made a little YouTube video of her helping me, and I appreciate having a physical family recipe book to refer to.
- Discussed my appreciation for a physical recipe book
- I love to spend time teaching my daughter this skill I am also continuing to learn about.
- I discuss my sensory issues I have with certain foods, and my struggle to overcome that by problem-solving, and allowing my daughter to help out with measuring.
- During this week, I had to learn how to let go of my OCD and allow for a mess to take place, and that it is not a big deal to clean up a mess.
Learning Project Week 6 – Being Sick, and Food Restrictions
Week 6 was a huge challenge, as I was only living off of soup and hope this week. I had fallen ill and did not have a lot of energy or an appetite.
- I was diagnosed with insulin resistance this week as well, which required me to now have to look at my diet and make some changes.
- I had to begin my research into what I was restricted to eating.
- I voiced that I was feeling a little overwhelmed as I had been ill and then getting a diagnosis that would affect my lifestyle.
Learning Project Week 7 – Lifestyle Changes
During week 7, I discussed my research into insulin resistance. I had explained what insulin resistance was and the expectations given to me.
- I discussed my signs and symptoms I was having before my medical findings.
- I had discussed my goals I was setting for myself to ensure I was doing the best I could with the information I had.
- I mention this week, giving myself some grace and not allowing my thoughts and anxiety about my changes to get the best of me.
Learning Project Week 8 – Taco Rice Stuffed Peppers
Week 8’s learning project was my week. I was trying to incorporate some of my restrictions while also enjoying a flavourful filling meal.
- Mentioned that I had ordered a recipe book from Amazon to help with my insulin
- I realized I did not discuss much learning this week, just my process in making the peppers.
- I relished in the enjoyment I had with this week’s project outcome. I learned that it was not as intimidating as I anticipated it to be.
Learning Project Week 9 – Layering a Lasagna
Week 9 was focused on learning different proper techniques in cooking, and what better way to learn than making a lasagna. I discuss my process in wanting to ensure I layer it properly.
- I had discussed my desire to know how to properly layer a lasagna, which seems silly, maybe, but I always wondered if noodles or sauce go first.
- Incorporated some “hidden veggies” with spinach, and reflected that it was a goal I had for myself in the beginning.
Learning Project Week 10 – Way Too Much Garlic Butter Chicken Orzo
I challenged myself this week to try something I have never cooked before, orzo pasta. This week was a little intimidating because I, of course, was overthinking the process, and I had never heard of orzo pasta before, and did not want it to be a possible waste of food. But I tried it.
- I started my process by ensuring I had all the ingredients to make this dish.
- Measured out the garlic with my heart, and measured way too much. But still edible.
- Learned that butter sticks have helpful measurements on the wrappers
- Found a conversion chart to help ensure I have the right amount of liquids.
My Biggest Lessons from my Project;
- Even though I have known how to cook for many years, there is always something new to learn, and do not be afraid to fail, as that is where we learn the best. Venture out with different recipes and look for things on platforms such as TikTok, YouTube, blogs, etc.
- Being online presents is not as scary as it seems. It is something to get use to if you don’t do it often, and allow yourself to get used to the language and different communities out there. Learning new platforms may be intimidating, but if you have any questions or concerns, just be sure to ask.
- Do not be scared to fail, my learning project has taught me that things get messy, your recipes do not always work out, being an avid YouTuber is not for everyone, TikTok’s are not as easy as they seem to make, etc. I found myself reflecting many times within my posts about what I was taking away that week, something new I was learning, or reflecting on things I needed to work on.
- Finally, be sure to have fun. I found myself often having to remind myself that it is not that “deep.” I would think I had to make big elaborate meals, to the point that I would get discouraged sometimes. I would criticize myself so often that I forgot to have fun just learning new and simple things about cooking. When I failed, I would panic, but take a step back and realize that it wasn’t as big of a deal as I was making it. I am a perfectionist in many cases, and I tried my hardest to ensure that I placed that trait aside and just live in the moment with it.
My learning experience in EDTC300 was one I will take with me for a lifetime. I have learned to step back when needed, to understand I need to challenge myself with learning new things online as much as I can, along with many other things. We learned many different things throughout this class, and I now have many tools and skills I can only build on from here.
Thank you to my fellow classmates and Katia for such a fun and great semester! Good luck to everyone on their education journeys!
For this week’s learning project. I wanted to venture out and try cooking a meat I have not had experience with before. After searching the web for a bit, I came across a meal of garlic butter chicken orzo. I had taken a look at the ingredients, which called for chicken thighs, and I had most of the ingredients at home already, just needed orzo and thighs. So off to the store I went. I purchased my ingredients needed and went back home to prep.
Once home, I gathered all the ingredients I needed, and reading the instructions, I realized that I had no idea what 32 ounces of liquid is equal to. So, back to the web, I searched and found a conversion chart. It was super easy to use and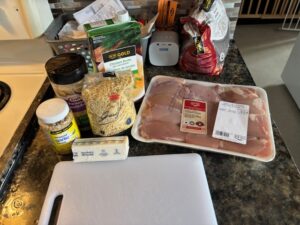 helped me know that it is 4 cups of liquid are needed. I began by prepping my chicken. I refuse to eat fat on meat, and I cut the chicken fat off and made sure it was ready to be lightly seasoned with salt and pepper.
Once the chicken was done, I was moving on to prepping it to fry in the skillet. The recipe wanted 3 tbsps. of butter melted and conveniently on the butter it showed the measurements for 1 tbsp. So that was super helpful. I let that melt in the pan, and I pat dried my chicken and then seasoned it with salt and pepper. At this point in the recipe I started to get anxious, as I did not know how to know when the thighs are done. But I powered through my doubts and kept on moving. 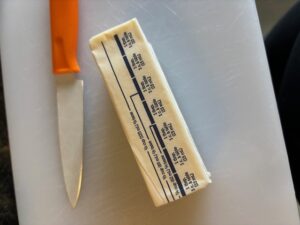
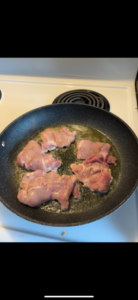
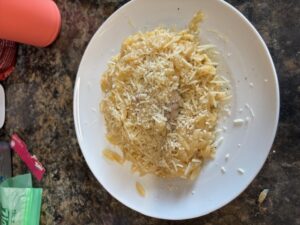
Next I placed the seasoned bird pieces in the skillet and let them cook while I had cleaned up some of the mess, I let them cook roughly 5 minutes of each side. I then had to remove the pieces and moved them onto a plate. The next step called for putting the orzo into the pan with the chicken grease and butter reminisce, until golden brown, and add the garlic in. In this step I definitely measured with my heart at what I thought would be 4 cloves of garlic, and let me tell you it was way too much. It was edible, but the garlic smell lingers off those who eat this dish for a bit. It was a little odd to me that I had to place the pasta in a skillet without liquid at first. But after reading a little more, it is so the orzo can adopt the flavors from the chicken and butter. I had let this cook for a bit and the smell was so yummy, I couldn’t wait to eat it. The aroma of garlic and butter cooking together definitely gets the salvation glands working.
I mixed in the final ingredients, the chicken stock and placed the chicken back in the skillet and turned my heat down. While cooking I had cleaned up and prep for the leftovers I would have, as this recipe made quite a bit. My final result was very delicious, but I have to admit that I did do too much garlic, and it made it hard to go back for seconds. But the parmesan cheese was a delicious touch, and it helped die down some of the garlic.
My Takeaways
Some take aways I have from this experience is;
- Chicken breasts are not the only chicken I can cook
- There is such thing as too much garlic
- Meals even though sound complicated, most times are not
- Cleaning up while cooking, helps not feel so overwhelming and discouraging
I’m a little behind in my learning project posts, so apologies. This week, I decided to make a lasagna because I was craving some pasta, as I was entirely restricted from eating it for the past little while. At the beginning of this process, I will have to admit I was wondering how to properly layer a lasagna. I have made this dish before, but I have always wondered, do the noodles go first, or the sauce? I mean, I am sure it all tastes the same in the end, but I literally searched on YouTube “how to layer lasagna.” So, after getting the confirmation, I needed to know on how to prepare this dish correctly. I then gathered my ingredients.
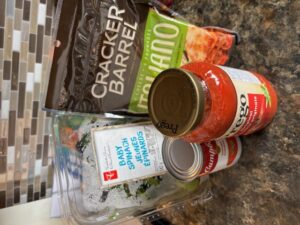 What I did not include in this is the ground beef cooking on the stove. But I got the Prego brand of sauce, seeing that they do not make the brand I usually use anymore, so this was new. I honestly do not mind it, but I find that many sauces taste so different. Nonetheless, this one was okay. I cooked the ground beef and added the sauce in, let that simmer and then I got my lasagna noodles ready to be cooked. I cooked those to “al dente” and then I looked up my trusty layering video one more time just to make sure I was going to do it correctly. I layered my lasagna with meat sauce first, some cheese, and spinach and then noodles, and repeated the steps three more times, until my sauce had ran out!
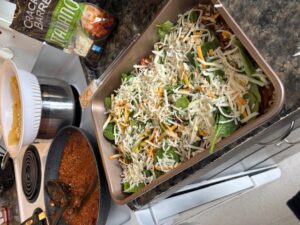
I also was unsure how the spinach was going to go over, as I have not used it in my lasagna before, but hey we are all about trying new things right? Anyhow I let that cook in the oven for about an hour at 250 degrees. Once it was all done the cheese was stretchy and very delicious. I wanted to try the Italiano cheese due to my grandma using it before and it has a different flavor, rather than just old plain cheddar. I would love to experiment a little more with lasagna, and maybe add some ricotta cheese, or cottage cheese, but we will just do baby steps for right now.
Big Finale!

The final product was nothing short of delicious, even with spinach. Which in all honesty did not have a ton of taste, but added the iron we needed. I had more than half of the dish be leftovers, but this dish is very good even the day after!
So this week I have decided to delve into the food I am going to venture around with. I ordered a cookbook from Amazon, but unfortunately, I have not received it So I improvised and decided to try taco rice, put some pizazz on it, and stuff it into some red and yellow peppers. I love anything stuffed into peppers, so I was excited to see how they would turn out!
To start I got all my ingredients out. 1 pound of ground beef (was going to use ground turkey, but our store did not have any left) beef broth, onion, garlic, taco seasoning, salsa, taco sauce, peppers, cheddar cheese, etc. I began by cooking the ground beef in a large skillet, and following that, I put in the garlic and onion, and let that cook
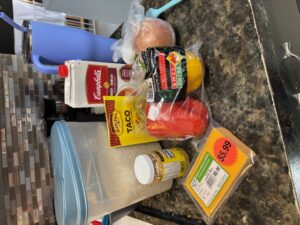
with the beef. I then added the broth and taco seasoning, mixing it all. I let that all simmer together for about 3-4 minutes. My next step was to add the long grain rice, and once I mixed that in along with 1/2 cup of salsa and taco sauce I measured with my heart. I covered it and allowed it to simmer while I moved on to my next step.
My next step was to prep the peppers to be stuffed. I washed them and cut them in half, placing them on a baking sheet lined with tinfoil. While I had some time to spare, I grated a cup of cheddar cheese which will be sprinkled on top once the peppers were ready to be placed in the oven. I preheated the oven to 350 degree’s and cleaned up some of the dishes in the meantime, so I was not so overwhelmed at the end. The taco rice concoction was ready to be stuffed into the peppers. So I stuffed the peppers and sprinkled the cheese on top. 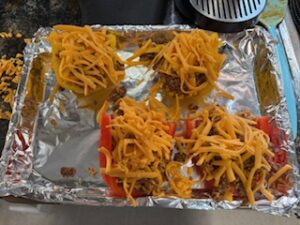
The cheese looked a little overwhelming at first as I though maybe I had added too much, but I decided I couldn’t go back so we were going to roll with it.
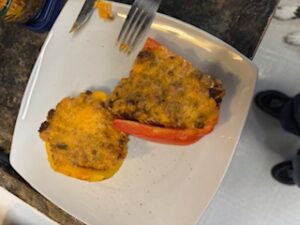
The Final Product!
The final product was absolutely delicious. The cheese was not too overwhelming. It was just right once it melted. I will willingly admit I ate 3/4 peppers I had made, and my daughter ate only the taco rice mix out of the 4th, as she does not like cooked veggies, which I am aware of, I just wanted to introduce it and see how she felt. She did try it a little but did not like it, which I was not surprised to hear. I will most definitely make this meal again, and I have plenty leftover, which I can eat with some corn chips, or just on its own heated up. It did not take much time to prep, and the clean up was not too terrible, even though I will always hate that part no matter what! Ha!
So, as I mentioned before in my last post, I recently found out I am insulin-resistant. So this past week I have dived into learning more about this diagnosis and making some notes on how I can incorporate a lifestyle change to help better myself.
What Is Insulin Resistance?
Insulin resistance is a complex condition in which your body doesn’t respond as it should to insulin. Insulin is a hormone your pancreas makes that’s essential for regulating blood sugar levels. Several genetic and lifestyle factors can contribute to insulin resistance.
I have learned quite a bit this week, concerning insulin resistance. I did not know that it could be classified as pre-diabetic, my knowledge around insulin resistance mainly came from TikTok and as we all know that social platform is not a good tool to get viable information. I also was alarmed at the percentage of people that actually live with this condition. I was reading this article about this condition, and it mentions that on average 40% of people in North America live with it, and many do not know.
My Signs and Symptoms,
Some signs and symptoms I had researched and found out about insulin resistance, is that some people can develop skin tags, which is in turn makes a lot of sense in my case as about 4 months ago I needed to get 3 skin tags removed around my neck, and I had just assumed they had developed from pregnancy, as that can happen. I also had symptoms like weight changes, I felt like I was gaining weight and I was not able to keep it off, no matter how much I tried. I also just chalked that up to getting older, and having hormonal issues. Increased hunger was also a factor I was struggling with, I felt like my appetite was insatiable. Looking back I had ignored these signs for a long time, and honestly it was not until I had an appointment with a naturopath doctor, and him putting things into perspective for me, and explaining the prognosis to me in language I could understand. I felt a little better being taught what it was instead of having prescriptions and tests done with no results from my clinic visits.
I will have to admit that I have some health anxiety around health conditions, as we know the web can be a scary place, and when researching things like this can send us down a rabbit hole. I luckily talked things through with my doctor and they had given me a realistic timeline of expectations and goals to work towards in order to better my lifestyle.
Goals!
Some goals my doctor and myself have set to help ease into this lifestyle change without being completely overwhelmed, is trying to limit the amount of carbs, refined sugars, and making sure I can fit in physically activity when I can. He stressed to my that I need to ensure I am making these goals reasonable and to not overwhelm myself with thinking I have to restructure my entire life.
Some things I have slowly incorporated;
- Taking my dog for a walk around the block every evening (even if it is cold, bundle up)

- When having carbs, seeing if I could possibly substitute other things such as vegetables or proteins into my meal (not always possible)
- Do not eat in the evening (as i was informed it will help my body not have to work in overtime breaking down sugars while I sleep)
- Trying to reach a goal of having 60 g of protein a day (surprisingly harder than I anticipated)
- Be mindful of my portions (eating off of a child’s plate, to help fool my eyes)
I am starting with these things and allowing myself to have some grace, as change is never an easy thing but it is crucial now so I do not have issues in the future. So moving forward, I will be sharing the journey of changing my habits, and how things are going. I am taking you all along this ride with me, so buckle up!
This week unfortunately has not been my week. I have been living on Lipton’s chicken noodle soup and crackers. Sickness has taken over, and on top of that, I have also found out I am insulin-resistant. Little backstory, I have been struggling with some blood sugar issues, which have led to surprising hormonal issues as well, and after clinic visit after clinic visit with no answers and great frustration on both ends both doctors and me. I reached out to a naturopath doctor, and we had a lengthy discussion of the concerns I was having. We opted for a blood test and another test (which is escaping my brain at the moment) which came back and proved I am insulin-resistant.
Food Restrictions
We had discussed the need to limit certain foods, now I need to steer myself into some research about insulin resistance and the food I will need to stray away from. My doctor suggested that I need to up my protein intake and lower my carb intake, he mentioned he does not want me to completely get onto a keto diet, which I am sure many of you know what that is. High fat, high protein diet with next to no carbs. He wants me to start slow and limit the amount of carbs I intake, so that will mean I need to delve into some knowledge I have not acquired thus far. In all honesty, it feels kind of overwhelming and I am not feeling any sort of way lately to do research. It is just trying to get better from this awful flu/cold thing going around.
I am hoping to research a little more about insulin resistance and diet this week, as I am needing to ensure I get back on track!
Sorry my post is less than exciting, hopefully this next week will be better
This week I wanted to take it back to the old-school ways and dive into a family recipe book I have had in my drawer since my great grandma passed away. I have been wanting to try out some baking this week and allow myself to just enjoy it and not have to rush through, I wanted to enjoy the process of having a physical recipe with me and refer to it, as opposed to having to keep going back and forth to my phone and unlocking it, and finding the recipe, or going back to my screenshots, etc. If anyone has ever used an online recipe, they can relate to the annoyance of having to go back and forth to your phone is.
Finding the recipe to use
I had dug out the family recipe book that my family created just before my great grandma had passed away. I had ventured through the book and I struggled to find what I wanted to make. There was so many things and I did not have enough time to obviously cook all of them, so I thought to myself to find a recipe my daughter could possibly help me with, as cooking is a life skill, and she loves to be helpful. I looked around the kitchen and I had the ingredients to do banana chocolate chip muffins, which are a staple in most homes, and a good lunch snack food my daughter throughout the week. I ended up finding my auntie Marlene’s recipe for banana chocolate chip muffins. It was not too complicated and Hudsyn could help me with all of the steps.
The process
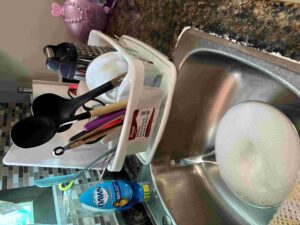
To start off the process, I gathered all the ingredients, and measuring utensils we needed and got the dish water ready for the dirty dishes. I will admit that I actually have a very odd sensory issue when it comes to flour. I am not able to touch it as I get goosebumps and it triggers my gag reflex – odd I know, explanation is unknown. Luckily this is where Hudsyn (my daughter) comes into save the day, as she does not have a sensory issue. I read the recipe out to her, and help her measure out the ingredients, she puts all the ingredients into the mixing bowl, and we take turns mixing as she complained her tiny arms were getting tired. We get to the process of putting the mixture into the liners and she wants to take that job on all by herself. Please note, this sends my OCD into a frenzy, because I struggle with mess, but I allowed her to give it a go. She did a very good job and took her time to ensure she did not make too much of a mess. Note, my daughter sings in almost every task she does, such as hockey, bathing, getting dressed, etc. She is a real songbird!
Enjoying the final product!
The final product was delicious, and honestly I enjoyed the journey. It was calming, and I reflected on the awesome experience it brought to my daughter and I. I realize during this weeks cooking challenge, that I need to incorporate Hudsyn into my learning journey as well, because she is a small sponge in life right now, and I want her to have a positive relationship with food, and learn to have these skills as she gets older, and more independent.
This cooking experience was inspired by a TikTok video. I came across a loaded gnocchi soup recipe. I watched the video, and I wanted to give it a shot. I have always wanted to try gnocchi, but I have never eaten or cooked it before, so this was my opportunity.
First I began to prep my ingredients. I cooked my bacon, diced my onion small, etc. and the came the step to add my gnocchi. After reading the package I had bought I realized that I bought the skillet gnocchi. Honestly I just hoped for the best because I did not want to take them back to the store and get another package.
The recipe called for a pound of gnocchi and I did not have the scale to weigh them out. So in this instance, I “measured with my heart.” I grew more and more anxious as I grew closer to the final result. Not in the aspect that I was not doing it correctly, just in the sense that I was not sure how this kind of food was going to taste, and it made me nervous, I did not want to waste a meal. Once it was time to add my “skillet” gnocchi, I allowed for that to simmer in the pot and I was able to clean up my ingredients and ensure I could get some dish water ready for clean up. The cleaning up aspect was not as bad as I anticipated. It took less than 5 minutes to do all the dishes.

Final Results!
I finished up my dishes and allowed for the soup to simmer. It was time to try it out. To my amazement, it was actually pretty good, even with using the skillet gnocchi.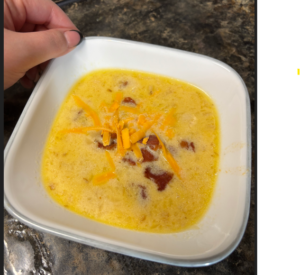 I added my bacon garnish and cheese to the bowl and ate it all.
Cons to the recipe
A couple things I wish could be different is the amount of soup this made. Being a single mom and having a picky child. I think this recipe had made way too much for our family, so I will be sharing my soup with my other family members to ensure it does not go to waste.
TikTok video
One platform I have never used before, is TikTok. Even though I send a ridiculous amount of time looking at TikTok’s and having the inspiration from that platform be that for this soup. I have never personally made one before. So, I chose to do a TikTok and I wanted it to be short and sweet.
Using TikTok I was humbled to know that it is not as easy as it looks. I had first off recorded an entire minute of nothing, and then while trying to edit, I struggled with trying to find the edit function to cut out the 49 seconds of black screen *insert facepalm emoji* I know that I am 29 and this should not be a foreign thing to me, meaning, making something as easy as a TikTok video but embarrassingly enough it very much is. I think that if I had a bit more practice with it, I would be able to get it, and it not be as intimidating. But I do not find TikTok an accurate site either. TikTok makes it very easy to get the impression things are so easy and fast, and let me bear the bad news. IT IS NOT.
now ladies and gentlemen, please enjoy my first official TikTok.
So, to start this post, this was incredibly easy to prep this breakfast idea. I struggle with breakfast ideas, and I am positive my daughter can only eat so much cereal before it gets boring. This recipe for the French toast casserole was incredibly easy. It took me less than 15 minutes to prep, and the clean-up was relatively easy, not many dishes were dirtied. I wanted to use a french toast casserole recipe that did not require a lot of ingredients. So the one I chose was an easy enough recipe that it wasn’t too intimidating.
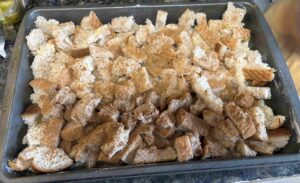
This recipe did require me to have it sit overnight for best results. This is the image of what it is supposed to look like before I cook it in the am. I will leave the mixture in the fridge overnight cook it in the morning and serve it for a breakfast option with some healthy fruit options, as this recipe requires more sugar than I would like to admit.
I have decided to use youtube as my tool to help describe my process throughout this cooking journey. I am going to admit that I did have to use a you tube video to show me how to upload a video from my phone. I am very technologically behind as I do not post video’s ever on the internet. Due to the fact, I do not find a lot of interest in it, and it seems time consuming, and time is one thing I do not have a lot to spare. The “how to” video gave me a step by step on the how to upload on both my computer and my mobile phone.
Stay tuned for the results, hopefully it is a hit!