From punctuation to cyberbullying and MySpace to Instagram digital citizenship has been here from the beginning. In school, there is much to remember when it comes to digital citizenship.
In a time when we use the internet for many different parts of the school, we need to be aware of our student’s digital access. When school was totally online many students needed to have school, computers brought to them because of their digital access. If this is not an option schools need to be aware of what needs to be available for students. Just because they have a computer doesn’t mean that they have wifi to use their computer.
Digital literacy is something that many students need to learn, and school can be a great place for them to begin their journey. When I was in school, I learned that lots of writing come with biases. If you were to get your information from a very conservative website, it will give a different view than a liberal website.
I had to learn digital communication in school along with many others. There are so many ways to miscommunicate in a text message. First off, a period will change the entire conversation.
If a conversation went
“Are you okay?”
“Yeah! I’m fine!”
Both people in the conversation seem very happy, however this conversation…
“Are you okay?”
“Yeah. I’m fine.”
The periods give the idea that the person answering the question is in fact not doing fine. There is so much that we need to learn when it comes to digital communication. I think that Jimmy Kimmel hits some key ideas in the video linked here. Texting requires lots of context as well as assumptions but the meaning behind the message can very easily be misconstrued.
I needed help this week. To be real with everyone, I didn’t want to work this week. As I walked back from class my friend told me she would come downstairs and do homework with me. This is all I needed because having someone with me helped, I was able to focus, and I actually got a lot of work done!
This week I decided to show my piano progress through a video on Final Cut Pro. If you want to give it a watch, that would be great!
Final Cut Pro has some very cool editing tools. It is important to note that the program that I am using requires you to buy it, however, my dad already has this application, so it was no cost to me. Also, Final Cut Pro is the more intense version of iMovie, for little editing projects iMovie works perfectly.
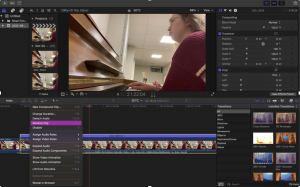
While using the program I found the “rename clip” very helpful. With this tool, it was easier for me to organize my clips with the different songs I played. This week I played
“You Belong With Me” and “Love Story” by Taylor Swift,
“Hey There Delilah” by The Plain White Tees,
“Sweet Caroline” by Neil Diamond,
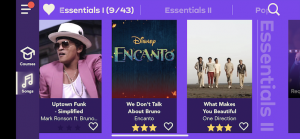
“What Makes You Beautiful” by One Direction, and
“Mama Mia” and “Dancing Queen” by ABBA.
Needless to say, there were a lot of clips that needed to be labeled and organized so this tool was helpful.
The highlighted section says “Rename Clip”
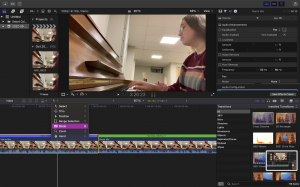
Another tool that saved me was the blade tool. This tool helped me cut a clip at any point. I played for about 2 hours on the piano so there were times that I had to cut parts of the video. Sometimes I needed to cut the clip because I messed up my song and I went back and improved.
The highlighted portion says “Blade”
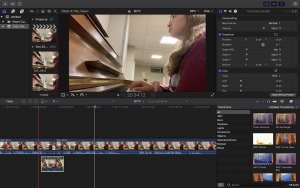
So, when making my video I chose the clips that best exemplified where I am at in my piano process. The piano I play on is in the basement of my residence and it is a place where many people like to hang out, this caused a few problems when I was recording. The image below shows a clip that is labeled “TOO MUCH SOUND”. I had to cut this clip out because there were people playing pool in the room beside me, so the blade tool made it easy to cut out the times that they were really loud.
The clip on the bottom is labeled “TOO MUCH SOUND”
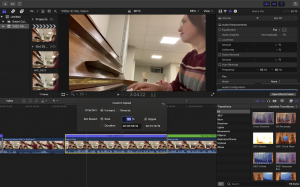
The final tool I used in this program was to increase the speed of my piano playing. I was learning this week on YouTube how to play different songs. The video ex. linked here was of the song in the regular tempo, but this was a bit too fast for me. My solution was to play the YouTube clip at .5 or .75 times the speed. This was very helpful but because I was playing slower the song is not as easily recognizable. The first minute or so of my video is of me playing the song at .75 times the speed but when you hear it, it sounds very slow. Final Cut Pro allows me to increase or decrease the speed of my clips.
The highlighted portion is the video being sped up to 125% times the speed of the original clip
The image above is of me setting the speed of the clip to 125% times the speed. This counteracts what I am playing at .75, and ends up with the song sounding similar to the tempo it is meant to be played.
Different video editing softwares would be a great tool in the classroom. Students can use this to make a presentation rather than using presentation tools such as PowerPoints. Students who do not like speaking in front of the class would be able to use this to do a presentation without having to stand in front of the class.
Overall, I would recommend video editing softwares as a classroom resource. However, for students who are using this to make videos for class, I think iMovie would be a better tool to use because it is simpler as well as cheaper!
Tune in next week, I don’t know what I’m going to be doing but I know that it will be a blast! Thanks for reading, you’re a gem! ?
This week I decided to do a bit of theory. As I began moving towards harder songs, the notes I needed to play were WAY too low and WAY too high on the staff. Even when I tried to count upwards using the handy dandy mnemonic. Every Good Boy Deserves Fudge (E, G, B, D, F) I couldn’t seem to get the song to sound right. I got really frustrated with myself I thought to myself “What the heck Meghan! You’ve been reading the notes that are on the staff with no problem, why is this so different?” Then it hit me! Cue the flashback memory music…
When I was in high school I played the trumpet. I liked to think that I was really good but I don’t think this was necessarily the case. I was a second trumpet, for those of you who are unaware in my school we had a band with first trumpets, second trumpets, and third trumpets. The first trumpet players most commonly played the more difficult higher notes, and the second trumpet players played music that was less difficult than the first trumpet players, so their goal is to help the first trumpets. The third trumpet’s music was less difficult than the second trumpet player’s. For more information on trumpet, sections click here.
Other than the subtle brag that I was an average trumpet player I realized that I never really had to learn the notes very high above the staff or far below the staff. This was my chance!
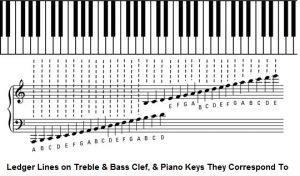
My first step was to understand why my fingers wouldn’t work when I was counting up the scale. Then I came across this photo
Image retrieved from https://socratic.org/questions/how-do-you-read-the-music-notes-above-below-the-staff-in-piano-sheet-music
I thought that the scale was based on the staff. I figured that E, G, B, D, F, and F, A, C, E, was
the pattern that all the notes would go in, this is not the case. After the last note on the 5 lined staff (an F), I assumed that we would then go up again starting with E then G, B, D F. But in reality the notes go on from F to G then to A, B, C, D before they get back to E. After learning this it was time to get started on learning a new memorization tool. I saw a memorization tool online that went Good Boys Deserve Fudge Always, I think that this saying would work in some situations but because I already learned a similar saying for the treble clef I decided to come up with my own saying! For the bass clef, I came up with the saying Gary Buys Divorce Frosting After. I think this saying will stick in my head much easier.
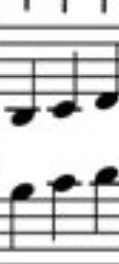
Also not to mention, I didn’t realize that the bass clef was just an extension of the treble clef. This is a zoomed-in version of the image above. This is something that messes me up! The B on the bass clef is the same as the B on the treble clef however, they are totally in totally different places on the staff.
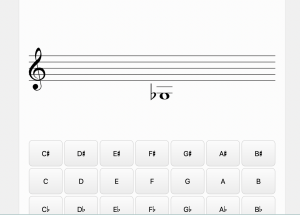
I used a great website called MusicTheory.net after I figured out how the music staff worked. Linked here is the website. The website had a section called note identification, this section gave
This is a G flat
you a note on the staff and asked you to label the note’s letter. This section was very helpful, and even though I am going to have to practice more, I am feeling confident with my progress thus far.
So that was my week! Lots of thinking to finally figure out music theory (a little late but better than never).
We watched many videos in my school that were used to scare us!
I also was shown the video about Sarah a girl who had unwanted images released. Everyone in her community then asked her creepy questions about when she was going to post more pictures or the colour of her underwear. This video was shown multiple times in school to deter students from taking or sending revealing images to others. If you want to take a look at the video, it is imbeded below.
The next video is of a girl who posted a photo of herself on a bulletin board. When the photo is taken by one student another one pops up in its place. Before long the entire school has this photo. When the girl decides that putting the photo on the bulletin board was a BAD idea, she takes down the image but another one pops up in its place. Then we see the terror in the girl’s eyes because she can never take the image off the bulletin board. This video definitely deterred me from taking and sending revealing photos of myself.
We also watched a video in middle school that unfortunately, I cannot find. The premise of the video was to show that in the 1980s if you took a revealing photo it would take 1 min for the image to develop whereas if you were to take it in 2014 the image could get around the world in the same 60 seconds. This video was meant to show us how quickly one decision can change your life however, again, I do not think that in one minute of posting a photo it would necessarily get to other countries.
The goal of the 3 videos was to scare us, and it worked for me! I think that many students were not affected because of the probability of this happening. In the video with Sarah, there were multiple old men asking her very uncomfortable questions, which is something that is unlikely to happen given that the adults (including a coach at her school) would be admitting to looking at child pornography.
Overall I wish that we watched videos that were meant to inform us rather than scare us. Why would posting a revealing photo be a bad idea? Who can see the photos you post? What are some solutions if you are feeling pressured into sending photos to others? If you do send photos what are ways to keep yourself safe? I think the last question is very important because although everyone in my class watched the same videos there were still students that sent revealing images of themselves to their peers. If we teach older students how to keep themselves safe this may be a better tactic than just telling them that they are not safe.
A few things happened this week, so where is what you missed…
I started playing the piano with 2 hands!!!!!!!!!!!!!!!!!!! (I don’t know if that is enough exclamation points to show how excited I am).
I started playing two notes at the same.
I was able to sightread “We Don’t Talk About Bruno” from Encanto
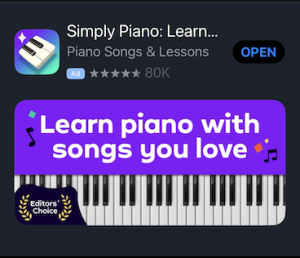
Sadly, I unsubscribed from the app Simply Piano
But all of this will be covered shortly.
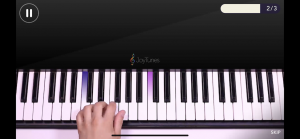
First off, I wanted to give everyone a visual representation of how my playing went this week.
I swear this is what I looked like
But in all reality, this is what I actually looked like
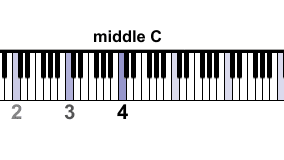
Back to what you missed! Yes, you read that right! I played with 2 hands this week! I used the Simply Piano app again this week. The image below is from a video on this app. The pink highlighted note is the “middle C” and the blue highlighted note is also a C but it is one octave lower than the middle C. These videos and similar videos are provided by the Simply Piano app, you are able to pause and restart the videos when you need time to figure out your finger placement.
Your pinky finger is labeled number 5, that finger plays the C an octave lower than middle C
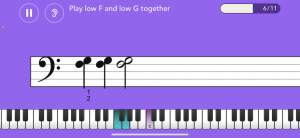
Something I learned this week was that there are times when you might play two notes at the same time with the same hand. The first image below shows what the note looks like to play a low F and low G together. It kind of looks like a flower, that’s how I remember it, anyone else has an idea of what it looks like? Also, when you look under the first note you can see a 1 and a 2, this is probably the most helpful tool of the week. The 1 and 2 tell you what fingers to play the notes with, in this case, you will play with your thumb and index finger. This is so helpful when the notes are coming quickly, and it takes a minute for your eyes to adjust to the notes you are meant to play.
These notes will be played with your left hand.
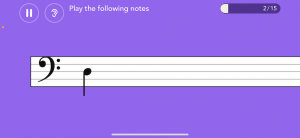
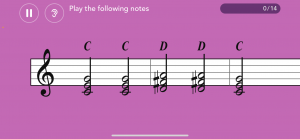
Although last week I was playing with chords and more pop songs, I decided it was time to go back to the basics. I practiced my scales and my notes. The app has fun little games that you can play throughout the learning process. One of my favorite games was when I played flash cards with notes. The app would give me a random note like the one below and I had to play the note on the piano.
This is one of the flashcard notes, the note on the screen is a D.
As I said above, I was able to sight-read the song “We Don’t Talk About Bruno” and after about 10 minutes I got 3/3 stars! The app is really encouraging to make me practice because I wanted 3/3 stars and on the first round, I only got 2 ½ stars out of three so I decided I better keep trying until I got better.
THREE STARS!!!!!
I know last week I recommended this app, and I still do, as long as you have an extra $150 a year to spare. As a university student, I am not ready to spend that much on an app! However, if this were used in a music class where multiple students were able to work using the same account, the price wouldn’t seem as high!
Also, I am on the hunt for other piano teaching tools, if anyone can fill me in on other resources I would greatly appreciate it!
Before I took this class, twitter was the furthest thing from my mind. Some first thoughts that came to mind when I heard Twitter were politics and reading. As someone who only went on Instagram, I was expecting twitter to be so much reading. Suffice it to say, I was wrong. I have learned that unlike other social media platforms Twitter has a character limit. I have been enjoying posting on Twitter for the last month!
Twitter has been helpful in my classes thus far so I am confident that it will help me in my future classroom. One activity I saw on Twitter was about the game spoons. The article suggested that students can make fraction cards and find equivalent fractions regarding their cards. The students will pick up the cards and pass them on if the card doesn’t match what they are trying to collect. I was able to use this idea in my EMTH class. If you want to check out the Twitter post I’m speaking of it is linked here
So far, my favorite part of Twitter, aside from all the interesting articles I’m finding is the #hashtags. Every time I post get excited because I get to think of fun hashtags to use! My favorites thus far have been #takecareofyourself #learnthroughmistakes #practicemakesbetter. My friends even call me the hashtag queen because I have started to use hashtags in my daily life. When I am ready to get lunch I will text my friends #lunch or when I finish an assignment I’ve been working really hard on I will say #finallydone. I get a kick out of thinking about different hashtags to use!
My friends call me the #hashtagqueen because of all the hashtags I use!
Twitter will also be helpful to create relationships with other teachers and even reach out for advice from other teachers. I wouldn’t be posting on Twitter using the students’ names or posting about their home issues; however, I could post questions similar to “my class is learning fractions, any good ideas for lessons” this way the lessons and ideas can come from other experienced teachers.
This week I got a great app called Simply Piano! The app for the iPhone is able to listen to you playing the piano through the phone. If you wish to download this app click here
This is the app I’ve been using throughout the week!
One problem I did have with the app is that you need to pay to use it. My plan was to sign up for the subscription for the free two-week period and then cancel my subscription however the app is really helpful! I got to choose what I wanted to work on and then the app would help me with my goal. This week I learned some chords. First I learned the C major chord. This chord is played with your 1st finger (thumb) on C, your 3rd finger (middle finger) on the E, and your 5th finger (pinky finger) on G. When you play all these notes at the same time, it creates the C major chord. I started this chord playing on the middle C. The middle C is the 4th C key on the piano, it is found in the middle of the piano, to the left of the 2 black keys
After I finished a few rounds playing with this chord, the app decided I was ready to move on to the G major chord. To play this chord you start as if you were going to play a C major chord and then move your fingers from C and E to B and D while your pinky stays on G. Finally, I learned a D major chord, where you put your 1st finger (thumb) on the note D, your 2nd (index finger) on F sharp (the smaller black key one step to the right of F) and then your 3rd finger (middle finger) on A. When this is played all together it makes the D major chord. I felt fairly comfortable working with these chords, however when the app moved me on to the next level, which included switching chords it became a lot more difficult. Linked here is the website Piano Keyboard Guide, it gives more visual representations of the chords on the piano.
These are some of the chords I can play on the piano thanks to this app!
My hands started cramping up and the accuracy of the chords I was playing started to diminish. I think that one improvement of this app would be to lengthen the lessons so that I can learn how to play the chords and practice moving up slowly to more difficult exercises. Overall, I would definitely use this app again, and I probably will… at least for the next two weeks! Thanks for reading you’re a gem! ?
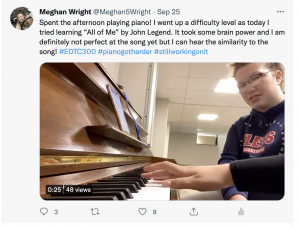
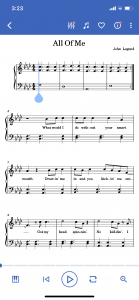
This week was frustrating! As I stated last week, I was playing songs such as Mary Had a Little Lamb and Twinkle Twinkle Little Star, but this week I think I became a little too ambitious. This week I played the song “All of Me” by John Legend. At first glance, I thought that this song would be more at my level because it was more difficult, but I felt that it was something I could play. Well, it was definitely more difficult! The song had four flats in it! I had to work my brain far harder than I did last week to remember the notes, the flats, and how to properly move my fingers. I have the video of me playing linked below, and honestly hearing it back is so rewarding because I can hear major progress in my playing!
I used time-lapse on my phone to document my learning. I have never used time-lapse before, but I am glad I did this week. A time-lapse option is included in the iPhone camera, and it takes a picture every few minutes. I think that this is a very helpful tool to use in the classroom to document the progress of something that is constantly changing. An example could include growing a plant in class. The plant wouldn’t look very different to the naked eye from day to day because the students will always be looking at it, but if there was a time-lapse of the plant the students could see the months of growth within a few moments. I think that because the students can see the process of the plant growing through the time-lapse this tool would be in the redefinition area. Because of the time-lapse, students can see the plant’s growth, flowers bloom, fruit appears, and leaves die. They can see the life cycle of the plant and they might not notice the significant change if not for the time-lapse.
When I made the time-lapse on my phone, I was able to see my progress. The only problem with the time-lapse is that I couldn’t hear my progress. This makes lots of sense because a time-lapse is just multiple images that make a video. When I finished practicing, I was very frustrated with myself, and I felt like I wasn’t getting anywhere but when I watched my time-lapse back, I saw that I put a whole lot of work in, and I was proud of myself! I don’t think I would use this tool again to document my progress in piano, mainly because it is important to be able to hear the piano. However, I think that the time lapse would be a lot of sense in situations that do not require sound.
The other internet tool I used today was an app called “MuseScore”. This app has piano sheet music, but it also plays the music with you. I also found the app helpful because it included the words with music. When I played the note, I would sing the corresponding lyric (not very well may I add). This helped me because I could hear if a note was off depending on where I was in the song. There were some issues with this app. First and foremost, the app has in-app purchases, and as seen in the video below they pop up at inopportune times. If you paid for the subscription, you wouldn’t have the apps.
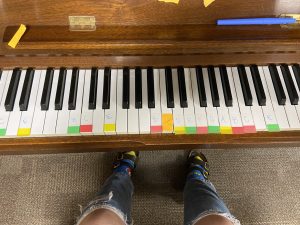
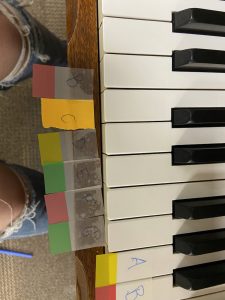
I played the piano this week! I grabbed some sticky notes, and I headed downstairs where we keep the pianos. When I sat down, I found a picture of all the 88 keys on the piano labeled with their corresponding letters.
After I wrote down all the notes, a friend of mine told me that I should learn how to do the C major scale. At first, I was very confused because I thought the scales were simply just moving up the keys A,B,C,D,E,F,G but then I found the video linked here, showing the fingers you are meant to use for each note. I ended up putting sticky notes on each of my fingers to remind me which one was meant to play with which note. The specific finger placement is something that I didn’t think about, however, it makes sense that when one if I play the notes with the proper fingers now it will be easier to play more difficult songs down the line. Although it took some time for my fingers to become comfortable moving in this way, once I got the hang of it, I was off to the races. Here are some images of my progress
My labeled piano keys!
The orange is different because that is “middle C”
I even chose to play a few songs, if you want to check out my first try at the piano video it is linked here.
Hi everyone! My name is Meghan Wright, I come from Estevan Saskatchewan, which is part of the unsurrendered land of Treaty 4. I am in my 3rd year of the Education program, and I am so excited for pre-internship to start! I think that it is important to mention in every introduction that I love reality tv, especially the Bachelor franchise, the sneak peek for the finale episode of the bachelorette is linked here. In case you don’t believe my pure commitment to this television masterpiece, The photo below is of my google doc where my sister and take notes on the episodes!
I think online classes have made me less scared of blogging. Whether it be a forum post or communicating over discord, covid helped us learn how to communicate in many different ways! However, I am extremely glad that lots of my classes are back in person. I am living in residence and I love the opportunity to spend time with my friends!
I have a few social media platforms, but this class will be my first time using Twitter. I am hesitant to create my blog on edusites because I do not know the platform and it’s tools, but I am excited to learn. If you would have asked me this summer, I would say I considered myself technologically literate, but I must say that these new sites have me feeling a bit overwhelmed.