Fifteen weeks ago, I began this journey with nothing more than flour, water, and doubt. I wasn’t sure if I could keep a sourdough starter alive—let alone bake something edible with it. But what started as a messy science experiment turned into a creative and surprisingly nourishing journey. Meet Dough-na-tella, my bubbly companion and teacher for this semester.
📽️ Before & After Assessment
Before: My first attempt at sourdough was… ambitious. I had no idea what hydration ratios were, my timing was off, and let’s say the “bread” was more brick than ball.
After: Fast forward to week 15: I’ve made rustic loaves, sandwich bread, inclusions bread, discard pizza dough, jalapeño cheddar loaves, and even taught myself to stretch and fold like a pro.
📝 Weekly Documentation
Throughout the weeks, I documented my journey through blog posts and videos, sharing everything from the chaos of an overflowing starter in my fridge to the joy of baking for others. Link to the blog hub: My Sourdough Journey with Dough-na-tella Highlights:
Sourdough Discard Pizza Glow-Up 🍕
Chocolate Chip Sourdough Drama 🍪
Baking on the Go at My Parents’ House 🏡
Sourdough Pancakes & Inclusion Loaves 🧀
🌐 Learning from Open Education
I leaned heavily on open educational resources (OERs) and social learning platforms to grow my skills. Some of my favorites include:
YouTube tutorials – especially Baker Bettie for visual shaping help
TikTok – where I documented my jalapeño cheddar loaf and learned tricks from creators
💬 Critique of Resources
Not all sources were created equal. Some blogs assumed too much background knowledge. Others lacked visuals, which made certain steps—like scoring or shaping—confusing. I found I needed to supplement with videos or look up multiple sources to fully grasp techniques. The most effective resources used plain language, visuals, and step-by-step timelines.
📱 Using Tech to Document Learning
This journey pushed me to learn new tools:
I made and edited TikTok videos (as a complete newbie!)
Created blog posts on Edusites
Used Canva and Powtoon for visual storytelling
Captured photos and videos weekly to reflect on progress
🎯 Takeaways
Learning is messy, but that’s where the magic is.
OERs make learning accessible—but curation matters.
You can teach others even as you’re learning.
Technology enhanced both my learning and storytelling.
Dough-na-tella is more than just a starter—she’s a symbol of growth.
This week, Dough-na-tella and I attempted something a little more indulgent—Sourdough Cinnamon Rolls! I followed the step-by-step recipe from The Clever Carrot.
While they looked pretty close to the photo at the end of the recipe (trust me on this one—I forgot to snap a picture!), the texture was a bit of a letdown. I was hoping for pillowy-soft, fluffy rolls, but mine turned out denser than I like. Maybe it was my proofing time or the temperature in my kitchen or it could have been that my wet ingredients were a little too hot when I added them into the starter like the recipe warns about(she stated that if it was too hot it would kill the starter bacteria)—either way, I probably wouldn’t make this exact recipe again as is.
Still, it was a fun learning experience, and now I know what to tweak if I ever give sourdough cinnamon rolls another go. Not every bake is a home run, but every bake is a step forward in the journey.
This week in my sourdough journey with my beloved starter, Dough-na-tella, I took a pretty big leap — and it actually turned out really well! I’ve been slowly learning the ropes, but this week I decided to challenge myself with a new recipe and scale things up in a big way.
It all started when I was approached by a coworker who knew I was on this journey and she requested if I would make her two loaves of bread if she paid me $20. So ofcourse I accepted the challenge but also warned her that the level of expertise I had in this journey was only beginning. She didn’t care one bit, and the deal was done! So… Off I went.
I followed the Homemade Sourdough Bread (Step-by-Step)recipe from AlexandraCooks.com — and instead of just sticking to a single batch, I went ahead and tripled it. (Go big or go home, right?)
From that one ambitious batch, I ended up making three different kinds of dough:
A regular sourdough loaf
A jalapeño cheddar loaf (spicy, cheesy, and so good)
And a cheddar loaf that I baked in a traditional loaf pan, just to try something new.
The first two loaves were actually made for a coworker who requested them — so not only was I baking for others, but I also had to figure out how to expand my starter to accommodate the extra baking. I learned pretty quickly that Dough-na-tella is very enthusiastic when she gets fed.
Maybe too enthusiastic…
Let’s just say, I went a little overboard. I ended up with way too much starter — so much that I ran out of containers to store it in. The fridge started looking like a bubbly science experiment, and eventually, the starter began overflowing. Lesson learned: Dough-na-tella is healthy, hungry, and does not like to be contained!
Even though it got a bit chaotic, all three loaves turned out beautifully — crusty on the outside, soft and tangy on the inside. It was incredibly satisfying to see the results of everything I’ve learned so far. One of the coolest discoveries this week was seeing just how alive my starter really is. Even after chilling in the fridge, she still grows big and bubbly as long as she’s been fed.
This week reminded me that sourdough is all about learning through doing — experimenting, adjusting, and sometimes making a bit of a mess. And honestly? I’m loving every second of it.
Next up: finding more recipes to use up all that starter… maybe pancakes or crackers? What kind of Discard recipes do you think I should try next?!
Until next time, happy baking from me and Dough-na-tella 🍞💛
Trying Something New- Creating My Learning Journey Video on TikTok
For this week’s learning journey, I decided to step out of my comfort zone and try something completely new — using TikTok to create my video reflection. I had never used TikTok before and didn’t even have an account until today, but I was pleasantly surprised by how intuitive and user-friendly it was. Honestly, I made my video in half the time it usually takes me!
The editing tools were super straightforward, and I appreciated how easy it was to trim clips, add text, and play around with the transitions. For someone brand new to the platform, the process felt surprisingly smooth. I can see why it’s such a popular app — it made content creation feel approachable and even a little fun.
Not only was TikTok an easy platform to post and download videos from, but I also dug into some researchers who have looked at the impacts of students using the platform to learn about other subjects such as Science. TikTok might seem like an unconventional classroom, but it has all the markings of a rich educational environment: shared content, collaborative learning, trial and error, and feedback from others walking a similar path. As I scroll through sourdough tips and post my own rising successes (and flat failures), I’m reminded of how powerful it is to learn in public—and how platforms like TikTok democratize knowledge sharing.
I recently came across a journal article that perfectly captures what I’ve been reflecting on. In TikTok: An Emergent Opportunity for Teaching and Learning Science Communication Online, Abigail G. B. Radin and Caitlin J. Light (2022) (click here for full article) explore how students used TikTok to creatively communicate science concepts. Through short-form videos, they engaged audiences, simplified complex ideas, and built real-world science communication skills (a lot like some of the teachers in this class are doing with their classrooms for their learning journey assignment). As someone learning the art of sourdough one 60-second clip at a time, their research resonated deeply.
Here’s how I made the video:
Plan the shots. I listed each key moment: mixing, stretching, adding fillings, shaping, scoring, baking, and the final crumb shot. I made sure each step would be clear and visually appealing.
Set up my filming station. I used my phone, and natural lighting from my kitchen window. I also cleared space around the counter for clean visuals.
Film in short clips. TikTok prefers bite-sized content, so I filmed 5–10 second clips for each major step. I shot top-down and side angles for variety.
Add transitions. Between each stage, I included fun transitions—like a hand swipe or cut on movement—to keep the video flowing.
Use a trending sound. I picked an upbeat audio track that matched the rhythm of the video. TikTok’s algorithm favours trending sounds, so I picked the song “Anxiety” by Doechii because it is trending really high right now.
Add text overlays. I only used text overlay for the final aspects of the video this time, normally I do a step-by-step process of the mixing, fermentation process, and baking but I found the clips too short for any normal human to read that fast so it would have been too overwhelming.
Edit + upload. I used TikTok’s built-in editor, added a cover image with “Little Spoon Farms Jalapeno Cheddar Sourdough Loaf!” in bold text, and posted with relevant hashtags like #sourdoughtok, #homemadebread, #cheddarloaf.
Engage with comments. After uploading, I replied to comments, answered questions, and even followed a few fellow sourdough makers!
The content of my video focused on my latest sourdough bake: a jalapeño cheddar loaf using the recipe from Little Spoon Farm. To find the recipe click here. This recipe quickly became one of my favourites! It was laid out step-by-step, complete with photos and a time schedule that helped me plan my day around the dough’s rising and baking stages. I appreciated how the recipe condensed the usual 3-day process into just 2 days — making it much more manageable.
Looking back on my learning journey so far, I’ve enjoyed exploring new skills and reflecting on the process in creative ways. It’s been both rewarding and humbling — from my first attempts at sourdough to experimenting with video creation, each step has taught me something new. I’ve gained more confidence in trying unfamiliar tools and techniques, and it’s reminded me that learning doesn’t have to be perfect to be meaningful. Sometimes, it’s about the small wins — like a well-baked loaf or a smooth video edit — the small wins all make the journey worthwhile.
Overall, this was such a positive experience. I not only learned how to use a new app, but I also created my favourite (to date) loaf of sourdough in the process (just ask my coworkers). Who knew learning could be this tasty and efficient?
Every loaf teaches me something new—and also reminds me I might need stretchier pants!
What is your favourite app to make videos on?? Comment below
.
.
.
.
.
References:
Radin, A. G. B., & Light, C. J. (2022). TikTok: An emergent opportunity for teaching and learning science communication online. Journal of Microbiology & Biology Education, 23(1), e00223-21. https://doi.org/10.1128/jmbe.00223-21
This past weekend, I found myself back at my parents’ house—not for a visit, but because my husband had some horses to trim in their area. Instead of making multiple trips back and forth, I packed up everything I needed for the weekend, including my ever-faithful sourdough starter, Dough-na-tella.
Knowing I wanted to bake while I was there, I prepped Dough-na-tella the night before, feeding her and making sure she was good and bubbly by the time morning rolled around. When I woke up on Saturday, I wasted no time putting her to good use. First on the agenda was our household staple: sourdough pancakes. There’s something special about starting the day with a warm, fluffy stack, and at this point, they’ve become a tradition in our home. Even my parents, who are usually skeptical of sourdough anything, couldn’t resist. It was my dad’s birthday so it was a great way to kick off the day for him to enjoy a nice stack of plain, choc. chip and blueberry pancakes, along with a side of bacon, and eggs! Yummy!
But the real adventure came with my first-ever inclusions loaf. I had been wanting to experiment with adding ingredients to my sourdough, and I figured this was the perfect opportunity. I followed Amy Bakes Bread’s Three Cheese Sourdough Bread recipe (link here) but with a small tweak. While Amy’s recipe calls for three types of cheese, my mom’s fridge only had mozzarella and sharp cheddar, so I rolled with it.
What I didn’t anticipate, though, were the little challenges that came with tackling a new recipe. While I’ve gotten comfortable with the basics of sourdough, shaping an inclusion loaf was a different story. Unlike my usual loaves, this one had chunks of cheese that made it harder to handle. I also hadn’t shaped a loaf for quite some time and even then when I did shape it last time I totally flew by the seat of my pants with it, this time I wanted to do it right. Amy’s recipe didn’t include video instructions, so when I reached the shaping step, I found myself second-guessing my technique. That’s when I turned to Baker Bettie’s YouTube tutorial (link here). Watching her step-by-step guide helped me gain the confidence to shape my dough properly, making sure the cheese was evenly distributed without overworking the gluten.
I really appreciate these type of Open Education tools at my finger tips. Videos and resources like this, literally get me through this learning journey. Without them I would be making so many mistakes and not knowing if what the recipe is describing is truly what I need to be looking for.
A few lessons I took away from this bake:
Trust the dough – Even when it feels sticky and challenging, patience and gentle handling make all the difference. This was a higher moisture dough, making it difficult to work with so I had to be super patient with the shaping and folding and the general working with it. But it turned out great!
Adjust based on what you have – I only had two types of cheese, but the bread still turned out delicious. Sometimes, you just have to work with what’s available.
Visual learning is a game-changer – Having a video tutorial to follow made the shaping process so much easier. Next time, I’ll probably look up videos beforehand to be better prepared.
By the time I got home and put her in the fridge and dough-na-tella came out of the oven, my kitchen smelled amazing. The bread had a beautiful golden crust, and the pockets of melted cheese inside made every bite worth the effort.
All in all, it was a great weekend of baking and learning, and Dough-na-tella proved once again that she’s up for any adventure. I can’t wait to try my next inclusions loaf—my coworkers have been cashing in on my learning journey and they have requested a lemon blueberry loaf next, if I can pull that off I may be the star of the office! Hold onto your hats, everyone!
Have you ever tried an inclusion loaf? What are your favourite add-ins?
What started as a week so full of activities I almost couldn’t even make anything new, turned into a week of discovering new ways to use my sourdough discard. I was feeling stressed and burnout was starting to sink in on a real level. My first thought was, ” I am never going to get something that takes 3 days to complete such as a loaf or any dough using dough-na-tella.” I knew there was no way! And if you’re anything like me, tossing out sourdough discard feels like a crime against carbs.
Enter… the world of “discard recipes”. A quick, easy, and tasty way to transform leftovers into the ultimate homemade pizza.
Credit: Facebook Group
Credit: Facebook Group
I follow a few different groups on Facebook regarding sourdough. I had seen a few times on this platform that people use their discard is some really cool and interesting ways, and I wanted to try it too!
Many other sourdough fanatics have written about using their discard and putting it to good use. It always did seem like it was going to waste to me anyway so this was a win, win.
Why Sourdough Discard Makes the Best Pizza Dough
Sourdough discard is packed with flavour, giving your pizza crust a slight tang and deep complexity that store-bought dough just can’t compare to. Plus, it crisps up beautifully while staying chewy on the inside—a true glow-up for both your sourdough game and my pizza nights…Or at least this is what I read, during my deep dive into how this was going to work. I scoured the internet for the perfect recipe. I finally landed on Pantry Mama’s Quick Sourdough Discard Pizza Dough Recipe (found here), I chose it because it said that it was quick, and it had the highest rating with the most people rating it, and let me tell you—it did NOT disappoint. Here’s how it went down.
The Dough: Fast, Foolproof, and Full of Flavor
What I loved most about this recipe is that it’s quick—no long fermentation, no overnight waits, just mix, knead, and go! Perfect for those last-minute pizza cravings.
Ingredients You’ll Need
Dough-Na-Tella after she was kneaded for 10 mins
Sourdough discard (the star of the show)
All-purpose flour
Warm water
Honey
Olive oil
Salt
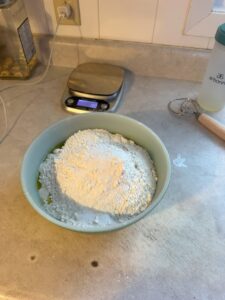
Mix it all together, it was a little tacky and wet at first, so as instructed I let it rest for 30 minutes. After 30 minutes I was to knead the dough for 10 minutes by hand until it became nice and elastic, while also being soft and silky.
Once I had my dough, I was to wait for it to double in size. But because I was in a rush and needed to get out the door to my daughter’s skating carnival, I popped it into the fridge and let it sit, covered, overnight and the next day! I was a little leary about doing this, but I was told that it would be perfectly fine! And boy were they right!
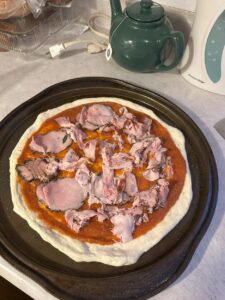
From Dough to Pizza: The Glow-Up in Action
Pizza stretched out, with added homemade tomato sauce and shaved ham
When I got home from work the next day, I popped it out of the fridge, let it roll out of the bowl and sit on the counter for 30 minutes to let the gluten relax. Then I pulled it and stretched it out with my fingers and prepped it for baking. I love a thin, crispy crust, so I stretched it out nice and even(ish), but if you prefer a thicker crust, you can go for a more rustic, hand-tossed vibe.
The beauty of pizza is that you can top it with literally anything, but here’s what I went with:
Pizza number 1 (shown to the left)
shaved black forest ham
pepperoni (not shown)
pizza mozzarella
Italian seasoning (for flavour)
parmesan
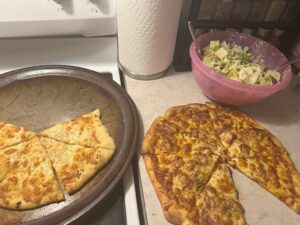
Pizza number 2 (shown below)
olive oil
Italian dressing
minced garlic and a little garlic juice
Salt and pepper
Mozzarella
Parmesan
After a quick bake at 425° F for about 15 minutes, the pizza was golden, crispy, and absolutely chef’s kiss perfection.
Finished Product
Final Verdict: Is It Worth It?
100% YES. The sourdough discard gives the crust such a unique texture and flavour—it’s light, airy, and has just the right amount of chew. Plus, knowing that I used my dough-na-tella discard for something this delicious makes it even better. If you want to see for yourself check out Pantry Mama’s Quick Sourdough Discard Pizza Dough Recipe. She wont let you down, but I do recommend following her guide step by step.
Next time you find yourself staring at a jar of discard, don’t throw it out—glow it up into the best homemade pizza you’ve ever had.
Are you a sourdough discard pizza fan? Drop your favourite toppings in the comments! 🍕✨
Before heading off for February break, I decided to get a head start on some delicious baking. I dove into the world of sourdough and crafted two fantastic recipes: sourdough bagels (inspired by Red Currant Bakery) and a unique twist on focaccia—a cinnamon roll sourdough focaccia bread inspired by Thrilled Foodie’s “The Cast Iron Series—Cinnamon Roll Sourdough Focaccia.” Not only did I prepare these treats ahead of time, but I also embarked on a valuable learning journey that deepened my appreciation for artisan baking.
Sourdough Bagels: A Classic Reimagined
I began my sourdough adventure with bagels, following the comprehensive recipe from Red Currant Bakery. Here’s an inside look at the process—and the lessons I learned along the way:
The Process
Mixing & Bulk Fermentation:
The dough starts with a blend of active sourdough starter, water, flour, salt, and a touch of sugar. After kneading until smooth and elastic, I allowed the dough to undergo bulk fermentation. This step lets the natural yeasts work their magic, enhancing flavour and strengthening the gluten. Lesson Learned: Fermentation time can vary with room temperature, and a slightly extended bulk can yield a richer flavour profile(longer fermentation process= more sour flavour profiles).
Shaping:
Post-fermentation, I divided the dough into equal portions, gently rolled each piece into a ball, and then carefully poked a hole in the center to form the classic bagel shape. Lesson Learned: Shaping taught me the delicate balance between creating a sturdy exterior—essential for withstanding the boiling process—and maintaining a soft, airy interior.
Final Proof:
The shaped bagels were allowed a final proof to relax and rise slightly. (approx 1 hr.) Lesson Learned: Finding the perfect proof time is crucial; too short leaves the bagels dense, while too long can compromise their structure.
Boiling:
Boiling in water enriched with barley malt syrup (or honey/baking soda) gelatinizes the outer starches, producing that signature chewy, glossy crust. Lesson Learned: Timing is everything—boiling each bagel for just the right duration (about 1-2 minutes per side) makes all the difference.
Baking:
Finally, the boiled bagels were baked to a beautiful golden brown. Lesson Learned: Baking seals in the flavours and textures, reminding me that every step, from fermentation to baking, plays a critical role in the final product.
The Result
The sourdough bagels turned out with a robust tang and a delightfully chewy crust. Whether enjoyed plain with cream cheese, toasted with butter, or transformed into a gourmet sandwich, they brought an extra dose of comfort and quality to my pre-break preparations.
For all the detailed steps and tips, I highly recommend checking out the full recipe at Red Currant Bakery.
Next I moved on to Sourdough Focaccia Bread (cinnamon flavour), check it out and let me know what recipes you have tried lately!
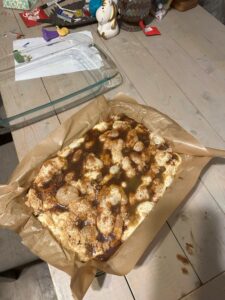
Sourdough Cinnamon Focaccia Bread: A Sweet & Savory Experiment
Next, I explored a playful twist on focaccia, merging the warm spices of a cinnamon roll with the rustic charm of focaccia bread. Here’s the recipe that guided my process, along with the insights I gained along the way.
Ingredients for the Dough:
100g active sourdough starter
440g water
505g flour
5g salt
2g cinnamon
10g sugar
Instructions:
Mix & Autolyse: Combine all the ingredients by hand or with a dough hook until just mixed. Cover the dough and let it rest for 30 minutes to 1 hour. Lesson Learned: The autolyze step helps the flour fully absorb the water, making the dough more workable and enhancing the final texture.
Stretch and Fold: Perform 16 stretch and folds, turning the bowl 1/4 turn each time to build strength in the dough. Lesson Learned: Consistent stretch and folds develop a robust gluten network, resulting in a structured yet tender crumb.
Overnight Rest: Cover the dough and let it rest on the counter overnight. Lesson Learned: Allowing the dough to rest overnight deepens the flavour and offers flexibility in scheduling, proving that good things truly take time.
Morning Routine:
Drizzle 1 tbsp olive oil over the dough and perform another round of stretching and folding.
In a large cast iron pan, drizzle 2 tbsp olive oil, then gently fold the dough into a rectangle or envelope shape.
Cover and allow the dough to rise for 4 hours. Lesson Learned: Handling wet dough with care in a cast iron pan emphasized the importance of gentle shaping during the final rise.
Cinnamon Roll Drizzle:
5 tbsp melted butter
5 tbsp brown sugar
2 tsp cinnamon
Drizzle the melted butter mixture over the risen focaccia. Then, using your fingers, gently dimple or poke holes in the dough so that the drizzle seeps into every nook and cranny.
Baking & Glaze:
Preheat your oven to 450°F and bake for 23-25 minutes, or until the internal temperature reaches 200°F. For an extra touch of sweetness, prepare the glaze: ( this is where I accidentally left it in for too long and it got a little crispy on the top! But it was still tasty nonetheless.
2 cups powdered sugar ( I added sugar until I got the consistency I wanted)
4 oz of cream cheese
3 to 4 tbsp milk
2 tbsp maple syrup
A splash of vanilla
Drizzle the glaze generously over the warm focaccia.
Lesson Learned: Experimenting with the cinnamon drizzle and glaze demonstrated how layering flavours can transform a simple bread into an indulgent treat, balancing sourdough tang with a warm, sweet finish.
Lessons Learned on My Sourdough Journey
Preparing these recipes before my February break was not just about having delicious food on hand—it was also an opportunity to learn and grow as a baker. Here are some key takeaways from my experience:
Patience is Key: Both recipes underscored the importance of time—from fermentation to resting. I learned that allowing the dough to develop at its own pace results in superior flavour and texture.
Embracing the Unexpected: Sourdough is as much art as it is science. Variations in temperature or humidity can influence the dough, teaching me to adapt and experiment with confidence.
Technique Matters: The precision required in each step—whether it’s stretching and folding or boiling—reinforced how crucial the technique is in this type of baking.
Flavour Experimentation: The cinnamon focaccia was a delightful exploration in balancing sweet and savory. It taught me how thoughtful flavor layering can elevate a recipe from ordinary to extraordinary.
Taking these steps before my February break turned out to be one of my most creatively fulfilling experiences. I hope these recipes and the lessons I learned inspire you to explore your own culinary adventures.
Happy baking, and enjoy every delicious bite!
Feel free to leave your comments below—I’d love to hear about your sourdough adventures and any lessons you’ve learned along the way!
My first attempt at sourdough sandwich bread was, well, a learning experience. The flavour was there, but the texture and rise weren’t quite what I was hoping for. Instead of a soft, structured loaf perfect for slicing, I ended up with something a little denser and more rustic (to say the least) than I intended. Lets just say I threw It our and intended to learn from that “dough-saster”.
Determined to get it right, I went back to the drawing board—or rather, back to Instagram—and found an incredible tutorial from Muscle Mommas Sourdough. Her recipe was simple yet complex, with just enough technique to elevate my bread without making it intimidating. And let me tell you, this time around, the results were chef’s kiss perfection.
Learning from My Mistakes
1. Stronger Starter = Better Rise
In my first attempt, my starter (ahem, Dough-na-tella) wasn’t quite at peak strength. While she was bubbly, she wasn’t as active as she could have been. This time, I made sure she was well-fed and doubling consistently before baking day. That alone made a world of difference in the final texture.
2. Nailed the Kneading
The first time, I underestimated how much kneading was needed. I now realize that a sandwich loaf benefits from a bit more structure. Following Muscle Mommas Sourdough’s method, I gave the dough a solid mix, let it rest, then did a series of stretch-and-folds. This improved gluten development and gave my bread a much lighter crumb.
3. Patience with Proofing
The biggest culprit in my first loaf? Over doing the bulk fermentation. I let my dough over proof leading to a dense loaf. This time, I let it ferment at room temperature until it was puffy and almost doubled before shaping. I also extended the final proof, ensuring the dough was airy before baking.
4. Proper Shaping for Structure
Another issue I had before was a loaf that spread out rather than up. I paid close attention to shaping this time, making sure to create surface tension so the loaf held its form in the pan. I also poked some air holes into the loaf to prevent holes. No one likes holes in their sandwiches. This small tweak gave me a more even and lofty rise.
5. Perfect Bake for a Soft Crust
I adjusted my oven temp and used steam for the first half of the bake to keep the crust soft. Muscle Mommas Sourdough recommended a slightly lower baking temperature, which worked wonders for getting that perfect sandwich texture.
6. Learning Visually with a Video
One of the biggest game-changers for me was using a full video tutorial instead of just reading a blog post. Seeing exactly what the dough should look like at each stage helped me understand the process more deeply. This type of hands-on, visual learning is where I excel best, and it allowed me to confidently execute the recipe with much better results.
The Final Verdict
I’m happy to report that this second attempt was a complete success! The bread had the perfect balance of softness and structure, making it ideal for slicing. It was light, airy, and had that slight tang of sourdough goodness—exactly what I was aiming for.
To see my full process (and maybe a few moments of baking-induced panic), check out my vlog posted above, where I document the entire journey.
Have you ever had to troubleshoot a sourdough fail? Let me know in the comments—I’d love to hear your experiences and tips!
Baking with sourdough is a journey—sometimes a glorious one, sometimes a humbling one. This past week, I embarked on an adventure to make a loaf of soft and fluffy sourdough sandwich bread, following a well-reviewed recipe from The Clever Carrot. However, what I ended up with was an over-proofed, sticky mess that had lost all structure. This is my tale of sourdough failure, and what I learned from it.
My Learning Style Epiphany
Apparently I enjoy learning via Video rather than critically reading (which is ironic considering I am a reading and writing specialist and consultant). Learning from a website isn’t my favourite way to learn—I’m more of a visual learner. I think my mistake with this recipe stemmed from having to read it critically while constantly scrolling back and forth. Although the format was clear and concise, with a variety of helpful pictures and even a video on shaping the dough, the lack of a full start-to-finish video may have been the final nail in the coffin for my sourdough sandwich bread. Once it was over-proofed, it was game over for Dough-na-tella and I. (insert sad face) Next week I am going to try and follow along with musclemommasourdough on Instagram. She has a full video and detailed ingredients in the caption.
The Plan: Foolproof Sandwich Bread
The recipe seemed straightforward: mix, knead, proof, and bake. I’ve made artisan-style sourdough before, but sandwich bread is a different beast—it requires just the right balance of fermentation and structure to get that perfect soft, airy crumb. The sandwich bread I have baked in the past has always had yeast in it as its leavening ingredient so the process of the bulk fermentation is quite frankly tripping me up a little bit as I journey through this process.
I followed the instructions carefully, measuring everything precisely. My starter, Dough-na-tella, was lively and bubbly, so I had high hopes. The dough came together beautifully, and I set it to proof in my oven with the light on—a trick I often use to create a warm environment for fermentation due to my kitchen being very cold when I’m not cooking in it.
The Mistake: Overproofing Disaster
Here’s where things went south. I underestimated just how quickly the dough would rise in that warm environment. I left it for too long, and by the time I checked, it was over-proofed. The recipe stated that I should be able to leave the dough without doing any stretch and folds for 10-12 hrs at room temperature. Mine was left in the oven overnight which ended up being 12 hours. In the morning, the dough had expanded beyond its limit, becoming weak and sticky. It no longer had the elasticity needed to hold its shape, and there was no saving it (but I tried anyway because I can be stubborn, and what I have read about over proofing is you can make focaccia bread instead, however, no one in my house eats that type of bread) So off I went, trying to salvage what was left of both my sanity and the two sandwich loaves in front of me.
In a last-ditch effort, I tried shaping it anyway, hoping the bake would work some magic. But when I put it in the oven, it deflated like a popped balloon, leaving me with a dense, gummy loaf—not the fluffy sandwich bread I had envisioned. It also had an overly tangy sourdough taste that I wasn’t prepared for, my previous loaf didn’t have the same flavour.
The Overproofed Dough-na-tella
The Lessons Learned
Watch the proofing time like a hawk. Warm environments speed up fermentation significantly. Next time, I’ll either proof at room temperature or check on it more frequently.
Know the signs of overproofing. If the dough is extremely slack, sticky, and unable to hold its shape, it’s gone too far.
Sourdough is a teacher, not a tyrant. Every failed bake is an opportunity to learn and improve.
Try and Find Recipes that have FULL videos. Understanding how best I absorb information like this is half the battle with me, even growing up I have never fully understood it. All I know is I learn by doing and by seeing!
Moving Forward I will most likely be trying this recipe again in a few weeks, with some tweaks and with a more cautious approach to proofing. I also plan to experiment with cold-proofing in the fridge to develop flavour while controlling the rise.
Even though this loaf was a failure, the experience wasn’t. Baking, like any skill, requires patience, trial and error, and a willingness to embrace the flops. So, here’s to the next bake—may it rise to the occasion!
Have you ever had a sourdough failure? Share your experiences in the comments—I’d love to hear how you recovered!
Baking with Dough-na-tella: The First Loaf Adventure
The moment I’ve been waiting for finally arrived—Dough-na-tella and I teamed up to bake our very first loaf of sourdough bread! After days of feeding, watching her grow, and whispering words of encouragement (okay, maybe just in my head), I was ready to see if my bubbly starter was up for the challenge.
The Preparation:
The process began the night before with a simple sourdough recipe. Mixing the dough was therapeutic—flour, water, salt, and of course, Dough-na-tella’s magic. The dough had this wonderfully sticky texture that hinted at all the potential hidden inside. After mixing, I let it rest and worked in a few rounds of stretch-and-folds, marvelling at how it began to come to life.
See the video for ALLLLLL my stretch and folds. It took me ll day to get the stretch and folds just right!
By the time I set it aside for its overnight rise, I was buzzing with anticipation. Would it double in size? Would it be airy and light? I could barely sleep thinking about how it might turn out.
Baking Day:
Morning arrived, and when I peeked at the dough, it had risen beautifully—puffy and full of life. After shaping the loaf, I gave it one last proof and preheated my oven (and trusty Dutch oven) to lava-like temperatures.
The moment I slid the dough into the oven was surreal. I scored it with a quick slash, held my breath, and waited. The house began to fill with that warm, heavenly scent of baking bread. When I removed the lid to check on it, there it was: my first loaf, golden brown and proud.
The Results:
The bread wasn’t perfect, but it was mine. The crust was crackly and had that satisfying crunch when tapped. The crumb was soft and slightly open, with just enough chew. And the flavour? Tangy, rich, and full of character, just like Dough-na-tella herself.
There’s something so rewarding about slicing into a loaf you’ve made from scratch. Sure, it wasn’t bakery-level, but that only makes me more excited to keep improving. This first bake with Dough-na-tella is just the beginning of what I hope will be a long and delicious friendship.
Lessons Learned:
Patience really is key. Letting the dough rise fully was worth the wait.
Don’t worry too much about being perfect, everything seems to work out if the fundamentals are followed.
A razor-sharp lame (or scoring tool) makes all the difference for those gorgeous loaf designs.
Celebrate the imperfections—they’re part of the journey.
I can’t wait to try another bake and experiment with new flours, hydration levels, and maybe even some fun add-ins like seeds or herbs. If you’re on a sourdough journey too, share your tips or favorite recipes—I’m all ears (and still a little flour-covered).
Here’s to many more loaves with Dough-na-tella! 🥖✨
Edited with the help of my personal Assistant “Chatty” (Chatgpt)


 Every loaf teaches me something new—and also reminds me I might need stretchier pants!