The Closing Round: A Putting Journey

Closing time I guess! Time to wrap up this putting journey with one final post! This has been such a fun and unique learning project that brought some different challenges and overall a positive experience! For this project I decided to improve my putting skills in golf, this post is a summary of what I learned, how I grew, and how technology supported my learning!

golf, game, golf course, heart, golf, golf, golf, golf, golf

Photo by Michael-Li on Pixabay

Week 1- Putting To Perfection

I had no idea where I was going to go with this learning project, or really how to blog about something in general! I knew my struggle in golfing was my putting game, things like form, pace, and reading greens have always been a question for me.

Takeaways after week 1-There is a gameplan but not sure how it’s going to go!

Week 2- Back to the Basics of Putting

  • This week was guided by Top Speed Golf in the video called Putting Basics
  •  Grip, stance, ball position, and stroke mechanics were the focus points
  • I learned keeping my eyes directly over the ball helped me get a better line and overall swing to the ball.
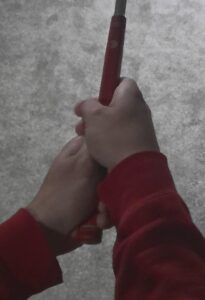
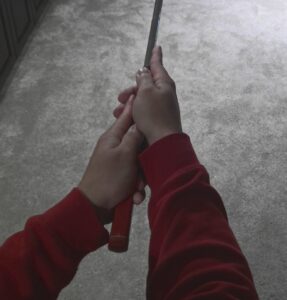
  • One of the biggest takeaways from this week was that it changed how I will be gripping the putter
  • Below is pictures of how my grip from before and after.  I hold the putter much lower now, almost at the bottom of the grip on the putter. Also, my index finger on both hands are pointed along the sides of the putter. I found this to allow me to have stronger control of the club when putting.


Takeaways after week 2- There was a lot to unpack on this one! Thankfully got to get comfortable with trying different grips and swing styles!

Week 3- Keep the Tempo

  • Tempo…pace…rhythm… metronome…are we talking about music or golf?? LOL.
  • As someone who loves music, it was funny finding the video How To Find Your Perfect Putting Tempo By Using A Metronome by Rhythmic Golf.
  • What I learned was that you can have your own tempo, it’s really a personal preference! Although it is nice having a starting point if you are really having troubles.

Takeaways after week 3-Connecting music with golf was a fun way to learn and practice! I found during this week it was important to stay consistent with practicing!

Week 4-Reading The Green, The Algorithm Is Here

Week 4 had my phone listening to me! I went to search music on Sportify and it auto-populated a golf podcast! This weeks learning was from Golf Tips for Beginners on Spotify as well as a great video called How to Read Putting Greens Better with Brad Faxon

  • Podcast was a unique way to learn about how to read a green
  • Understand slopes and green speeds but overall go by feel
  • Find a routine and stick with it! Helps stay consistent.

Takeaways after week 4- Listen and learn! A big part of putting is based of intuition and feeling. There are many factors when putting the key is to take what you know and have a good feel with what you can do with your putter!

Week 5- Putting From Home

Week 5 was a week where weather kept me off the course but yet I still found a way to practice some putting! At this point I had gone through understanding the fundamentals, now it was to practice and do some drills to get better! I’m including this video because I found it really helped with control and tempo!! Best part was that it can be done from home!

  • Sharpie allows you to see what is happening when you are contacting the ball
  • Coin on your putter drill is great for control and speed practice
  • Last drill gets you practicing keeping your eye on the ball

Takeaways after week 5- No place like home? I was able to find some great drills that can be done right at home! these drill were inspired from Rory Mcilroy. Some great simple drills that can easily improve feeling with your putter!

Week 6-Putting Drill With Phill

  • Week 6 I found another video that helped me ALOT! I knew this one was going to be great when I was that Phil Mickelson was the one giving the lesson.

  • 3 foot putting drill is by far one of the best drills to work on short putts
  • Allows to practice further putts if you want to work on longer putts
  • The drill gets you moving around the hole for different putting lines

Takeaways after week 6- BEST FOR LAST!! Hands down the best drill I found that can improve your putting game! I think if I were to stay consistent with this drill or even incorporate it into my warm up, I will have better success in putting! I would encourage everyone to check this drill if they want to improve their putting!

TAKEAWAYS FROM LEARNING PROJECT

  1. Small adjustments can have a big impact- Simply changing my grip and practicing keeping my eye on the ball helped me grow consistency and control
  2. Tempo is different for everybody- Find a tempo that works for you! You have to be comfortable when putting!
  3. Find the balance- Understand slopes and wind but go with intuition and feel!
  4. Practice can happen anywhere- Especially in Sask. the weather can’t always be best for practicing golf, putting drills can be done at home inside!
  5. Patience and consistency- Two of the most important things to remember in golf! Stay calm if your struggling, stay consistent when practicing and with your routine.

THE ROLE OF TECHNOLOGY AND ONLINE RESOURCES

It was through technology and online resources that were crucial in helping me improve my putting game in golf! YouTube was a great tool for finding different videos that not only helped but were easy to follow and understand! I encourage all to utilize online resources and technology when learning something new!

FINAL THOUGHTS

This learning project taught me that if I want to become better at putting in golf, I need to focus, adapt to new learning techniques and be will to try new things! After reflecting on my journey, I do feel more confident on the greens and my overall putting skills! One thing I enjoyed about this project was also seeing the progress in my blogging skills! So not only was I making progress with putting but also in my blog posts! I hope to stay consistent and keep improving different parts of my golf game. I definitely noticed by practicing more and getting more comfortable with my putter, I feel better with my putting skills and knowledge! My biggest advice for anyone trying something new, is to break it down and find different ways you can learn and practice. It might be from a golf pro at the course or finding something online, no matter what your trying to accomplish, KEEP GOING!!

Thanks to everyone that followed along my journey and even shared a comment! Big thanks to Katia for providing this opportunity! I had so much fun practicing and improving my putting skills!

Professional golfer putting ball

Putting Drill With Phill

I didn’t know what to expect when I saw the video posted by Willow Glen Basketball but one thing I know is that I had to make the title catchy for this one! One of golfs greats Phil Mickelson shares THE BEST (funny because of the title of the video) putting drills he learned from Jackie Burke, who was a 1956 Masters and PGA champion. Phil claims the 3 foot circle drill has been the foundation to his short game. Here is the video below!

Here’s what I took from the video:

  • The 3 foot circle drill allows for the golfer to focus in on practicing those 3 foot putts by hitting in a circle around the hole.
  • What I really like about this drill is the ability to pick the distance you want to practice. Now, this can be a 3-7 foot drill depending on how far away you want to be.
  • The drill moves you around the hole which makes you have different breaks on the ball, great for practicing breaking putts.

My Results:

Right now I’m working on uploading a video of me doing the drill but I am having some technical difficulties.. BUT!! Let me tell you, I missed many of the short putts in the 3 feet range! I found myself on hot and cold streaks of making and missing. I think if you do this drill more and more, you’ll see improvements! I’m considering about using this drill in my warmup routine when I go golfing, as I think it would be a great way to warmup your putting before heading out on your round!

Professional golfer putting ball


Putting From Home!

Now that I’ve gone through some of the fundamentals putting, I want to change my focus to doing putting drills! I was supposed to golf a couple times last week but cancelled due to weather. I always have thought there is no way I can putt from home, it’s just not the same. Then I thought to myself, I’m here to get out of my comfort zone and try some new things!

So what I did was search on YouTube “Putting from home for beginners” and I found the video by Feel Good Golf called “I tried Rory Mcilroy’s Home Putting Drills….(in 2 minutes)“. After I watched the video, It quickly changed my mind on practicing putting from home. Here’s why:

  • The video is only 2 minutes
  • Sharpie, coin, cup, putter, ball is all you need
  • The video looks at control, comfortability, and speed
  • Easy to understand and follow

Check the video for yourself!

What I learned in the process:

  1.  Shading half your ball in sharpie allows for you to see what the putter face is doing when contacting the ball.
  2. The coin on the putter drill allows you to understand the importance of speed and control. THIS ONE WAS MY FAVOURITE!!
  3. The last drill is great for two reasons, One being keeping your eye on the ball and also to help you from grounding your club which really can affect your putt.

Before, I would have only practiced putting on a actual green but after watching this video I learned how helpful simple little drills from home can benefit your putting game! I would encourage all to check out this video as it helped me! I am hoping to get some practice on the green and I am excited to share some content of my progress!

golf, game, golf course, heart, golf, golf, golf, golf, golf

Photo by Michael-Li on Pixabay

Reading the Green, The Algorithm Is Here

Hey all!

For this post, I wanted to share some tips on reading the green with putting! This time I used two different resources, One being a YouTube video and the other a short podcast from Spotify! Wondering why I titled “The Algorithm is Here”, find out below!

Let’s back things up first! Reading the green is used to help a golfer understand / predict where your ball is going to go on the green based on slopes, angles, and even which going with or against the grain of the grass! This is something most people from beginners to pros think is the most crucial part of golf. But is reading the green really something you need to be really good at? well… good news! the answer is NO! You do NOT have to be really good at reading the greens to be a good golfer. What a relief! I will say, being able to have an idea of where your ball is going to go is usually helpful in the game of golf! Here’s what I learned on this weeks on reading the greens!

As it was a late evening, I was on my phone listening to music on Spotify. I went to search for a new song, and as I was typing the search bar auto populated a search recommendation called “golf tips”. I think I panicked and dropped my phone on the floor because never have I ever seen anything in my search on Spotify that was golf related! Now I know I have been searching lots on golf and talking about to friends and family! So why not Spotify! I went ahead and listened to the podcast called “Reading The Green” by GolfTipsForBeginners. Here’s what I learned from the 3 minute clip on Spotify on tips for reading the green!

Putting against the grain- If grass is a light shade, you are putting against the grain, the blades of grass are pointing toward you.

Putting with the grain-If grass is dark, you are putting with the grain, the blades of grass are pointing away from you.

Look for the setting sun! Grain often grows towards the setting sun.

One of the more common things that was talked about is looking for slopes on the green, putting uphill will take more swing power, while putting downhill will take less swing power.

Another trick for reading the green is based on feeling with your feet! yes, you read that right! If you feel the ground is soft the green, it is likely to be a slower green that might take more swing power, while if it is a hard ground, it might be a faster green and take less swing power. Another thing to keep in mind is if the ground is wet or dry as this will change ball speed!

Now listening only did so much for me, I needed to see more on reading greens! Which is where I found a great video by Brad Faxon and his take on reading greens! Here’s the LINK if you’d like to watch how Brad reads greens! This is what I took from Brad:

1.) Reading the green can happen 25-30 yards out from the green looking for slopes

2.) Walk around the green looking at grain, not just from behind your ball

3.) Be aware of playing partners

4.) Instinct and visualization, based on feel and seeing your putt through

5.) ROUTINE!!

The most helpful tip is #5! Make your routine and stick with it! building consistency through routine will build your confidence when you have the putter in your hand!

Stay tuned for more!


Keep the Tempo!

This week I wanted to focus on my tempo when I am putting!

Tempo is how long your swing takes from the moment you pull the club into the backswing then follow through. I often wondered if there is a certain tempo you should use when you are putting. So I decided to get to work and start trying different tempo speeds. I tried many different speeds from slow to fast and really found that it didn’t really make to much of a difference for me other then it just felt uncomfortable!

I went golfing the other day on a course to try and put some things I learned into action. I think it was a good idea not keeping score that day because I wasn’t playing good and especially struggling with putting. As I was trying different tempos, I was starting to get frustrated because it seemed everything I tried wasn’t working. I went home and started to look up some videos and found a great trick to keep in mind when thinking about putting tempo.

Izidor Marik is a golf teacher at a golf course in the states and helps makes tutorial videos on YouTube with the account Rhythmic Golf. I would recommend checking their channel as they have some great videos on everything golf related to help you and your golf game!

I was intrigued when I was scrolling their channel and found a putting video that was titled “How To Find Your Perfect Putting Tempo By Using A Metronome”. Growing up playing piano, Metronome is something used in music to keep the tempo of a song. I NEVER would have thought it could be used to help me with putting. There was only one issue! I don’t have a metronome anymore! Ohhh but the internet is a wonderful place! You can actually just google metronome on and it has one for you!

So did it work?? well not exactly as I thought. No, I didn’t just use the metronome and my putting got better. I will say it did make me feel more in control. What I did learn, was that putting tempo is really a personal preference. I used the video as a guide and found what was comfortable for me!

Tempo is just a piece of the putting puzzle! Stayed tuned for more to come!

Back to the Basics of Putting

Lets get Started!!!

I was thinking of where to start in this putting process because I already have a basic understanding of putting. I thought it would benefit me if I went back to the basics! My first resource is a YouTube channel called Top Speed Golf by Clay Ballard. The one I picked to watch is one of his golf lesson videos called Putting Basics.

During this video, Clay breaks down an introduction of putting covering the basic information to get someone started. The video highlights and details four key components for putting which are grip, stance, ball position and stroke mechanics, and tips for a smooth stroke.

1.) GRIP: How to hold the putter

Convectional Grip– Used by most golfers

Left Hand Low– Opposite to the convectional grip by place left hand low on the grip

The Claw– A grip that can takeaway common faults in many golfers, the claw allows for the left wrist to be locked, while the right holds for control.

I tried some different grips on the putter and realized that the “Claw” and “convectional grip” work best and gives a feeling of control and stability.

2.) STANCE: How far apart you keep your feet

Wide Stance- Is okay, but can tend to lose rhythm when putting

Normal Stance- (like talking to someone) or just inside shoulder width apart.

One thing I’ve noticed, is that your stance can be in many different forms as long as its comfortable and works for you. I went with a normal stance which was comfortable and worked for me.

3 & 4.) BALL POSTISION AND STROKE MECHANICS: Where to have your ball placed between your feet and the mechanics of your upper body when swinging the putter.

Ball Position– have ball centered in the middle so if you drew a line back, it it would end up in the middle between your feet. This helps with the ball rolling end over end which is what pro golfers do to create the best roll of their ball. One of the keys of ball position, is having your eyes above the ball, not behind, in front, off to the side but above the ball. In the video, Clay gives an example of how you can tell if your eyes are in the right position by taking a object (ball, tee, etc) from your eyes and dropping down. If your eyes are in the right spot, the object should land right on top or in the target line of the ball.

Stroke Mechanics- Many golfers including myself have heard of the “pendulum” or “grandfather clock” mechanic of putting. During the video, Clay mentions this is totally fine to use this method..BUT!!!! There are little adjustments you can make so you are getting that end over end roll. I had a learning moment during this part of the video!! The video mentions how when pulling back the putter, you want it closer to the ground..compared to when following through, the club is coming up. This allows for the ball to get a better roll.

Overall this is a great resource and helped remember some key tips and tricks when putting. Even though I had some understanding of putting before, I still had some learning moments such as where your eyes need to be over the ball when putting. I had some challenges this week because I strained my neck and wasn’t able to grab my putter other then to try some grips!


Putting to Perfection!

Hey all!

I was all over the map with debating what I was going to do! It started with a garden then guitar and many other ideas! I have always loved to golf even though I struggle often when I golf! There is no better time to get better then right now! I am going to be improving my putting skills hopefully! For me, it is usually a guessing game when I putt, just get on the green and hit. I’ll be looking at things like form, pace, and reading greens which will hopefully improve my putting!