Welcome back to my sewing learning journey! Last week, I shared the process of cutting fabric using a stencil, which was both exciting and a little nerve-wracking. This week, I’m diving into the next phase of my project is sewing the fabric pieces together. It’s one thing to cut and prepare your fabric but sewing it into something beautiful and functional requires a whole new set of skills and careful attention. Let’s get into it!
Preparing the Fabric
After carefully cutting the fabric using the stencil, I made sure to press each piece with an iron to remove any creases. Ironing the fabric is an essential step in the sewing process because it helps ensure that the fabric lies flat, and the seams will be crisp. I took the time to ensure each piece was aligned properly before moving on to sewing.
Choosing the Right Stitch
One of the most important decisions when it comes to sewing is choosing the right stitch. I decided to go with a basic straight stitch for most of the seams, as it’s the most common and versatile. It’s perfect for lightweight to medium-weight fabrics, and since I’m still working on mastering the basics, I thought it would be a good starting point.
For the edges of the fabric, I used a zigzag stitch to help prevent fraying. This is particularly important with fabrics like cotton or linen, which tend to unravel easily after cutting. The zigzag stitch also adds a nice decorative element to the edges, which was a fun bonus!
Pinning the Pieces Together
Before sewing, I made sure to pin my fabric pieces in place. Pinning helps keep the fabric from shifting while you sew, ensuring that the edges align correctly. I used straight pins, placing them perpendicular to the edge of the fabric to keep them out of the way of the sewing machine needle. This step might take a little time, but it’s well worth the effort to avoid any fabric slippage while sewing.
Setting Up the Sewing Machine
For this project, I used my trusty sewing machine, which I’m still getting comfortable with. I made sure the needle was properly threaded, and the machine was set to a straight stitch with the appropriate stitch length for my fabric. It’s also important to adjust the tension settings based on the type of fabric you’re using, and I spent some time experimenting to find the best tension for smooth, even stitching.
Sewing the Pieces Together
Once everything was set up and pinned in place, it was time to sew! I began stitching slowly, taking my time to make sure the seams were straight and neat. As a beginner, I find it helpful to sew in short sections, especially around curves or corners, so I can maintain control over the fabric and avoid any mistakes. For the straight edges, I used the machine’s guide to keep me aligned, but for more intricate parts, I relied on my own judgment.
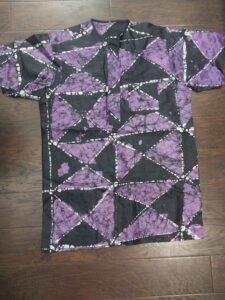
One thing I’ve learned this week is that consistency is key. Keeping an even seam allowance (the space between the edge of the fabric and the stitching) is essential for the project to look professional and neat. I made sure to guide the fabric gently, not pulling or pushing it, to avoid uneven stitching. Here is my final output
Dealing with the Fabric’s Edges
After sewing the pieces together, I went back and used the zigzag stitch on the raw edges. This prevents the fabric from fraying over time, which is especially important for projects that will be washed regularly. I’m still working on mastering this part, but I can see how it makes a big difference in the longevity of the finished piece.
Challenges and Lessons Learned
One of the biggest challenges this week was managing the fabric while sewing. Sometimes the fabric would bunch up or shift slightly, leading to uneven seams. To address this, I had to slow down, take frequent breaks to re-align the fabric, and re-check the tension and stitch settings. I also learned that it helps to keep the fabric under the presser foot steady, particularly on longer seams.
I also discovered that not every fabric behaves the same way when sewing. While cotton was smooth and easy to work with, the linen fabric I used for the stencil design tended to wrinkle more, making it trickier to manage while sewing. This was a reminder that different fabrics require different techniques, and it’s something I’ll keep in mind for future projects.
What’s Next?
Next week, I’ll be focusing on finishing the edges and adding any necessary details like buttons, zippers, or decorative stitching. I’m excited to see how the project is taking shape and can’t wait to share the final results with you soon!
For now, I’m proud of how far I’ve come in this sewing learning project. Each step, no matter how small, is a lesson in patience and craftsmanship. Sewing is truly a journey, and I’m looking forward to the next chapter. Stay tuned for more updates, and don’t hesitate to share any tips or advice you have—I’m always open to learning from others!
Happy sewing!

This look super good! I remember watching my grandma sewing growing up and she was amazzzzing! So fast at it! She is 87 and still sewing quilts now, though it is getting harder
Thanks Kacey, that must be a sweet memory. I am also enjoying every bit of this journey.
This is such a cool learning project, I had taken a few sewing classes in high school and ending up trying it out for a while on my own time sewing small things for fun. It’s definitely a process but once you’ve got it figured out it gets easier! Good luck in the rest of your journey!!