Last week as I was knitting I discovered that the stitches were incredibly tight on the needle, I could barely get the yarn to move. I ended up coming across this video on how to fix tight knitting. Through this video I discovered that this is a common occurrence when you are first starting off learning how to knit, as you are nervous. Thus, results in holding tighter to the yarn as you are afraid it will slip off the needle. Eventually you will become more comfortable and less nervous which will allow the stich to naturally be looser. In the video she suggested:
- Use wood or bamboo needles as the yarn grips easier to these.
- Also suggested a larger needle size.
I am already using large wood needles so that was a nice affirmation that I am on the right track. I also learned this happens when you are using only the tip of the left needle and not maximizing the rest of the surface space. I followed this advice and it seemed to really help make the knitting looser and made the yarn easier to work with.
Purl Stitch
 This week I decided to learn the purl stitch as when I was researching different knitting stiches, Sheep and Stitch mentioned that purl stitch and knit stitch are the two basic stitches you should learn. It sounds like all the other stitches are a combination of these stitches or build upon these stiches. So this seemed like the logical next step. I ended up using two different videos to teach me the purl stitch. Both of these videos were great resources but also had their downfalls. I found when learning online it is good to learn from multiple sources, as sometimes one source will leave things out you didn’t even know are important. Also, I found I struggled with keep good tension on the purl stitch which is something that came naturally and easier to me when doing the knit stitch. I know with practice this will get better as I become more comfortable with this new technique.
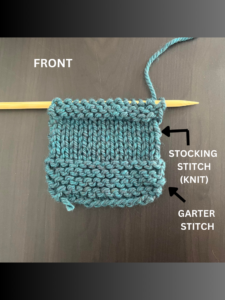
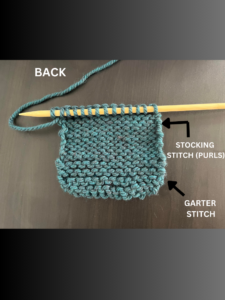 Also, I think it is important to note that while I was practicing the purl stitch I stumbled upon a piece of information I didn’t realize I was missing. I was practicing my purl stitch, row after row, and when I looked at what I was creating I realized it looked the exact same as my previous dishcloth I had made. This left me confused and wondering if I was doing the technique wrong. After some researching, I discovered that since knit and purl stitches are exact opposites of each other when you only do the one you end up with a combination called a garter stitch. This means that in my previous work, even though I was using the knit stitch technique I was actually creating a garter stitch. In order to see the true difference between the stitches, you have to do what is a called a stocking stitch (or stockinette stitch). A stocking stitch is one row knit and one row purl.
Pros:
- This video was good to learn from in the sense that she repeated the purl stitch many times, so was a good example of repetition when trying to learn
- She also slowed down each step, so was great to visually see what was happening
- Video was short and direct to the point which is beneficial if you just need to see how to make the stitch without needing to know any background information or if just looking for a refresher
Cons:
- Only showed the breakdown of the technique and didn’t give any additional information on the purl stitch
Pros:
- Great visuals for each step along the process of purl stitching
- Provided general knitting information, including the difference between knit stitch and purl stitch and how to visually tell the difference. Explained that knit stitch are flat ‘V’s’ and purl stitch are bumps.
- Demonstrated the knit stitch first and then the purl stitch which helped to see the comparison of the two and understand that they are exact opposites of each other. This was very helpful to know when learning about knitting in general and when trying to figure out how the stitches go together.
Cons:
- Nothing noteworthy
Overview of What I Learned
- When doing a stocking stitch one side is knits and the flip side is purls
- Knit and purl stitch are opposites of each other.
- Knit stitch is right needle goes underneath the left needle and the yarn wraps around the back of the right needle
- Purl stich is right needle goes on top of the left needle and the yarn wraps around the front of the right needle
Thanks for following along with Amber’s Knitting Chronicles and I look forward to what next week will bring for my learning journey!
Photo by Canva
Wow good catch! I would have never thought! It’s so interesting to see all the different ways to create the stitching’s and I loved how you showed what happened with yours and how to do it properly!
Thanks Carys!! I was surprised that none of the resources I had learned from up until this point had mentioned the piece of information that just doing the knit stitch is actually creating a garter stitch. Although maybe they all just assumed the viewer has that previous knowledge. This is something I am learning about learning from online sources, you have to piece together the knowledge, question things and then further dig for answers.
This is such a cozy and informative post. It’s so cool that you’re already recognizing the subtle differences between stitches and getting more confident. Also, major props for digging into multiple resources since tutorials can miss things.