
I am stoked about this project! I love a crossover learning opportunity. Nailing down an idea, however, has been more challenging. I bought a drumkit a couple of years ago and learned that easy White Stripes song and then didn’t touch it again. I was sold on the idea…
Until I entered my upstairs bathroom. My spouse, Brian, started tiling the bathroom after successfully refreshing the main floor half bath: before (after demo), during, and after.
We are trying to restore/maintain the character of our 120-year-old house. This has been tedious and time-consuming. As such, our upstairs bathroom reno has slowed to a halt. I realized that this was the perfect and most productive learning project for me!
The baseline for learning is as follows:
- I watched Brian do all the work so I have a little know-how by way of osmosis
- the shower portion/system and plumbing (the actual hard part) is done
- I already have all materials to complete task so the endless trips to Rona eliminated (I estimated tile myself so I very likely may run out and have to source it–get there when we get there haha..)
- I have endless access to advice/guidance if I need it (I will)
The project consists of:
- caulk shower (a simple and short job I have been putting off. It will be my warm up)
- finishing tiling the remainder 3 walls
- remove old and install new privacy thinger for window
- install sink fixture
- install vanity lighting and overhead lighting
- seal grout (at least floor and shower)
- install overhead exhaust fan (no idea how to do this)
- put up wallpaper to cover crazy messed-up ceiling instead of drywalling over it
- hang door and hardware
- hang mirror
Besides the fan, the most daunting part of this renovation to me is the tiling. I get the steps, as outlined by every YouTube video I started watching, but doing it and making it look nice seems more challenging. I am going to start by referring to the above-linked video and this tutorial. 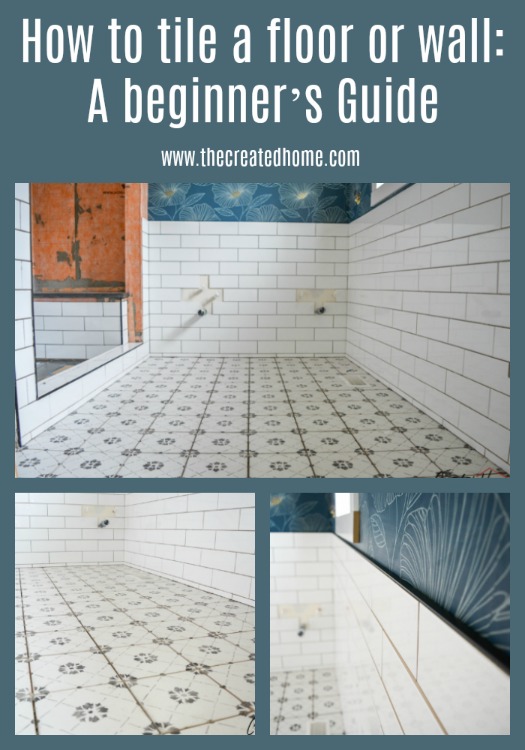
It seems straightforward, but I am told there is a certain finesse required. This is what we started with and this.
This is where we are at. Notice the walls on each side are unfinished and the wall with the door is totally empty (update with pic link later; working remotely).
Following what not to do according to r/DiWHY is my first step; watch this video. it is my worst nightmare and is still hilarious. The pros on r/Tile are not quite my speed, but I did find out how to install the waterproofing system on there. I will probably refer back in case I get stuck.
Greatest takeaway from my preliminary reading (and input from Brian) is to plan out walls to avoid splices of tile; use level/lazer to keep tiles straight; back butter tiles (spread mortar on them) in addition to spreading mortar on walls to help even out uneven walls; use lots of spacers; and don’t EVER mess with black grout, especially if tile is light because it highlights imperfections, is difficult to wipe down, and easily gets soap scummy. REPEAT: DO NOT USE BLACK OR CONTRASTING GROUT. Here is a whole contractor forum on the horrors of black grout, in case you’re curious or have been flirting with the idea yourself. Of course, I chose this demonic grout and never considered the far-reaching implications until it was on the wall, floor, and everywhere. I do have a head start in that I watched Brian struggle with it so at least I know what I am in for? I guess?
Wish me luck!