Pre-February Break Culinary Adventure: Sourdough Bagels & Cinnamon Focaccia
Before heading off for February break, I decided to get a head start on some delicious baking. I dove into the world of sourdough and crafted two fantastic recipes: sourdough bagels (inspired by Red Currant Bakery) and a unique twist on focaccia—a cinnamon roll sourdough focaccia bread inspired by Thrilled Foodie’s “The Cast Iron Series—Cinnamon Roll Sourdough Focaccia.” Not only did I prepare these treats ahead of time, but I also embarked on a valuable learning journey that deepened my appreciation for artisan baking.
Sourdough Bagels: A Classic Reimagined
I began my sourdough adventure with bagels, following the comprehensive recipe from Red Currant Bakery. Here’s an inside look at the process—and the lessons I learned along the way:
The Process
-
Mixing & Bulk Fermentation:
The dough starts with a blend of active sourdough starter, water, flour, salt, and a touch of sugar. After kneading until smooth and elastic, I allowed the dough to undergo bulk fermentation. This step lets the natural yeasts work their magic, enhancing flavour and strengthening the gluten.
Lesson Learned: Fermentation time can vary with room temperature, and a slightly extended bulk can yield a richer flavour profile(longer fermentation process= more sour flavour profiles).
- Shaping:
Post-fermentation, I divided the dough into equal portions, gently rolled each piece into a ball, and then carefully poked a hole in the center to form the classic bagel shape.
Lesson Learned: Shaping taught me the delicate balance between creating a sturdy exterior—essential for withstanding the boiling process—and maintaining a soft, airy interior.

-
Final Proof:
The shaped bagels were allowed a final proof to relax and rise slightly. (approx 1 hr.)
Lesson Learned: Finding the perfect proof time is crucial; too short leaves the bagels dense, while too long can compromise their structure.
-
Boiling:
Boiling in water enriched with barley malt syrup (or honey/baking soda) gelatinizes the outer starches, producing that signature chewy, glossy crust.
Lesson Learned: Timing is everything—boiling each bagel for just the right duration (about 1-2 minutes per side) makes all the difference.
- Baking:
Finally, the boiled bagels were baked to a beautiful golden brown.
Lesson Learned: Baking seals in the flavours and textures, reminding me that every step, from fermentation to baking, plays a critical role in the final product.
The Result
The sourdough bagels turned out with a robust tang and a delightfully chewy crust. Whether enjoyed plain with cream cheese, toasted with butter, or transformed into a gourmet sandwich, they brought an extra dose of comfort and quality to my pre-break preparations.
For all the detailed steps and tips, I highly recommend checking out the full recipe at Red Currant Bakery.
Next I moved on to Sourdough Focaccia Bread (cinnamon flavour), check it out and let me know what recipes you have tried lately!
Sourdough Cinnamon Focaccia Bread: A Sweet & Savory Experiment
Next, I explored a playful twist on focaccia, merging the warm spices of a cinnamon roll with the rustic charm of focaccia bread. Here’s the recipe that guided my process, along with the insights I gained along the way.
Ingredients for the Dough: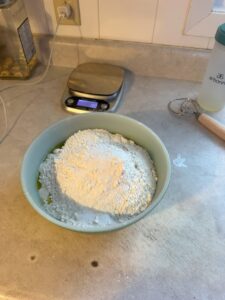
- 100g active sourdough starter
- 440g water
- 505g flour
- 5g salt
- 2g cinnamon
- 10g sugar
Instructions:
-
Mix & Autolyse:
Combine all the ingredients by hand or with a dough hook until just mixed. Cover the dough and let it rest for 30 minutes to 1 hour.
Lesson Learned: The autolyze step helps the flour fully absorb the water, making the dough more workable and enhancing the final texture. -
Stretch and Fold:
Perform 16 stretch and folds, turning the bowl 1/4 turn each time to build strength in the dough.
Lesson Learned: Consistent stretch and folds develop a robust gluten network, resulting in a structured yet tender crumb. -
Overnight Rest:
Cover the dough and let it rest on the counter overnight.
Lesson Learned: Allowing the dough to rest overnight deepens the flavour and offers flexibility in scheduling, proving that good things truly take time. -
Morning Routine:
- Drizzle 1 tbsp olive oil over the dough and perform another round of stretching and folding.
- In a large cast iron pan, drizzle 2 tbsp olive oil, then gently fold the dough into a rectangle or envelope shape.
- Cover and allow the dough to rise for 4 hours.
Lesson Learned: Handling wet dough with care in a cast iron pan emphasized the importance of gentle shaping during the final rise.
Cinnamon Roll Drizzle:
- 5 tbsp melted butter
- 5 tbsp brown sugar
- 2 tsp cinnamon
Drizzle the melted butter mixture over the risen focaccia. Then, using your fingers, gently dimple or poke holes in the dough so that the drizzle seeps into every nook and cranny.
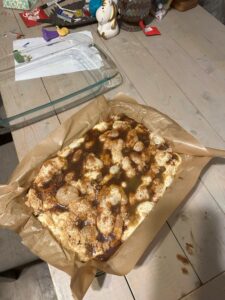
Baking & Glaze:
Preheat your oven to 450°F and bake for 23-25 minutes, or until the internal temperature reaches 200°F. For an extra touch of sweetness, prepare the glaze: ( this is where I accidentally left it in for too long and it got a little crispy on the top! But it was still tasty nonetheless.
- 2 cups powdered sugar ( I added sugar until I got the consistency I wanted)
- 4 oz of cream cheese
- 3 to 4 tbsp milk
- 2 tbsp maple syrup
- A splash of vanilla
Drizzle the glaze generously over the warm focaccia.
Lesson Learned: Experimenting with the cinnamon drizzle and glaze demonstrated how layering flavours can transform a simple bread into an indulgent treat, balancing sourdough tang with a warm, sweet finish.
Lessons Learned on My Sourdough Journey
Preparing these recipes before my February break was not just about having delicious food on hand—it was also an opportunity to learn and grow as a baker. Here are some key takeaways from my experience:
-
Patience is Key:
Both recipes underscored the importance of time—from fermentation to resting. I learned that allowing the dough to develop at its own pace results in superior flavour and texture. -
Embracing the Unexpected:
Sourdough is as much art as it is science. Variations in temperature or humidity can influence the dough, teaching me to adapt and experiment with confidence. -
Technique Matters:
The precision required in each step—whether it’s stretching and folding or boiling—reinforced how crucial the technique is in this type of baking. -
Flavour Experimentation:
The cinnamon focaccia was a delightful exploration in balancing sweet and savory. It taught me how thoughtful flavor layering can elevate a recipe from ordinary to extraordinary.
Taking these steps before my February break turned out to be one of my most creatively fulfilling experiences. I hope these recipes and the lessons I learned inspire you to explore your own culinary adventures.
Happy baking, and enjoy every delicious bite!
Feel free to leave your comments below—I’d love to hear about your sourdough adventures and any lessons you’ve learned along the way!

Wow, Shasta, those bagels look delicious! I bet your family does not mind your learning project at all. HA! I really appreciate your “lesson learned” sections – they make everything easily compartmentalized but show how each step contributes to the next. I have to admit – I did not fully understand what “proof” meant until reading your post. I have that setting on my oven and air fryer, but it never registered for my non-baker brain. Thanks for the lesson. Enjoy the break!
This makes my heart happy! I’m glad I could contribute to your learning about “proofing” in a small way! Maybe you will have to try and create something in your air fryer, that sounds intriguing to me! I have never seen bread done in an air fryer but I would guess that the proofing button is just a very warm place for bread dough to rise (aka Proof). I don’t have an air fryer but I want to look into that now that I know an air fryer has the option! Thanks!
Shasta!
Those look fantastic! I think you might have to find a way for our class to have some samples of your baking. What has been the biggest lesson you have learned so far on your sourdough journey ?
Mike
Right! I agree, I want some of the other who are doing baking to bring me some of theirs too! It all looks so delicious!!
Shasta, I think you have this sourdough baking down! Those bagels look at sounds delicious. I also really appreciated the Lessons Learned section. I’ve tried sourdough (during the COVID sourdough craze) and I could have used this advice then.
You have a lucky family!
Thank you! Those bagels may have been the best thing I have made to date! I think I need to make those again with a more advanced recipe next time! Change it up and see if I can handle it. Keep ya posted, the thing about sourdough, Just when you think you have it cased you discover 10 more advanced recipes than the previous one you just tried! It is intense!