
I have made some new progress in my Learning Project journey! This past week I really went into more detail in the Stop Motion Studio app. I learned how to set up my camera for stop motion, how to take pictures while slowly moving the objects in the scene, and I learned how to change the speed of the frames to either slow down the stop motion or to speed up the stop motion.
While making the clip, I did encounter some challenges; small challenges, but challenges nonetheless. I was forced to redo the stop motion video that I made a couple times because either my hand got caught in the images or I bumped the camera and it moved. I’ve found that that is the biggest challenge, keeping the camera in the same spot, even on a tripod, it is difficult to keep it totally still.
The clip that I ended up making for my first ever stop motion clip was very simple. I took a LEGO Brickhead Harry Potter figurine and made it appear to be spinning. The steps to this are quite simple. Simply set up your camera, set up your scene, and start taking pictures! Taking multiple pictures and just slightly moving the figure after each picture is all that is needed to make the figure appear to be rotating. While the clip is literally 2 seconds long, I can assure you it took me a lot longer that 2 seconds to create it. Here is a link to my first ever Stop Motion clip
During this week, I also looked in some timelapse tools to try and show how to create the stop motion. I chose the app Capcut to edit the screen capture that I took while creating the stop motion. I’ve never used Capcut before but I know that my students use it quite often for various projects.
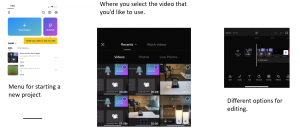
Capcut is very easy to use and has a very similar look to the stop motion app that I am using which makes the transition quite simple. Once I started a new project, I was able to choose the video that I wanted to edit. Once you move into the editing part the app, there are several options for editing your video such as adding effects, audio and text to your video. Below are some screen shots of a couple pages of Capcut.
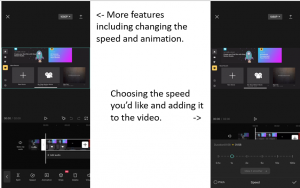
Finally I got to the time lapse part of the editing process. This part was super easy to do! I found the area where you edit the speed. Once there, you can choose the speed you’d like to use and it is that simple! You add it to the project and your timelapse is complete. Here is the making of my stop motion video, condensed into 23 seconds!
As a review for Capcut, I think it was definitely easy to learn and use. I know that my students have used it in class in the past and I would feel confident that most of my students would be able to figure it out in the future. As far as the SAMR model goes, I believe that it definitely falls into the deep end of the model, modification or redefinition. Capcut allows students to show different talents of film editing, film making, and showing talents through film that otherwise would not be possible to show at school. Capcut is also a great way for students to show progress over time using a time lapse or a similar feature with the app. That is something that would not be possible without this technology.
Thank you for not only sharing your finished project but the process you went through to create your first stop motion. I appreciate that you chose to use CapCut as I’ve been reading about it in some other blogs: I really like the time lapse feature you explained and can see myself using it in the future.
P.S.: Your efforts to keep the shot still paid off! The first time watching I didn’t notice any changes in the background. I only noticed them the second time as I was specifically looking for them. Great start to your stop motion process!