STOP the MOTION

Well, my stop motion project has finally come to an end and I have learned a lot along the way… mostly patience. There is a lot more that I’ve learned while working on this project. I learned to embrace my creativity a bit more. I’ve never really thought of myself as a creative person, but this project has really helped me realize that sometimes I can think of some creative ideas and that once I get ideas rolling, a tend to branch off of them quickly. I’ve learned how to use YouTube as a research tool for University rather than to simply look up funny videos. I’ve also learned how to connect with my students a little more through this project as I assign a “Genius Hour” project to my students every year. Now I can truly reflect on the work my students do and can give them better advice and feedback based on my own experiences with a similar project.

I’ve already shared my final project when it comes to Stop Motion, but I would like to share with you a full summary of my journey through the past 3 months.

Learning Project week 1 – Where do I start?!

When I started this project, I really had no clue what I was going to do. I didn’t have much of a plan and I really didn’t know where to start. I figured that if my students in grades 6 and 7 could do good work with Stop Motion, how hard could it be?!

I ended up watching some YouTube videos and looking at a few articles to get me started, but it was slow going to begin.

Learning Project week 2 – Here. We. Go! (Joker voice)

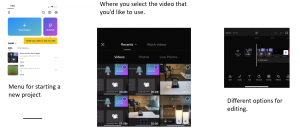
During week two I found my most important resource for this project, the Stop Motion Studio app. This app was easily my most used tool. I used it to create all the videos I made as well as for many learning purposes as it provides many tutorial videos on it which helped so much for a beginner such as myself.

Learning Project week 3 – Lights, Camera, timelapsespinACTION!

Week three I finally got to it and made my first stop motion video. I watched a lot of tutorials through the Stop Motion Studio app and tried my best at something super basic. I made a video of a Lego figure spinning. It was a good start and gave me some confidence moving forward.

Here was my first video: Spinning Harry

Learning Project week 4 – A LOUD Wedding

In week four I really focused on adding sound effects to my stop motions. I looked through the sounds that the Stop Motion Studio app offers and even added in some of my own sounds. This was a fun experience and I felt confident in my abilities to add sounds after this week.

Here was the video I made for week 4: Happily Married

Learning Project week 5 – Nothing to see here… but a lot to talk about

This week, while I didn’t make any new videos, I spent a lot of time researching about stop motion and how to make better videos and to find new resources. I read a couple articles, watching some videos. I tried to find some blogs about it but had no such luck finding anything that really enriched my learning. This was a good week to take a step back and figure out how I could refine some skills that I already learned.

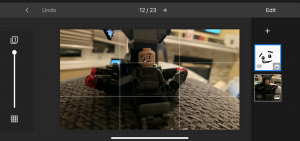
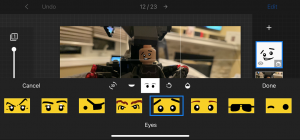
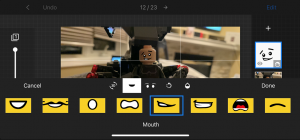
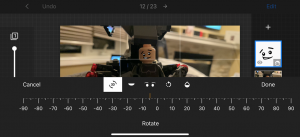
Learning Project week 6 – The Many Faces of LEGO Stop Motion

This was the week that probably challenged me the most. Using the Stop Motion Studios app allows you to add faces to blank LEGO characters. This sounds really neat, and in all honesty, it is a really cool aspect of LEGO stop motion… However, it is quite challenging to be good at. It takes a lot of practice and patience, I hope one day to get better at this aspect of stop motion. I did create a video using the different faces the app offers while also continuing to add my own voice to the video.

Here is my week 6 video: Faces of Motion

Learning Project week 7 – Walkin’ Towards Progress

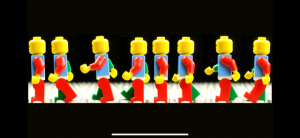
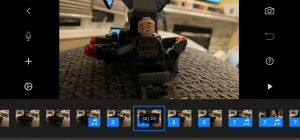
During week 7 I learned how to make LEGO mini figures appear to be walking which is really cool to watch come together. It takes 9 images alone just to create 1 walking rotation of 2 steps. Makes a full length video with a lot of walking would be incredibly tedious just to create the walking animations. This shows how much time and work can go into a simple motion a LEGO stop motion video. I made a short video illustrating a walking sequence with a LEGO mini figure.

week 7 walking video: Storm Trooper walking video

Learning Project week 8 – The Beginning of the End

During week 8, I really started to focus on my final project and how I could bring everything together. I got my students to help me come up with a story line and started putting together some sort of script. I realized that it was going to take a lot of work but I was excited to get started on my final piece of work.

Learning Project week 9 – Jack of All, Master of None

This was the last progress post that I made. I was really struggling to actually get going on my project, mostly because I had such grand ideas but was struggling to figure out how I was going to realize those goals. I was often comparing my work to stop motions that I saw on YouTube and how well done they were. I had to take a step back and admit to myself that the people making those videos most likely had a ton of experience and I was very much a beginner still. I settled to the fact that I just need to focus on what I CAN do and not the skills that would take much more practice and mastery.

All in all

As this project comes to a close, I am very happy with my final product. I learned so many skills that I didn’t have before this project started. I really learned about all of the time and effort that goes into these projects and other stop motion pieces. I spent upwards on 12 hours to create a 5 minute video, which compared to other, more sophisticated LEGO stop motions, was a very average work. This is just an example of how much work and time goes into the really well done LEGO stop motion movies. I hope to one day reach that level of creative work if I keep on working on these skills.

Here is the link to my final product, which was combined with my Summary of learning for EDTC300:

Final Learning Project and Summary of Learning

Enjoy!

The Summary of my Learning Project – See what I did there?

Over the past few weeks, I have been working on ideas to present the final product of my learning project as well as putting together my summary of learning. I thought to myself, “What better way to show my summary of learning than THROUGH my learning project?!”

After brainstorming with my students of how I could mix together Star Wars, Harry Potter, and The Simpsons, I was able to put together a combination of what my learning project has taught me with everything that we have learned in EDTC300.

I started my final project as I mention previously, through brainstorming with my students. Once I heard a few great ideas, I started putting together a script. The idea of combining my learning project with my summary of learning came to me while I was thinking of how I could present it. What better way than to use the skills that I’ve been learning all semester long through stop motion than to use that to share EVERYTHING that I have learned so far. I started with the idea that Vart (changed name for copyright purposes) would have an upcoming test on blogs and the functions of Twitter. Hairy Potta (again, copyright) and his friends would be able to help Vart study a bit while he explains the functions of those topics. Afterward, those characters end up on the S.S. Killstar (you get it at this point…), where they landing in a room with workers talking about online safety, didgtal literacy and digital identity.

I thought this would be a fun way to end my learning journey and I’m happy with what I learned along the way. From having 0 experience with stop motion to creating a short film with 400+ images and tons of audio mixed in, I learned a lot during this process. Someone who has never done stop motion might think that taking 400+ pictures would be the most tedious part of the process, however the Stop Motion Studio app makes it so easy. The most tedious part by far is adding the audio and making sure that the audio and images line up properly. At this point, I’ve spent many hours putting together different stop motions and learning different skills. My final product might not be perfect, and it is nowhere near what professionals can do but I’m proud of what I’ve created and I hope you enjoy my final product!

Jack of All, Master of None

Doing this project has been a great learning experience and I’m more than grateful for it. While doing this project, I learned a ton about stop motion and all of the little things and movements that go into it. The editing definitely being the most tedious of all the skills that I learned. Over the past two weeks, I’ve been fooling around with the app more and trying to pin point my ideas for my final project. Over that time, I have come to a tough but simple conclusion… While I have learned a lot and am miles ahead of where I started, I am nowhere near being a master, which has been kind of tough to accept, even though I really haven’t been working at this as long as I’m sure many people around the world have.

It is very difficult to be really good at stop motion and I’ve accepted that my final project is not going to be a professional piece of work… It is going to look choppy at times, the sound effects won’t be perfect, and the editing is going to take a long time simply to make a short story video.

While my final project is coming together nicely, I’d like to share a lot of the content that I’ve found along the way to help me improve!

A lot of the videos I’ve found to help have been through the Stop Motion Studio app. They have a fantastic library available to help beginners with their work and the videos are quite easier to follow and are great for instructional work. I’ve also been on YouTube to help find other tips and tricks as well as ideas for videos to make.

In previous posts, I’ve highlight articles that have helped me on my way with tips and tricks and I’ve even had the opportunity to talk to some of my current and previous students about their experiences with Stop Motion and how they made their projects work.

Overall, it has been an amazing experience and as a practicing teacher that implements Genius Hour in their classroom, this project has given me the opportunity to show my own students the “Genius Hour” project that I’ve put together myself. It definitely speaks volumes as a teacher to be able to show students that I’ve done the same type of project as a student myself and what I’m expecting of my students is not unrealistic!

The Beginning of the End

I feel like at this point I have at least tried all of the skills when it comes to Stop Motion and using Stop Motion Studio that I feel comfortable trying right now without pushing myself too far and trying skills that I wouldn’t be able to master. Now is the time to start working on my final project.

I started by asking the help of my class for ideas for script/story line. This was a lot of fun as I only gave them a few parameters to work with. I have a lot of LEGO at home… I gave them the ideas of Star Wars, Harry Potter and The Simpsons to work with. I also gave them the option to come up with an original idea as I have a lot of regular LEGO that isn’t affiliated with any sets. We bounced some ideas around the class, some absolutely ridiculous and some were actually pretty good. It was a really good opportunity to hang out with my class in a casual setting and for them to get to know that I am still participating in creative projects as a student right now as well!

I have started coming up with some of my own ideas based off of what they brought forward and I’m making some progress. The idea of a Star Wars/Harry Potter crossover could be a lot of fun, and also hilarious. I’m still open to ideas! If anyone has any fun ideas of how I could incorporate the themes that I proposed above, that would be amazing! I think I’m going to have a lot of fun putting together my final project and can’t wait to really get going on it!

Let me know if you’ve got any fun ideas as well!

Time To Write Typewriter Concept

Photo by Ivelin Radkov

Walkin’ Towards Progress

This is most likely not going to be a very long post, however, I did learn a new skill when it comes to Stop Motion! This week I learned how to replicate a walk cycle of a LEGO mini figure. It was a pretty basic skill to learn but it is also essential to making a short film using the LEGO figures. Below is the walk cycle illustrated in one frame.

LEGO walking sequence

I did make a little video as well with some waving action from the mini figure. This Storm Trooper walking video will probably be the last video that I post before I start working on the final project for this assignment. I feel like I have made a lot of progress along the way and I’m excited for my final product and what I’ll be able to produce!

Thanks for tuning into my quite short progress post!

The Many Faces of LEGO Stop Motion

This week I challenged myself to do a deeper dive into adding faces to LEGO faces with the Stop Motion Studio app. This process proved to be a lot more time consuming than I anticipated. After taking to initial pictures of the frames that I wanted, I needed to copy and paste those images to ensure that I was using the same frames and only editing the faces on the LEGO figures.

Going through the different facial feature options was a lot as well as making the slight changes to the frames like changes the faces, moving the faces, and rotating them was very time consuming and a lot of work. While I was doing this, I was also adding sounds and assuring that the sounds were lining up with the frames and images. It may not sound like I did much and this is a shorter update than I’ve had in the past but most of my time was simply spent making tiny changes and copying and pasting frames to make the changes.

Below I have added some examples of what the app looks like while I’m editing and making these changes.

An example of the multiple frames and the added edits to add audio and pause frames to ensure the sound/voice effects line up with the images.

This is the look of the page when you add a face to your frame

These are different eye options. Only a few among many more once you start scrolling.

Different mouth features, similar to the eye features.

This is where you can rotate the faces on your image. This is often used to make a character appear as if they are facing a different direction other than straight at the camera.

Here is a short video that I made this week which uses different features such as the faces being added to the frames and voice over effects for the speaking parts. Please excuse my TERRIBLE voice acting… Enjoy! Faces of Motion.


Nothing to see here… but a lot to talk about

I have already come quite a long way in my journey of never making a stop motion video ever before, to experimenting with visual and sounds a few weeks later. This week I thought that I would take a break from making videos and decided I would instead focus on researching and fooling around with the app a bit more to better understand the more complicated parts of LEGO stop motion.

I started looking into some articles that I could find related to LEGO stop motion. Unfortunately, there is not a whole lot dedicated solely to LEGO stop motion, however, I was able to find one pretty good article that I enjoyed reading about another creator’s experience with LEGO stop motion. The neat thing about this article: LEGO stop motion for beginners, is that the creator was also using the Stop Motion Studio app that I’m using as well! What I really liked about this article is that it keeps everything simple. The article gives you some easy tips and tricks to improve for creating skills, as well as it gives you a list of supplies to use to make things easier. The article also included some videos for visual learners to use which was very helpful.

The next thing that I did was focused strictly on LEGO stop motion from now on and not just stop motion in general. The app that I’m using, Stop Motion Studio, Has many tutorial on all of the different aspects of LEGO stop motion. I decided to take some time and to watch and then practice some of the techniques shown in the video.

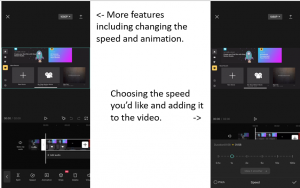
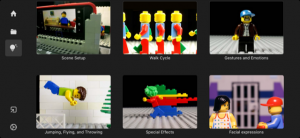
These video are super helpful as they walk you through exactly where to go on the app to add which effects. I am learning that there is so much time and effort that goes into the short video clips. I’m excited but also a little bit nervous when it comes to starting my final project.

As I was going through the tutorial videos, I was realizing that there are so many parts needed to make a successful LEGO stop motion video if you want it to be done well and to use the full potential on the video. I started looking at kits that are available for making LEGO stop motion and I found a fairly inexpensive one from the LEGO site that is also available on Amazon.

This kit comes with a platform, which is very useful for LEGO stop motion to assure that you mini figures stay in place. It also comes with several mini figures, different accessory pieces, and several different backgrounds that you can use.


I have made quite a bit of progress this week, even though I haven’t actually filmed anything. I learned a lot of the intricacies of LEGO stop motion, different accessories that will make my creating experience better, and I’ve been able to gather more tools. There are couple more skills I want to practice before I start working on my final project. I can’t wait to keep moving forward!

A LOUD Wedding

This week on my Stop Motion journey, I fooled around a bit with sound effects on the Stop Motion Studio app. It was a lot easier than I thought it would be. The app makes it very easy to be able to insert different sounds that over lap each other and it also makes it simple to cut down the sounds to better fit your motion picture.

By access the sound section of where you can add things to your movie, I was able to scroll through and find some music that I could play in the background of my video. There are quite a few options but I think there could be more added in the future. My video is a wedding themed video for this one and I hoping there would be something labelled “wedding music” or something similar to that but unfortunately I could not find such things so I settled for some low key happier toned music that was available on the app.

The app also gives you the chance to record your own sounds. In my movie, I capture the bride and the groom kissing. Unfortunately, the app does not provide a sound effect for a kiss for I had to record the kissing sound on my own and insert it into the movie.

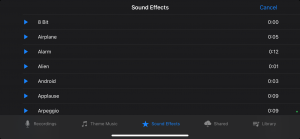
At the end of my video, I found a clip for a crowd cheering so I could emphasize the end of the of the wedding. In the screenshot that I took you can also see some of the other options for sounds.


Finally! Here is my latest creation using Stop Motion “Happily Married

Enjoy! I appreciate the comments and feedback!

Lights, Camera, timelapsespinACTION!

I have made some new progress in my Learning Project journey! This past week I really went into more detail in the Stop Motion Studio app. I learned how to set up my camera for stop motion, how to take pictures while slowly moving the objects in the scene, and I learned how to change the speed of the frames to either slow down the stop motion or to speed up the stop motion.

While making the clip, I did encounter some challenges; small challenges, but challenges nonetheless. I was forced to redo the stop motion video that I made a couple times because either my hand got caught in the images or I bumped the camera and it moved. I’ve found that that is the biggest challenge, keeping the camera in the same spot, even on a tripod, it is difficult to keep it totally still.

The clip that I ended up making for my first ever stop motion clip was very simple. I took a LEGO Brickhead Harry Potter figurine and made it appear to be spinning. The steps to this are quite simple. Simply set up your camera, set up your scene, and start taking pictures! Taking multiple pictures and just slightly moving the figure after each picture is all that is needed to make the figure appear to be rotating. While the clip is literally 2 seconds long, I can assure you it took me a lot longer that 2 seconds to create it. Here is a link to my first ever Stop Motion clip

During this week, I also looked in some timelapse tools to try and show how to create the stop motion. I chose the app Capcut to edit the screen capture that I took while creating the stop motion. I’ve never used Capcut before but I know that my students use it quite often for various projects.

Capcut is very easy to use and has a very similar look to the stop motion app that I am using which makes the transition quite simple. Once I started a new project, I was able to choose the video that I wanted to edit. Once you move into the editing part the app, there are several options for editing your video such as adding effects, audio and text to your video. Below are some screen shots of a couple pages of Capcut.

Finally I got to the time lapse part of the editing process. This part was super easy to do! I found the area where you edit the speed. Once there, you can choose the speed you’d like to use and it is that simple! You add it to the project and your timelapse is complete. Here is the making of my stop motion video, condensed into 23 seconds!

As a review for Capcut, I think it was definitely easy to learn and use. I know that my students have used it in class in the past and I would feel confident that most of my students would be able to figure it out in the future. As far as the SAMR model goes, I believe that it definitely falls into the deep end of the model, modification or redefinition. Capcut allows students to show different talents of film editing, film making, and showing talents through film that otherwise would not be possible to show at school. Capcut is also a great way for students to show progress over time using a time lapse or a similar feature with the app. That is something that would not be possible without this technology.

Here. We. Go! (Joker voice)

This week I started doing some research into what apps might be good and where to get started with stop motion. I started by talking to some former students of mine and hearing what they had to say and the experiences that they have had. I then did a little bit of my won research and have come down to the app Stop Motion Studio.

Once I decided on the app that seemed to be the best based on reviews, articles, and the opinions of my students, I started looking into the app and how to use it. After downloading the app, I realized that the app provided multiple tutorial videos that I could watch as well as other example videos from other creators. I took it upon myself to look into YouTube as well to find some more in depth tutorials and some general tips for stop motion.

I’m super excited to get going. This week I plan on fooling around with the app to get used to using it. I would also like to start coming up with ideas for my final project… I’m think maybe a StarWars/Harry Potter crossover maybe? Stay tuned for details…

Tutorial sign on a wooden table in a room with lights