This week’s app that I have chosen to do a quick little overview on is Canva. Although, personally, I’ve religiously used the basic PowerPoint software on my laptop to create presentation, I thought this would be a perfect opportunity to step up those skills and venture into the world of Canva.
While I hopped onto canvas digital site, it was easy enough to create a free account, that sets you up with the basic functions and applications available within the program (there is even an option for blogging on Canva) although, I didn’t venture down that road yet. I decided to keep it simple as within a elementary classroom setting we will most likely be focusing on learning how to create a presentation.
With that being said; here’s a quick rundown of how I’d present Canva to a grade 5 class!
Step 1: Log in (school account)
Step 2: Find the create a design button in the top right-hand corner
Step 3: Find the right design for your project (for this case we’ll be looking at presentations)
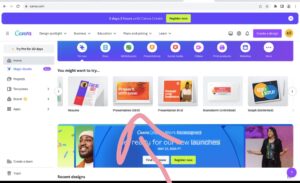
Step 3: Pick out your template, and hit apply to all pages at the top (make sure the theme is appropriate for the topic, and is easy to read
Step 4: Begin creating!
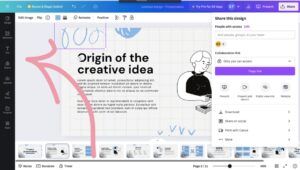
Step 5: On the left-hand side of the screen there is a tool bar with the options to add in elements, text, uploads, draw and ect.
Step 6: Go through the slides and add in your own information. Each slide is pre laid out with Canva words. Take the time to go through the slides and take out their words and put in yours!
Step 7: Tt’s okay if you accidentally deleted something you needed! at the top of the page there is another blue bar with the undo and redo button. Just click whichever on you need
Step 8: Play around with it! Here’s a few tips and tricks…
- To change the colour of elements, click on them till they are surrounded by a purple box, once highlighted you can edit image, flip, change color or animate by clicking one of those option on the top bar.
- To add in other graphics, click the elements icon on the left hand side of the page, once it expands out there will be another search bar that says “search elements” here you can type in what you’re looking for and add them to your presentation. The fun thing about these graphics is you can also edit and animate them!
- To add in your own photo, go to the bar on the left-hand side of the screen there’s an icon to add in your own images. Simply click the upload icon, and then it will expand until you see a bigger purple button that says upload files. Once you hit that button, follow the prompts (make sure the picture is appropriate)
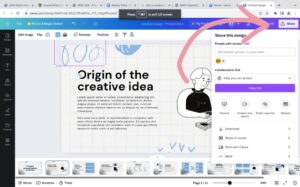
Step 8: Canva is a save as you go app, so as you’re working on your presentation it is actively saving it as well. But once you’re done if you want to download your work, simply go to the blue menu at the top of the screen. On the top right-hand side of the screen there will be a grey share icon. Click on this and a drop-down bar will appear, at the bottom of this there will be a download button click on this, and follow the prompts to download.
Optional step: To add in other members to create a group project find the blue menu at the top of the screen. On the top right-hand side of the screen there will be a grey share icon. Click on this icon, and a drop-down tab will appear, in the tab there is a bar to add in members in this space add in your group partners emails so they can help create.
Once the initial learning curve of how to navigate Canva is figured out, I personally will us this to create more interactive presentations. Allowing for the chance to have more engaging class discussions and participation. Allowing for substitution, and argumentation of the SAMR model to be present within the classroom setting by enhancing how we as teachers create and preset material.
Thanks for reading along!
One Comment
Rowena Cuento
Hello Katelyn!
You’re off to a great start with Canva! Even if you haven’t explored Canva’s blogging features yet, it’s exciting to know that there’s even more potential waiting for you to be explored. Thank you for sharing your insights, and I’m looking forward to reading more about your experiences with tech tools as you dive deeper into it! Keep up the great work!