I spent the week reading some articles about bread baking, and I ended up going down a rabbit hole of bread…. Bread 101, the science behind baking bread, bread history, no-knead bread, breading on food, milk-bread, soda bread….and this list goes on . I guess I am ignorant to the passion surrounding bread. Maybe I, too, will become passionate about bread after this project is over. Eventually, I settled on trying a blogger’s recipe. What caught my eye was this: “Easy fast bread recipe that bakes up soft, fluffy and golden brown in only 60 minutes.” ONE HOUR. Come on folks. If you read last week, I spent 4 HOURS baking 2 loves.
I repeat: ONE HOUR.
Let’s do this.
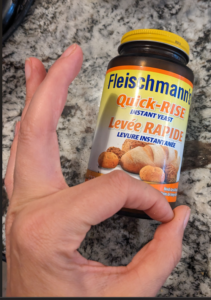
I quickly realized that the reason this recipe only takes one hour is because of this magical ingredient: quick rising yeast. I am 99% sure Mamma Val used this back in the day. There’s no way she would spend 4 hours on her bread with 3 kids all up “in her kitchen”. Huge shoutout to Mamma Val again. Naturally, she had an entire jar of quick rise yeast she gifted me. She is the best.
After taking my middle child to soccer one evening, I came home and promptly gathered my ingredients, excited to have fresh bread in one-hour as the recipe claims. It was 8:00pm, and I was hopeful to be crushing a fresh slice of bread and butter at 9:15pm. I’m so sorry to report: SugarGeek Recipes:

To begin, I had to warm the milk to a very precise temperature: 110 degrees. I was very worried I was going to scald it, so I took this part slowly, warming up the milk 30 seconds at a time. Well, it turns out, I went one 30s too long that it ended up WAY over the recommended temperature. So then, I had to let it cool. Not off to a very good start of the one-hour track. This recipe calls for the use of a stand mixer with a dough-hook, and since I have a Kitchen Aid one, I was pumped to use it, thinking it would make up for the time spent on not scalding the milk. I threw all the ingredients in the bowl and let the mixer do the work. I guess I wouldn’t be getting in my muscle work by kneading like last week. Pffffffffff.
FALSE.
I followed the instructions to the letter, and I kept testing it to get the little see through window without tearing as stated.
NOPE.
Uggggh. So, I went back to what I know best: kneading it by hand for another 15 minutes to get that darn stretchy window. I finally achieved that, and this dough was ready to rise. (TIME STAMP: almost 25 minutes into the recipe).
Just like I remember Mamma Val doing, it told me to put it in an oiled bowl with a towel over top, and leave it somewhere warm. It happened to be 29 degrees out, so the air conditioning was on. I had nowhere warm, so I thought I’d try their suggestion of turning the oven on to the lowest setting and setting the covered bowl in. PERFECT.
Uggggggggggh.
I didn’t read the suggestion correctly, and put the bowl literally in the oven and closed the door. WRONG. I wasn’t supposed to shut the door because it gets too hot and could kill the yeast. Oh well, 25 minutes into the rising, and it looked pretty good to me. I guess I’ll never know if I killed the yeast or not (TIME STAMP: well over 60mins into the recipe).
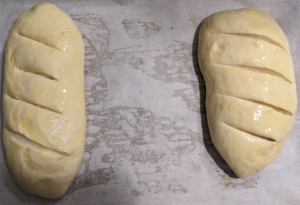
I cut the dough in half and shaped it. I like that I could just shape it onto a parchment lined baking sheet. I am no artist, but there’s definitely some French bread vibes here. Then, I had to put an egg wash on it. Egg wash. Pfffffffffffff. What a waste of an egg. I guess I should I have read all the notes at the end that it could have been milk. Or water. Or something else. I guess I also should have read that an egg wash is egg and water, not just an egg.
Ugggggggghhhhhh.
Then I had to score the top with four diagonal cuts “at a 30º angle in the top of the loaf, about ¼” deep”. What? I have no idea what that looks like, so I just went for it. Pretty sure I went too deep. And after a solid 90 minutes into this “One-hour bread recipe”, into the oven for 25 minutes.

For sure cut it way too deep.
I mean – the house smells incredible again, so maybe it is worth it?
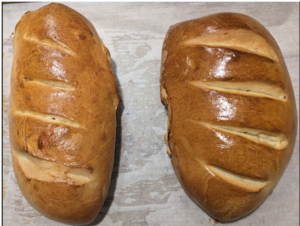
Okay. FINALLY. After one hour and 55 minutes into the recipe, the bread is done. It actually looks fantastic. I loved the suggestion to take the temp in the middle of the bread, and if it’s between 190-200 degrees, it’s done. This is a solid tip I will use for the forthcoming weeks. They were perfectly golden – I guess the egg wash did it’s job.

Looks gooood…with some deep cuts.
I wanted to let it cool longer, but PLEASE NOTE: it’s 10:00pm at this point and way past my breadtime (see what I did there…). I have lost my mojo.
Alas, to quote Larry, “let’s butter a slice and giv’er a taste!”.
Unreal. Light. Fluffy. Tasty. A success.
So, my friends, this is definitely not a one-hour bread recipe for beginners. This is more like a one-hour bread recipe for seasoned bakers. In fairness, I should have read all the way to the end before starting. It would have saved me a lot of “pffffsssss” and “ugggghhhhssss”. I should have clicked on “jumped to video” instead of “jumping to recipe”. The video was super helpful and made me recognize my mistakes in hindsight. Also, the mixer she uses looks super cool – I’ve never seen anything like that in all my Food Network watching. Probs the most important fact of all time: the quick rise yeast saved me 2 hours – I think it’s the real MVP here.

The real MVP
Or, maybe it’s my husband who is getting fresh bread once a week.

Crushing it

One happy hubby.
Overall, this recipe is good, but I still don’t buy that it’s a one-hour recipe, especially if your standmixer doesn’t do its job. I take full responsibility for not watching the video or reading the recipe notes at the end, but let’s be honest, shouldn’t those notes be put within the instructions, not as a sidebar? I feel like there should be, in big bold letters, READ THE NOTES AT THE END BEFORE YOU START. I do think this bread tasted better, was lighter and fluffier, and much quicker than Larry’s recipe, but I think at this point, I would use Larry’s instead. I can’t fault the recipe for my user errors, so I’d still give it 4 doughballs out of 5.


Stay tuned for next week when I try buns for the first time. I’m quite certain it will be quite bun-ny.
Laura, I love so many things about this post and about your bread making efforts. First off, I’m slightly jealous that your hubby gets to be the taste tester of all these delicious looking creations. Secondly, I commend you for taking this task on. Bread making is not easy to do and it is even tougher to do it well! Lastly, I’m highly entertained by your puns and the use of doughballs as your ranking system. Well done! I tried to get into sourdough bread making during COVID and it was a tough task. I definitely had more failed attempts than successes! Thanks for the heads up about reading the notes at the end of the recipe first. Such trickery to not put those notes in the instructions at the start. I can’t wait to see the other dough-licious baking that you create!
Thanks for your words, Michael. You know, I thought the second week would be better, but it is just not what I thought it would be. I’m so glad you find my blog funny…I like to think that humour will get me through this. I make notes at every step of the way, and then I string them all together for my post. I would be a little more uncensored if I could. I’ve only been doing this for 2 weeks, but I 100% am sure that sourdough is not in my future. No chance. Solid pun, btw. I’m here for it. 🙂
Hi Laura!
I am laughing out loud reading your post. One early Sunday morning I saw a reel, Tik Tok or some kind of quick video and it was all about how to make this “foolproof” bread. I grabbed all the ingredients to make it, worked all day on it and it was TERRIBLE! Shout out to your husband for being your emotional support! You are showing grit and perseverance!
Thanks, Karlee. I feel like bread should be this super easy thing, especially since so many people and places claim it to be, but it’s definitely not. I appreciate you sharing in the difficulty. Thanks for following along in this misery. Hahaha.
This update made me giggle! A coworker of mine has been dabbling in learning about making breads and he too has gone down the rabbit hole you talked about. So much to learn about it and I have listened to his triumphs and his failures so I can say you are not alone.
Isn’t quick rise awesome? Don’t give up on your hopes of making a sourdough bread! It’s one of my favourite breads my colleague has done.
Mama Val here, thanks for the all the accolades. Truth be told I always have such good intentions. You may have noticed the yeast had not been open. Pretty big jar, and past the best before date…What was I thinking? Happy to be able to have it for you to use. I love reading your blog and I love being your mom.
Laura, not only do I love the sarcastic humour, I feel you’re my spirit human, but I find this post incredibly relatable. I. Cannot. Bake. I set out on a mission a few years ago to be able to bake bread and turns out it’s the only thing I can bake. I have a French loaf recipe that works well for loaves and buns if you’d like it. Maybe it will work! https://roxannej1.wordpress.com/2014/03/02/90-minute-bread/
What strikes me about all of these Learning Projects is the depth of each subject. I’m sure everyone doing this project has found what a rabbit hole you can go down as you explore a new topic or skill. As others have said, your post is a great mix of comedy, detail, visuals, and relatability! Great work, Laura!