Learning Through Living

Month: February 2024

Follow Along With Me: Woodworking YouTube Videos

I have been putting off this form of learning for a while now, due to the fact that in other areas of my life, I tend to gravitate towards this form of learning. That is of course the humble YouTube tutorial. I have used it in some ways during my learning project such as, to help with the learning of programs or to gain inspiration, but this week, I wanted to see how it would go if I built something alongside the video, in real time.

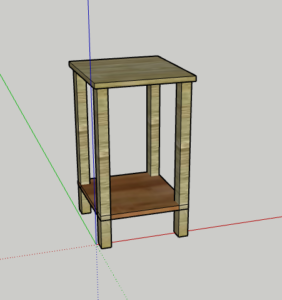
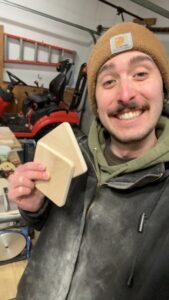
Throughout this experience, I have been trying to make practical items that I will be able to use every day and this week is no exception. As I was looking through YouTube to gain some ideas, I came across a video talking about coasters. I thought this would be a perfect build as it is not something that I currently own and I believe it is another approachable project for someone who is just getting started with woodworking.

There were two videos that I decided to follow, the first was by Ben Grimsley Woodworking.

This was an great place to start for building the coasters. I decided to make some modifications to the size as I did not like how thick these coasters were but that was a simple enough adjustment. In the video Ben is using a hardwood, which I did not have available to me so I used some old scrap pieces of pine we had around the shop. As you can see from the thumbnail of the video the coaster holder is very basic. I wanted to challenge myself a little more with a more appealing design. Lucky for me a video appeared in my recommended feed from Keddie Woodshop which had exactly what I was looking for.

Something I found challenging at first was the fact that my coasters were one measurement and the coaster holder was a different measurement. I almost made the mistake of copying each video exactly as they were, but I am glad I caught this before it resulted in a lot of frustration.

Keddie Woodshop’s video also finally inspired me to create a crosscut sled for the table saw.

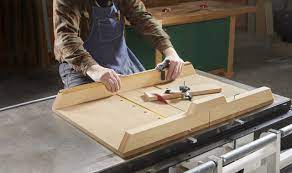
https://www.familyhandyman.com/project/table-saw-crosscut-sled/

They are very easy to make and in addition to making all your future cuts much easier, it adds a slight level of safety as your hands have more surface to hold onto while you push the board through the table saw. I constructed mine on my own however if you are interesting in building one yourself, Jay Cork with Family Handyman is an excellent website to check out. He has an instructional video as well as a step by step walk through with images on the website for you to follow along.

Overall the coasters turned out really well! As I anticipated watching a step by step YouTube video is my preferred way of learning a new skill. Being able to see exactly what the individual is doing helps a lot when you are trying to replicate it yourself. You also have the luxury of pausing at anytime so analyze the image further or even replaying certain steps if you did not fully understand the first time.

I am enjoying the process of exploring other methods of learning online, but I think myself and instructional YouTube videos will forever have an unbreakable bond.

Until next week,

Kyle


Flip That Camera on and Start Recording!

This week I will be reviewing a website called FlipGrid. I have used the site once before in my ECS 300 class however, that was as a student and I was curious as to what the program could offer for educators. FlipGrid is a video recording website used for educational purposes and is very easy to set up. Once you have signed up using your email you will be prompted with a screen asking you about the community and subjects for your account.

This is excellent for organization if you are using this in multiple way or for multiple classes. There are several options from math, law, and science, to art, music, and language. Once you have set up your account it is time to make a group.


On the left hand side of the home screen you will see a camera tool, a spot where you can view videos that you have created, a purple plus sign with group next to it, and underneath that you can view all the groups you have either created our are a part of. For today we will be creating a new group and after clicking on the purple plus button a drop down will appear (as shown in the image), we will click on create group.


You will then be given a screen that askes you to select a grade level for this particular group. Again this is very handy for organizational purposes.

Following the selection of the grade level you will be able to customize your home page. I have titled this group Woodworking Project, however for a teacher is might be beneficial to name it something like Math Grade 6, or building project February 2024. Not only does this help keep you organized but also helps your students navigate the program if they are in more than one FlipGrid group.

I have also chosen a background that pertains to the topic of the group. The website offers some stock examples however they are limited. With that being said there is an option to upload your own images to the program.

Now that we have set up our group it’s time to look at what FlipGrid has to offer. The main premise is that the teacher will create a topic which the students are able to access and respond to in video form. Some of the stock examples that are generated when you first create an account are shown below.


Creating a topic is very easy. Simply click on the purple topic button that can be found on the home screen. It will take 
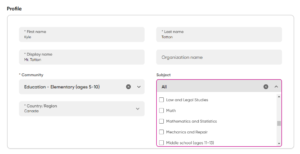
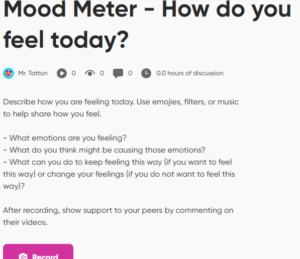
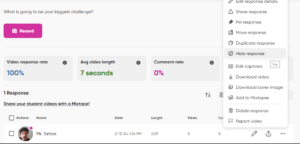
you to a page where you can give your topic a title, and a brief description about what you would like to students to discuss in their video. One of the features that I find super interesting is the time limit for recording. It ranges from 15 seconds to 10 minutes and I think it is an excellent way for your students to stay on track while answering. If you have a shorter time limit it forces the students the really think about what is important in their response and only share the key details.

I have created a topic as an example for how FlipGrip might be used in the classroom. I have titled to topic “What’s in your Shop?” and the prompt is asking the student to create a video describing some of the tools and materials they have available to them, what they are going to build with it, and what is going to be their biggest challenge.

After clicking on the record button the students are brought to a screen where they can create their video. There are several options to choose from including a backdrop selection, the choice between video or audio only and a number of text and drawing features that add a level of creativity to the recording.

Jumping ahead slightly, but after you have created your video there are a few editing options such as, trimming your clip and adding ambient music. Something else that is think would be super helpful for students is the ability to access the prompt while record. As shown in the image below.


This saves students from having to write the prompt down and look at their paper while record, or have to redo their recording because they forgot what they were supposed to talk about.

Overall I think this is an excellent website to use in classrooms. It gives students an alternative to journal writing or other small writing tasks. It could also by a tool used for accessibilities if a student has difficulties with writing or if  English is their second language they may be able to express themselves more thoroughly this way than on paper. I could also see myself using this a lot in art classes as students create their own songs and dances as well as skits for drama. The interface is easy to navigate and all topics and groups are given a code which is great for easy sharing. A new topic can be added at anytime which makes this a very interact process. The teacher can also record a video that can be view by the students for an example.

While exploring this program I had a thought that students may not want their peers to be able to view their videos. I think for some assignments it is important to share with classmates, however something like journal responses can be quite reflective and vulnerable. There is a solution for this! Once a video has been uploaded to the topic, the educator can click on the three dots at the far right of the video (can be seen at the bottom right of the above picture). This will bring up a menu with several options. Clicking on hide response, will only make that submission visible to the educator.

I have created an example video responding to the “What’s in your Shop?” topic that can be viewed by clicking this link. Once again I think this is a great tool that will definitely be seeing some use in my future classrooms. I highly recommend checking it out. I am also going to link two YouTube videos one for teachers, and one for students that visually walk you through the steps of setting up an account and provide a more in depth look at how to use some of the additional creative features while recording.

Thanks, see you next week!

Education in the Digital Age

When you picture a classroom what do you see? Maybe some desks, a whiteboard, several books, notebooks, pencils and paper. I would say this is a common idea of what a classroom looks like as this is what most of us experienced growing up.

Picture of a Elementary Classroom

https://en.wikipedia.org/wiki/Classroom

But perhaps in your vision, you also saw a smart board or TV and students with laptops and tablets. If so you have envisioned the modern classroom and what most schools look like today.

A Picture of a class of students with laptops in front of a tv

https://www.dell.com/en-ca/blog/tags/education/

As our society changes over time, so too does our education system and the tools we have available to us as educators. I feel like there are a lot of varying opinions when it comes to how technology is affecting our youth. I myself go back and forth on this topic as well. So let’s look at some facts to see if we can get a better understanding of both sides of the story.

Firstly, it is clear to see that youth are using social media and technologies more than ever. A Pew Research Center article states that 46% of teens aged 13 to 17 report using the internet almost constantly, with 48% claiming to use it several times a day. That same article collected data on social media use and found that the most common apps were YouTube (95%), TikTok (67%), Instagram (62%), and Snapchat (59%). So what does this mean for educators? I personally see this as students being able to stay connected outside of the classroom community, as well as having first hand access to what is happening in popular culture. This connectedness can be a great tool to use to connect with your students. If you are also aware of what is happening in popular culture you can relate your lessons and topics to things that are relevant in your students lives. There is a concept in the video An Anthropological Introduction to YouTube called participant observation, which means that to truly understand how something functions we must try it ourselves. I think this goes back to my point of popular culture. As educators we must try and stay on top of new technologies and what our students are interested in to better understand them and what they are going through. This way we are able to provide them with meaningful experiences and opportunities in the classroom.

However with that being said, there are some downsides to this increase in technology. I have found in my own life that at times I can be a much less social individual in person than I used to be as most of my communication now takes place online. This is something that I am aware of because I know what I was like before being consumed by technology. But I am curious to see what this is going to do for the youth that have always had a screen readily disposable for their entertainment. Facetiming their friends instead of making playdates or choosing to be on their phones rather than exploring the world. Will they have the insight to take a step back and remind themselves to take a break, as I so often do? Is this issue as bad as we think or is online forms of community just as good as communities developed in person? Only time will tell. I am interested to hear where your views stand! Please let me know your thoughts!

Thanks for reading my post!

Woodworking in a Virtual World

This week I wanted to take a different approach to the art of woodworking. Obviously the main focus is on the construction of an object and that process is where most people find their joy with this practice. However, there is another, arguably more important, step that must take place before you dive into a build. The planning!

I am someone who has a vision in my head and I will kind of just go for it. At times I will make a small drawing on paper with rough estimations of sizes and shapes, but I often will brandish the attitude, “I’ll figure it out as I go.” Sometimes this is fine and things work out but on occasion, my lack of plans results in a lot of pacing around the garage, some words said under my breath, and the need to restart the project. Today all that changes!

As I was surfing through YouTube one day I came across a video discussing the importance of modeling your builds and how it can benefit your work flow and limit mistakes. They mentioned a program called SketchUp which I decided to explore further. I found an incredibly helpful tutorial by Home With Stefani where she creates the design for a planter box in the program. The video is detailed and approachable and was a great start to gain some knowledge before exploring the application myself.

SketchUp is super easy to access! Simply typing “SketchUp” into your web browser will take you to this page. Image of the SketchUp WebPage

Selecting the option for personal projects will give you access to the free version of the program which in my opinion will be more than sufficient for most DIY at home builders. I also noticed a section for primary and secondary education. This can be a very helpful tool for educators to use while exploring various math topics such as geometry, or simply being able to visualize the calculations you are making. I highly recommend checking out Du Bois Design Class’ playlist on SketchUp which covers how to setup an account and what all the different features are used for and how you might use them in the class. Students can also have access to this program and explore making creations of their own.

I spent about 30 minutes exploring the program and it was relatively easy to navigate after a few minutes of familiarizing myself with the layout. I decided that I wanted to design some end tables for the living room that would match the color and style of the wine rack I made with my dad a few years ago. This is what I came up with.

I was limited with the colours in the program but my idea is to have the major colour be a light grey stain and the bottom shelf a walnut stain. I am also thinking about adding a small drawer but I am not sure just yet.

I am very excited to get started on the building process! This coming week I will be in search of some new websites that might help me with this project! If you have any ideas or suggestions please let me know!

Thanks, see you next week!

© 2024 Kyle Tatton

Theme by Anders NorenUp ↑