This week I wanted to take a different approach to the art of woodworking. Obviously the main focus is on the construction of an object and that process is where most people find their joy with this practice. However, there is another, arguably more important, step that must take place before you dive into a build. The planning!
I am someone who has a vision in my head and I will kind of just go for it. At times I will make a small drawing on paper with rough estimations of sizes and shapes, but I often will brandish the attitude, “I’ll figure it out as I go.” Sometimes this is fine and things work out but on occasion, my lack of plans results in a lot of pacing around the garage, some words said under my breath, and the need to restart the project. Today all that changes!
As I was surfing through YouTube one day I came across a video discussing the importance of modeling your builds and how it can benefit your work flow and limit mistakes. They mentioned a program called SketchUp which I decided to explore further. I found an incredibly helpful tutorial by Home With Stefani where she creates the design for a planter box in the program. The video is detailed and approachable and was a great start to gain some knowledge before exploring the application myself.
SketchUp is super easy to access! Simply typing “SketchUp” into your web browser will take you to this page. 
Selecting the option for personal projects will give you access to the free version of the program which in my opinion will be more than sufficient for most DIY at home builders. I also noticed a section for primary and secondary education. This can be a very helpful tool for educators to use while exploring various math topics such as geometry, or simply being able to visualize the calculations you are making. I highly recommend checking out Du Bois Design Class’ playlist on SketchUp which covers how to setup an account and what all the different features are used for and how you might use them in the class. Students can also have access to this program and explore making creations of their own.
I spent about 30 minutes exploring the program and it was relatively easy to navigate after a few minutes of familiarizing myself with the layout. I decided that I wanted to design some end tables for the living room that would match the color and style of the wine rack I made with my dad a few years ago. This is what I came up with.
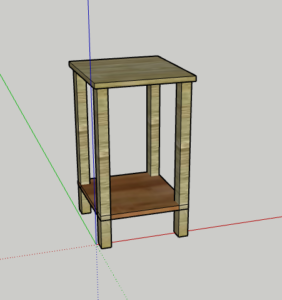
I was limited with the colours in the program but my idea is to have the major colour be a light grey stain and the bottom shelf a walnut stain. I am also thinking about adding a small drawer but I am not sure just yet.
I am very excited to get started on the building process! This coming week I will be in search of some new websites that might help me with this project! If you have any ideas or suggestions please let me know!
Thanks, see you next week!
Hey Kyle!
Very impressive post this week. My progress is very scattered and really depends on my work week. You did a good deal of research and learning this week, I look forward to seeing your progress continue. When I think of woodworking I often think of my friend’s grandpa, who was an avid woodworker, and also my neighbor. He was well into his nineties and working away every day, and my friend claimed the woodworking is what kept his mind sharp.
Best of luck!
Cheyenne