Learning Through Living

Category: Learning Project (Page 1 of 2)

Time to Sweep Up The Shop: A Review of My Learning Project

The time has come to wrap up my learning project! At times it has been a fun relaxing experience and other times it proved to be quite challenging. However, I am happy with the results of the overall experience. When I started this journey I did have some woodworking knowledge but I wanted to build on what I knew and make it a more independent affair. Most of the other learning projects followed a somewhat linear path building on a skill or one particular project. Mine on the other hand became a collection of small projects along the way. Being that much of the focus of this blog was to find different online resources to learn your skill, I gave myself a goal to try and find a different medium of online technology to use each week. I am proud to say that I was successful at doing this barring a couple of weeks where I had some repeats, but overall it went very well!

Week 1 – Time to “Branch” Out: An Adventure in Woodworking

I was very excited for this project, however a little nervous still about the blogging side of things as this is not something that I have done before. I am much more comfortable with the medium now.

  • Introduction to learning project
  • My previous experience with woodworking
  • My inspiration for choosing this topic
  • Introduced what I would be building first

Week 2 – Constructing a Cutting Board

The was the first week actually starting my learning project. I remember that initially I struggle to decide what online resource I wanted to use but settled on blog posts and websites as it was something new to me. I always use YouTube videos for tutorials. It turned out to be a successful process after a while. Most of the time spent in the shop this week was locating all the tools and getting a good setup and feel for everything.

  • Inspiration for the build
  • Explored a blog post about different materials to use for the build
  • Consulted a website with helpful tool tips for the project
  • Constructed my cutting board with the help of a step by step DIY website

Week 3 – Woodworking in a Virtual World

I have had a few proud moments throughout the learning project process but I’d have to say this might top that list. I was searching YouTube and some websites for inspiration about what to create for the week and I stumbled across a 3D Modeling video. I was very intimidated by the task as it was extremely out of my comfort zone but I knew I needed to give it a try. I am happy to report that it was wildly successful and I have even went back to design some more project within the program.

Week 4 – Flip That Camera on and Start Recording!

This was a fun look at the FlipGrid program that allows teachers to create prompts for the students, who then record video responses to those prompts. I think this is a great alternative to paper assignments and can be a nice exciting change for your students.

Week 5 – Follow Along With Me: Woodworking YouTube Videos

The was a very fun week in the shop as I was able to use some equipment that I have not used before. I wanted to make some coasters for the house and it turned out to be a fairly easy thing to find a tutorial for on YouTube. Everything started out pretty standard however, when it came to rounding the edges of the coasters I did not have the proper tool that was shown in the video. So I decided to, for the first time, use a belt sander and free hand the rounding of the edges. Although is does not result in every coaster turning out to be exactly the same size, I am super happy with how they turned out!

Week 6 – Learning New Woodworking Tips With TikTok

I use TikTok on occasion, however, never did it dawn on me to use it as a form of learning. This post I did just that. I remember finding it somewhat difficult to find exactly what I was looking for, but once that algorithm knows that I am interested in woodworking I am sure I won’t be able to get away from thought videos.

  • What is TikTok?
  • How TikTok can be used for inspiration
  • Videos are good for tool tip, and tricks
  • A look at some positives and negatives of the source

Week 7 – Woodworking With Kids

This week I was very reflective on the educational process of woodworking, and how I could get students of all ages involved, not just high school level students. Pinterest was my website of choice this week, and it offered a plethora of craft ideas that I think students would really enjoy.

Week 8 – Learning Woodworking With Online Magazines

For this post I was looking for something a little outside the box, which led me to the idea of searching for a magazine. The search was more than successful as I found a website that provided a magazine subscription, along with blog posts, a podcast, and helpful videos. It really is a nice one stop shop for all your woodworking needs.

  • Why magazines and woodworking?
  • Deep look at the website
  • Finding out it is more than just magazines
  • Potential benefits of a woodworking podcast

Week 9 – Using Television as a Learning Tool for Woodworking

I was reminded of the TV shows I used to watch when I was younger, and became excited about the potential that the HGTV network to bring to my learning project. Their website was full of helpful tips and went beyond woodworking, so I would definitely recommend that everyone gives it a look for their home improvement or craft needs.

  • Overview of the website
  • Who can benefit?
  • Helpful tool glossary

Week 10 – A New Form of Woodworking: Wood Carving

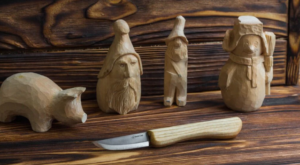
  • Introduced the topic of wood carving
  • Shared the interest I got from a BM Sculptures video
  • Explained the difference between dremel carving, and whittling
  • Overview of my progress (or lack of progress)

Closing Remarks

All in all this that been an incredible experience! I feel as those I have gained a wealth of knowledge about using online resources for a topic on interest. I think as a future teacher I feel more established and confident to guide and gear my students to the right places when they are searching for how to content. From my humble beginnings of thinking that tutorials were only on YouTube to morphing into someone who now will look for magazines, podcasts, and blog posts, I feel as though I’ve learned a lot.

In terms of the woodworking itself, I definitely feel more comfortable in the shop and using the tools at my disposal. Finding the time between four other classes and personal commitments was challenging at times, but when I did manage to get into the shop it always put a smile on my face and definitely sparked a passion that I’d like to continue in the future.

I am happy I was given to opportunity to spend some time woodworking and I am truly grateful to everyone who has commented on my posts.

Signing off one last time, thank you for reading my post!

I wish you all the best!

Kyle Tatton
A New Form of Woodworking: Wood Carving

For this post, I wanted to try something a little different. I have been caught up in a rabbit hole on YouTube, watching wood carving videos. Some of my favorites are by a creator named BM Sculptures. His signature style is to combine the wood with a clear epoxy resin and carve an animal out of this mixture.

A favorite of mine is this bear as at the end of the video he takes some time to create a small salmon out of wood to place in the bear’s mouth which really elevates an incredible piece. As with a lot of professionals showing off their talents, they do it in such a seamless and flawless way that makes the video think, you know I think I could do that! And I was beginning to develop some of those feeling while watching these videos. Now I am not going to sit here and claim that my first piece would look like this or even be a large scale build but I did have the inspiration I needed to give it a try! I do also appreciate how BM Sculptures is very transparent in his video, showing mistakes and failures along with beautiful finished products, and he is frequently asking for advice from views. I think that also lend credence to the feeling that anyone can give this a try if they are willing to put in the time!

Now that I had my inspiration, I needed to find my design. I wanted to continue with the animal theme as I figured this was a pretty popular item that I would be able to find a fair amount of tutorials about, and I just thought it would be fun to have an animal carving! Initially, I was thinking about carving a wolf as they are one of my favorite animals, however, I decided that they might have a few too many intricacies for my first attempt, and decided I would follow the lead of my inspiration and crave a bear.

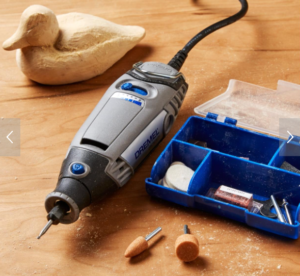
Before we dive too much more into the design I want to spend some time distinguishing between dremel carving and whittling. A dremel is a power to used for cutting, carving, sanding, and polishing, either wood or metal.

https://www.leevalley.com/en-ca/shop/tools/power-tools/rotary-tools/71188-dremel-3000-variable-speed-rotary-tool?item=17J1710

The process of whittling, involves a knife, most often specialized knives of different sizes, to create a sculpture out of wood.

https://beavercrafttools.com/blogs/ideas-inspiration-carve-hacks/suitable-whittling-projects-for-beginners-everyone-will-succeed

For this project I wanted to try my hands at dremel carving. With my design and material all set it was time I found a tutorial video. After a bit if searching I came across a video by Log’s Carving Club which had exactly what I was looking for!

In the video he uses hardwood as it is easier to carve stays together better. Unfortunately, I have to drive out of town to to acquire the hardwood that desired and I was unable to do that in time for this post. However, I tried anyways with some pieces of scrap wood I had around the shop. This proved to be difficult to work with as the wood kept splintering and messing up the design. I had to call it on attempts as I was running out of wood that fit the size I needed. It was good practice with the dremel however, so I am feeling a little more confident with that! I am excited to try again in the coming weeks when I am able to get my hands on some hardwood.

Thanks for reading my post!

Until next time!


Using Television as a Learning Tool for Woodworking

When I was younger, my family and I would often watch HGTV in the morning as everyone got ready for the day, as well as after supper. We enjoyed the real estate shows as well as the reno show, and upon reflecting on this experience I was reminded of all the fascinating design ideas presented in these shows. So I decided to do a search on the HGTV website to see what I could find.

https://www.hgtv.com/design/topics/diy

https://www.hgtv.com/how-to/home-improvement

The home page provides a handy selection tab that allows you to navigate between what project types you are looking for. Some selections like the home improvement tab have additional categories to select from such as, painting, home improvement ideas, kitchen remodeling, bathroom remodeling, basement remodeling, and curb appeal.

Quickly I became aware that this website offers a lot more that just woodworking. There are simple how tos, such as how to remove a dishwasher, or kitchen cabinets. I think is this great for people who have acquired skills while woodworking who want to expand upon that domain to make home improvement style work. I do believe that this can go both ways though, and someone can start out with doing small reno projects and move onto more specific woodworking tasks.

As I have mentioned previously in the blog, woodworking comes in a number of different forms. I have been particularly focused on the crafting side of woodworking, such as making cutting boards, or coasters. These are more passion projects as it would be easy to simply go and buy these items from the store. But I think it is just as important to learn the skills needed to cut and add trim to your house, or frame out and build a woodshed for example, because these are things that can save you some money in the long run. And I believe that this is an excellent website for those kinds of tasks and learning.

https://www.hgtv.com/lifestyle/clean-and-organize/tool-glossary

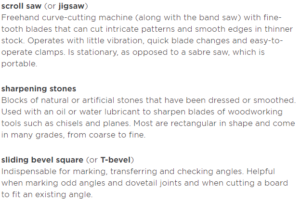
One last section of the website I want to point out it the tool glossary tab. Here you are given the name of the tool and a small description of its purpose. The is great for someone starting out but also to get a better explanation on a tool that they are maybe hearing about in research, on videos, or in podcasts.

Overall, a very helpful website that I recommend you check out if you’re interesting in anything DIY. As I mentioned it is way more than just woodworking.

Thanks for reading! Until next time!

Learning Woodworking with Online Magazines

For this blog, I wanted to try something different in terms of online media, and that was to explore online magazines. My intrigue with this was that magazines have the potential to have a high variety of content all in one space. This would be great for someone who is starting out with woodworking because you would have the possibility of having some small tips, projects, and tool options all in one spot.

One magazine online magazine that I found is called FineWoodworking.com which is a paid-for subscription, but they do have a good overview on the home page. After some further searching, I was able to see that this website was more than just a magazine website, they offer, a podcast, videos, how-tos, shop tips, and more. It is important to not that these features on the website are free to access!

https://www.finewoodworking.com/

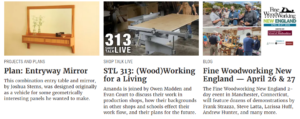
The home page is easy to navigate and proves a few selections for the viewer to click on, as seen in the picture above. Personally, I was very intrigued the the podcast as this is a form of media that I had not considered to research. Woodworking can be a slow mediative process that required a lot of patience. A podcast such as this one highlighted in the website can be a great way to have some background noise and learn some new things as you work.

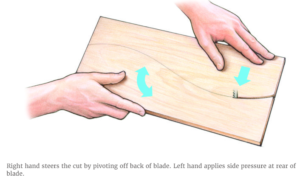
When look at the how tos I came across a video link that discussed how to cut curves using a bandsaw. This was created in a blog style but was taken from the podcast which is nice to see that you don’t have to listen to the whole podcast to receive it’s benefits.

https://www.finewoodworking.com/project-guides/shop-machines/a-trick-for-cutting-smooth-curves-on-the-bandsaw

Overall, I think is is a great website that can be very useful for anyone looking to get into woodworking.

Thanks for reading my post!

Woodworking With Kids

I have been having a lot of fun exploring the woodworking world and finding an outlet to express my creativity, but I did not want to keep all the joy to myself. Most people will think of woodworking as an adult activity due to the power tools and risks of danger, however, there are several ways to get kids and teens involved! My goal this week is to find some websites and resources that are kid-friendly to encourage young people to explore the shop, with some supervision of course!

There are several YouTube videos with project ideas to make with kids such as this one.

It is important to use your judgment with what tools you allow the kids to use. I think there are excellent learning opportunities to use power tools by going very slow and providing a lot of hands-on guidance. Due to the risk factors, you are able to teach the kids focus and the importance of patience. This is something that even veteran crafts people can forget but when using power tools you must give that task your full attention, double checking your hand placements, and making sure everything is lining up, there is a lot to think about. This is where the patience comes in. When using a table saw for example, there is no rush as a lack of focus can result a trip to the emergency room. In my opinion developing a positive relationship with items like this at a young age is important but there should always be a small element of fear present, even for adults, that fear is what will remind you to take the task seriously and give it your full attention. Again when with kids, use your judgment. Maybe have them watch you do the task, and talk through what you are thinking about with them. When they are a little older maybe you can shadow their movements and guide them by having your hand overtop of theirs. With that said, there are many tasks for them to do that do not involve power tools and they can definitely remain busy as you make a few cuts.

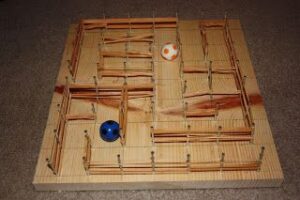
Here are a few examples that I found on Pinterest that I think would be great to bring into the classroom. The first

survivingateacherssalary.com

is this maze made from rubber bands. You can have the students experiment using their imagination to create a maze, but you can also implement certain constraints to have them think through. For example, there must be one entrance and one exit, you can only have a max of 4 sections that include a 2 square long hallway, a max of 1 section that includes a 4 square long hallway, and the ball must pass through an “S” shape pattern to complete the maze. 


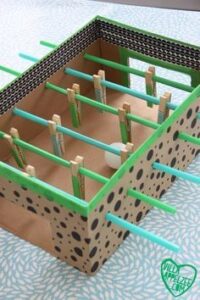
A second example is this mini foosball table. More that half of my grade 6/7 internship class was obsessed with soccer and would have loved something like this for indoor recess.

joyintheworks.com

The image is depicting a cardboard box and straws, however it would be easy enough to precut the boards and have the students help you put them together and drill out the holes. The can be a great mini math lesson to problem solve the spacing for the clothes pin players and where the straws need to be placed. If you are wanting to make this all out of wood, you can buy some wooden dowels to act as the straws.

Hopefully this has given you some ideas and inspiration to create some DIY wood working crafts with your kids, or to implement some wood building into your classroom!

See you next week!


Learning New Woodworking Tips With TikTok

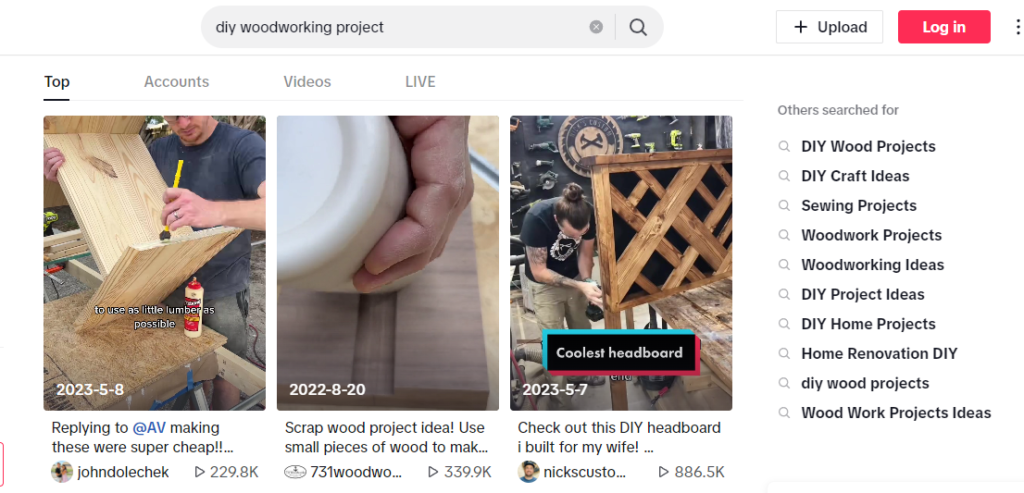
For this week’s learning project, I was unfortunately limited in time due to various other commitments. So I was unable to physically create something, however, I took this time instead to try out a new learning strategy. TikTok! This is a platform where content creators upload videos similar to YouTube, however, TikTok’s focus is primarily on short-form videos. This is great for woodworking as you can scroll through several videos in short succession to gather inspiration and ideas. Some pages that I found interesting and helpful were design.by.fatema, nickscustomwoodworks, and therealgerber.

Simply typing in DIY woodworking projects or one of the related searches seen on the right, is a great way to find thousands of videos to gather ideas about what to build next. Although small glimpse of the process are often present I have found that with TikTok it is a lot about the reveal of the finished product, which is perfect when browsing for inspiration.

Another use for TikTok that could be helpful is the content surrounding tool tips. There are numerous videos dedicated to making life easier around the shop or a cool function that you have on your tool that you may not have known about.

@woodwhisperer

Dovetail Gap Repair | Can you see it? #woodworking

♬ original sound – Marc Spagnuolo

Woodwhisperer is a great place to look for tool and project tips. The video shown above demonstrates a strategy you can use to repair a miscut in your project, which I think any beginning woodworker would greatly appreciate.

I will say the only downside is due to it’s focus on short form videos TikTok is not a place I would go for a how to video, as most of the content I came across were time-lapse or smaller tips about an overall build. However, I do think it is an excellent place to gather ideas and improve your woodworking knowledge and will definitely be making it’s what into my repertoire.

Until next week!

Follow Along With Me: Woodworking YouTube Videos

I have been putting off this form of learning for a while now, due to the fact that in other areas of my life, I tend to gravitate towards this form of learning. That is of course the humble YouTube tutorial. I have used it in some ways during my learning project such as, to help with the learning of programs or to gain inspiration, but this week, I wanted to see how it would go if I built something alongside the video, in real time.

Throughout this experience, I have been trying to make practical items that I will be able to use every day and this week is no exception. As I was looking through YouTube to gain some ideas, I came across a video talking about coasters. I thought this would be a perfect build as it is not something that I currently own and I believe it is another approachable project for someone who is just getting started with woodworking.

There were two videos that I decided to follow, the first was by Ben Grimsley Woodworking.

This was an great place to start for building the coasters. I decided to make some modifications to the size as I did not like how thick these coasters were but that was a simple enough adjustment. In the video Ben is using a hardwood, which I did not have available to me so I used some old scrap pieces of pine we had around the shop. As you can see from the thumbnail of the video the coaster holder is very basic. I wanted to challenge myself a little more with a more appealing design. Lucky for me a video appeared in my recommended feed from Keddie Woodshop which had exactly what I was looking for.

Something I found challenging at first was the fact that my coasters were one measurement and the coaster holder was a different measurement. I almost made the mistake of copying each video exactly as they were, but I am glad I caught this before it resulted in a lot of frustration.

Keddie Woodshop’s video also finally inspired me to create a crosscut sled for the table saw.

https://www.familyhandyman.com/project/table-saw-crosscut-sled/

They are very easy to make and in addition to making all your future cuts much easier, it adds a slight level of safety as your hands have more surface to hold onto while you push the board through the table saw. I constructed mine on my own however if you are interesting in building one yourself, Jay Cork with Family Handyman is an excellent website to check out. He has an instructional video as well as a step by step walk through with images on the website for you to follow along.

Overall the coasters turned out really well! As I anticipated watching a step by step YouTube video is my preferred way of learning a new skill. Being able to see exactly what the individual is doing helps a lot when you are trying to replicate it yourself. You also have the luxury of pausing at anytime so analyze the image further or even replaying certain steps if you did not fully understand the first time.

I am enjoying the process of exploring other methods of learning online, but I think myself and instructional YouTube videos will forever have an unbreakable bond.

Until next week,

Kyle


Flip That Camera on and Start Recording!

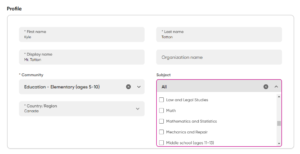
This week I will be reviewing a website called FlipGrid. I have used the site once before in my ECS 300 class however, that was as a student and I was curious as to what the program could offer for educators. FlipGrid is a video recording website used for educational purposes and is very easy to set up. Once you have signed up using your email you will be prompted with a screen asking you about the community and subjects for your account.

This is excellent for organization if you are using this in multiple way or for multiple classes. There are several options from math, law, and science, to art, music, and language. Once you have set up your account it is time to make a group.


On the left hand side of the home screen you will see a camera tool, a spot where you can view videos that you have created, a purple plus sign with group next to it, and underneath that you can view all the groups you have either created our are a part of. For today we will be creating a new group and after clicking on the purple plus button a drop down will appear (as shown in the image), we will click on create group.


You will then be given a screen that askes you to select a grade level for this particular group. Again this is very handy for organizational purposes.

Following the selection of the grade level you will be able to customize your home page. I have titled this group Woodworking Project, however for a teacher is might be beneficial to name it something like Math Grade 6, or building project February 2024. Not only does this help keep you organized but also helps your students navigate the program if they are in more than one FlipGrid group.

I have also chosen a background that pertains to the topic of the group. The website offers some stock examples however they are limited. With that being said there is an option to upload your own images to the program.

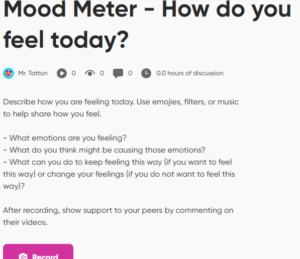
Now that we have set up our group it’s time to look at what FlipGrid has to offer. The main premise is that the teacher will create a topic which the students are able to access and respond to in video form. Some of the stock examples that are generated when you first create an account are shown below.


Creating a topic is very easy. Simply click on the purple topic button that can be found on the home screen. It will take you to a page where you can give your topic a title, and a brief description about what you would like to students to discuss in their video. One of the features that I find super interesting is the time limit for recording. It ranges from 15 seconds to 10 minutes and I think it is an excellent way for your students to stay on track while answering. If you have a shorter time limit it forces the students the really think about what is important in their response and only share the key details.
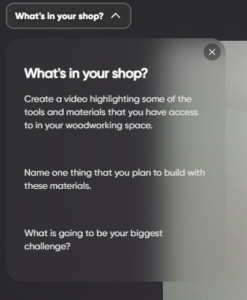
I have created a topic as an example for how FlipGrip might be used in the classroom. I have titled to topic “What’s in your Shop?” and the prompt is asking the student to create a video describing some of the tools and materials they have available to them, what they are going to build with it, and what is going to be their biggest challenge.

After clicking on the record button the students are brought to a screen where they can create their video. There are several options to choose from including a backdrop selection, the choice between video or audio only and a number of text and drawing features that add a level of creativity to the recording.

Jumping ahead slightly, but after you have created your video there are a few editing options such as, trimming your clip and adding ambient music. Something else that is think would be super helpful for students is the ability to access the prompt while record. As shown in the image below.


This saves students from having to write the prompt down and look at their paper while record, or have to redo their recording because they forgot what they were supposed to talk about.

Overall I think this is an excellent website to use in classrooms. It gives students an alternative to journal writing or other small writing tasks. It could also by a tool used for accessibilities if a student has difficulties with writing or if  English is their second language they may be able to express themselves more thoroughly this way than on paper. I could also see myself using this a lot in art classes as students create their own songs and dances as well as skits for drama. The interface is easy to navigate and all topics and groups are given a code which is great for easy sharing. A new topic can be added at anytime which makes this a very interact process. The teacher can also record a video that can be view by the students for an example.

While exploring this program I had a thought that students may not want their peers to be able to view their videos. I think for some assignments it is important to share with classmates, however something like journal responses can be quite reflective and vulnerable. There is a solution for this! Once a video has been uploaded to the topic, the educator can click on the three dots at the far right of the video (can be seen at the bottom right of the above picture). This will bring up a menu with several options. Clicking on hide response, will only make that submission visible to the educator.

I have created an example video responding to the “What’s in your Shop?” topic that can be viewed by clicking this link. Once again I think this is a great tool that will definitely be seeing some use in my future classrooms. I highly recommend checking it out. I am also going to link two YouTube videos one for teachers, and one for students that visually walk you through the steps of setting up an account and provide a more in depth look at how to use some of the additional creative features while recording.

Thanks, see you next week!

Woodworking in a Virtual World

This week I wanted to take a different approach to the art of woodworking. Obviously the main focus is on the construction of an object and that process is where most people find their joy with this practice. However, there is another, arguably more important, step that must take place before you dive into a build. The planning!

I am someone who has a vision in my head and I will kind of just go for it. At times I will make a small drawing on paper with rough estimations of sizes and shapes, but I often will brandish the attitude, “I’ll figure it out as I go.” Sometimes this is fine and things work out but on occasion, my lack of plans results in a lot of pacing around the garage, some words said under my breath, and the need to restart the project. Today all that changes!

As I was surfing through YouTube one day I came across a video discussing the importance of modeling your builds and how it can benefit your work flow and limit mistakes. They mentioned a program called SketchUp which I decided to explore further. I found an incredibly helpful tutorial by Home With Stefani where she creates the design for a planter box in the program. The video is detailed and approachable and was a great start to gain some knowledge before exploring the application myself.

SketchUp is super easy to access! Simply typing “SketchUp” into your web browser will take you to this page. Image of the SketchUp WebPage

Selecting the option for personal projects will give you access to the free version of the program which in my opinion will be more than sufficient for most DIY at home builders. I also noticed a section for primary and secondary education. This can be a very helpful tool for educators to use while exploring various math topics such as geometry, or simply being able to visualize the calculations you are making. I highly recommend checking out Du Bois Design Class’ playlist on SketchUp which covers how to setup an account and what all the different features are used for and how you might use them in the class. Students can also have access to this program and explore making creations of their own.

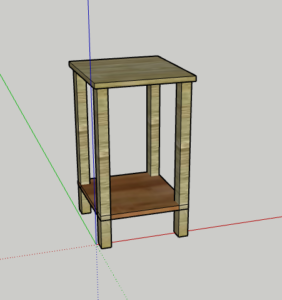
I spent about 30 minutes exploring the program and it was relatively easy to navigate after a few minutes of familiarizing myself with the layout. I decided that I wanted to design some end tables for the living room that would match the color and style of the wine rack I made with my dad a few years ago. This is what I came up with.

I was limited with the colours in the program but my idea is to have the major colour be a light grey stain and the bottom shelf a walnut stain. I am also thinking about adding a small drawer but I am not sure just yet.

I am very excited to get started on the building process! This coming week I will be in search of some new websites that might help me with this project! If you have any ideas or suggestions please let me know!

Thanks, see you next week!

Constructing a Cutting Board

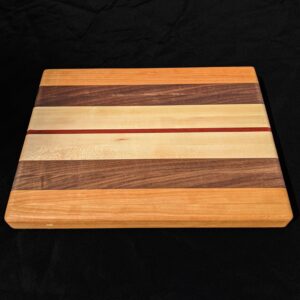
This week I tasked myself with making a wood-cutting board. My idea was to create something similar to what is depicted in the image below. Using a few different colours of wood to create a pattern.

wooden cutting board with various types of wood

Cutting Board created by PaulTheMaker

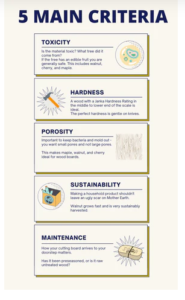
Seems simple enough, but now I needed to pick what type of wood I would be using. My technology for this build was blog posts and websites as they are not normally my first place to look when tackling a DIY project. I found a very informative post by Virginia Boys Kitchen which outlined 5 criteria to lookout for when selecting your wood.

5 Main Criteria for Selecting Wood – Virginia Boys Kitchen https://virginiaboyskitchens.com/blogs/features/best-wood-for-cutting-boards

The category that stood out to me the most was the toxicity section. I would not have been actively thinking about that if it were not for this article. They do not go into extensive detail on the subject but note that any tree that is bearing fruit or nuts is probably a safe option for wood type. based on my previous knowledge of woodworking I know that some wood is treated with chemicals to allow it to last longer outdoors, so we will definitely be staying away from that.

A second note is the hardness of the wood. We will be needed a hardwood board for this build as it offers durability for the wood but also a proper board selection will not dull your knife as quickly. Wood types we will be looking out for include, walnut, cherry, maple and acacia. With this in mind I went out to search for my lumber, however, this is when I ran into my first problem. I could not find the type of wood I needed. Being that my hometown only has 2 small lumber stores I was limited on my selection. I was able to find some oak (not ideal for cutting board) and repurposed some old scraps I found laying round my dad’s garage. I decided that I wouldn’t be able to use this particular cutting board for it’s intended purpose but it would be a good way to practice for when I am able to acquire my desired lumber.

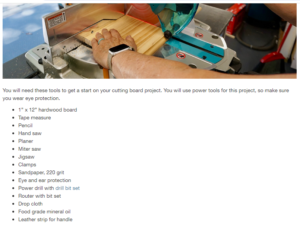
Now that I have my materials, I was ready to begin crafting my cutting board. I found a very helpful guide on this home depot website. They also gave an idea of what types of wood you should be using which was a great way to cross reference my information I had found before.

List of tools needed for project

HomeDepot.com https://www.homedepot.com/c/ah/how-to-make-a-cutting-board/9ba683603be9fa5395fab901c8502155

I found it very helpful that the website included all the different tools that were needed for the projects. This allowed me to gather all of them beforehand and resulted in a more efficient workflow. I did not have all of the tools needed for such as a router, however they are used for finishing the build and not a overall critical item for my new intent of having this be a practice cutting board.

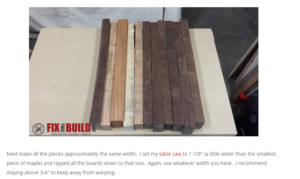
To begin the construction of my cutting board I used the website FixThisBuildThat.

Boards of different colours cut into strips and layed together on a table

FixThisBuildThat.com https://fixthisbuildthat.com/how-to-make-a-cutting-board/

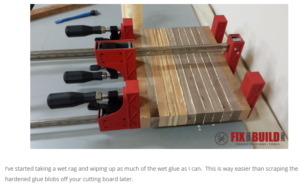
Different colour boards glued together and held with red clamps

FixThisBuildThat.com https://fixthisbuildthat.com/how-to-make-a-cutting-board/


This website was just as good as any DIY video I have watched. Every step of the way they added a picture for reference and a small description of what to do next. I will say however, that the website does assume that you have some basic knowledge of how to use the equipment. For example, when setting the table saw, the website says “I set my table saw to 1-7/8,″ but it does not show you how to do that. Where as with a gif or video you are able to see the maker physically preform all of these actions resulting in replicating the actions a little bit easier.

Overall I would say I gained a lot of information from these websites and I think using a website for woodworking projects is a great option. The most helpful usage was the ability to research materials and what tools you will need to complete a specific job. With the only major downside being that the progress of the build is completed in steps with at times ambiguous picture references. Actions like setting up your tools, or how to sand properly not included.


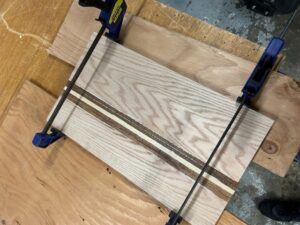
Here is an image of my progress! I am still waiting for the glue to dry, and I’m hoping to finish sanding tomorrow!


« Older posts

© 2024 Kyle Tatton

Theme by Anders NorenUp ↑