The Many Faces of LEGO Stop Motion

This week I challenged myself to do a deeper dive into adding faces to LEGO faces with the Stop Motion Studio app. This process proved to be a lot more time consuming than I anticipated. After taking to initial pictures of the frames that I wanted, I needed to copy and paste those images to ensure that I was using the same frames and only editing the faces on the LEGO figures.

Going through the different facial feature options was a lot as well as making the slight changes to the frames like changes the faces, moving the faces, and rotating them was very time consuming and a lot of work. While I was doing this, I was also adding sounds and assuring that the sounds were lining up with the frames and images. It may not sound like I did much and this is a shorter update than I’ve had in the past but most of my time was simply spent making tiny changes and copying and pasting frames to make the changes.

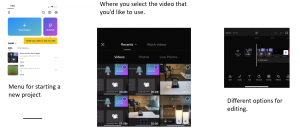
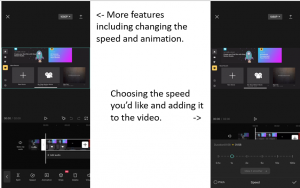
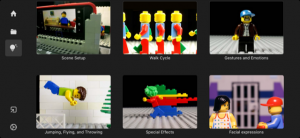
Below I have added some examples of what the app looks like while I’m editing and making these changes.

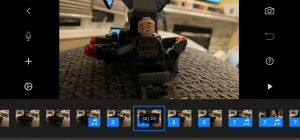
An example of the multiple frames and the added edits to add audio and pause frames to ensure the sound/voice effects line up with the images.

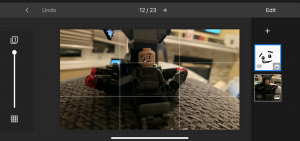
This is the look of the page when you add a face to your frame

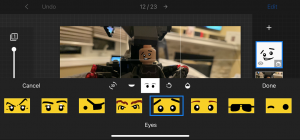
These are different eye options. Only a few among many more once you start scrolling.

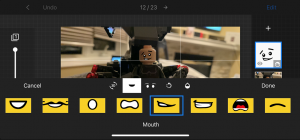
Different mouth features, similar to the eye features.

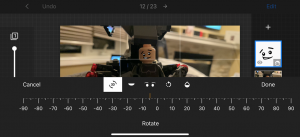
This is where you can rotate the faces on your image. This is often used to make a character appear as if they are facing a different direction other than straight at the camera.

Here is a short video that I made this week which uses different features such as the faces being added to the frames and voice over effects for the speaking parts. Please excuse my TERRIBLE voice acting… Enjoy! Faces of Motion.


Digital Literacy?… Wait, What’re We Reading?

I had the joy of growing up in the 90s and the early 2000s. I grew up with a GameBoy, SEGA and a N64. The big difference between video games today and back then, other than the obvious point of the sophisticated graphics and massive processing units, is of course that there was no online play back then. Once I hit middle school, in comes MSN Messenger, cell phones (flip phones of course) and an early introduction to online video games.

In school, we really did not have any digital literacy or cyber safety taught to us until high school. While I was in elementary school, kids being online seemed to be a fairly new thing and teachers were not talking about it very much. Although we were chatting with MSN, using webcams, and sharing photos, it felt as though teachers and most parents had no clue what was really going on while kids were on MSN and online, whether it was good or bad. Once in high school, I remember a little bit more digital literacy happening, but as discussed with some classmates, it was more of the police coming in and scaring you with committing a crime. Teachers were not educating about online usage. Teachers were not involving themselves with students’ online lives when I was in school.

Now that I am a teacher, I make a point of explaining and teaching my students about digital literacy. One of my favorite ressources is from Common Sense Learning. It is a great interactive resource for all grade levels which includes videos, activity sheets, and stories. I think it is very important to teach digital literacy because our children and students are online so often. It has become such a part of regular life for most people that we often forget the risks of being online so often. My students often tell me about things they’ve done or said online and most of the time I’m pretty surprised and I try to teach them about the dangers. Some students do not take it seriously and I do not think that they will until something bad happens to them unfortunately. I do my best with the resources that I have and hope that it helps most students be more conscious going forward!

Digital literacy word cloud

Photo by ibreakstock

Nothing to see here… but a lot to talk about

I have already come quite a long way in my journey of never making a stop motion video ever before, to experimenting with visual and sounds a few weeks later. This week I thought that I would take a break from making videos and decided I would instead focus on researching and fooling around with the app a bit more to better understand the more complicated parts of LEGO stop motion.

I started looking into some articles that I could find related to LEGO stop motion. Unfortunately, there is not a whole lot dedicated solely to LEGO stop motion, however, I was able to find one pretty good article that I enjoyed reading about another creator’s experience with LEGO stop motion. The neat thing about this article: LEGO stop motion for beginners, is that the creator was also using the Stop Motion Studio app that I’m using as well! What I really liked about this article is that it keeps everything simple. The article gives you some easy tips and tricks to improve for creating skills, as well as it gives you a list of supplies to use to make things easier. The article also included some videos for visual learners to use which was very helpful.

The next thing that I did was focused strictly on LEGO stop motion from now on and not just stop motion in general. The app that I’m using, Stop Motion Studio, Has many tutorial on all of the different aspects of LEGO stop motion. I decided to take some time and to watch and then practice some of the techniques shown in the video.

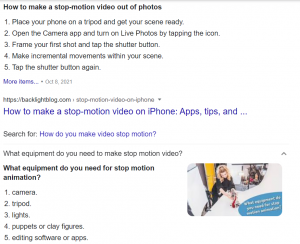
These video are super helpful as they walk you through exactly where to go on the app to add which effects. I am learning that there is so much time and effort that goes into the short video clips. I’m excited but also a little bit nervous when it comes to starting my final project.

As I was going through the tutorial videos, I was realizing that there are so many parts needed to make a successful LEGO stop motion video if you want it to be done well and to use the full potential on the video. I started looking at kits that are available for making LEGO stop motion and I found a fairly inexpensive one from the LEGO site that is also available on Amazon.

This kit comes with a platform, which is very useful for LEGO stop motion to assure that you mini figures stay in place. It also comes with several mini figures, different accessory pieces, and several different backgrounds that you can use.


I have made quite a bit of progress this week, even though I haven’t actually filmed anything. I learned a lot of the intricacies of LEGO stop motion, different accessories that will make my creating experience better, and I’ve been able to gather more tools. There are couple more skills I want to practice before I start working on my final project. I can’t wait to keep moving forward!

A LOUD Wedding

This week on my Stop Motion journey, I fooled around a bit with sound effects on the Stop Motion Studio app. It was a lot easier than I thought it would be. The app makes it very easy to be able to insert different sounds that over lap each other and it also makes it simple to cut down the sounds to better fit your motion picture.

By access the sound section of where you can add things to your movie, I was able to scroll through and find some music that I could play in the background of my video. There are quite a few options but I think there could be more added in the future. My video is a wedding themed video for this one and I hoping there would be something labelled “wedding music” or something similar to that but unfortunately I could not find such things so I settled for some low key happier toned music that was available on the app.

The app also gives you the chance to record your own sounds. In my movie, I capture the bride and the groom kissing. Unfortunately, the app does not provide a sound effect for a kiss for I had to record the kissing sound on my own and insert it into the movie.

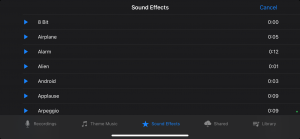
At the end of my video, I found a clip for a crowd cheering so I could emphasize the end of the of the wedding. In the screenshot that I took you can also see some of the other options for sounds.


Finally! Here is my latest creation using Stop Motion “Happily Married

Enjoy! I appreciate the comments and feedback!

The bird goes… TWEET TWEET

I have been using Twitter for a very long time. I feel like I jumped on Twitter in the very early stages of the app. I have seen all the changes that the app has gone through and I believe that it has become a great tool for just about anyone to use. I mostly use my personal Twitter for sports, news and following some of my friends and what they are up to. I do not tweet much from my personal account. At times, I will retweet and likes things, but rarely do I tweet my own ideas from my personal account.

I am only just starting to use Twitter professionally. I like finding new resources, reading about different apps and find new ways to engage my students through all the different spaces on Twitter. I have used Twitter Spaces a couple times which allows you to have full on conversations with people about certain topics which is a fairly new feature of Twitter. It is a neat feature that allows you to actually have verbal conversations with anyone in the “Space” and discuss the main topic. I have found it more useful than a blog because of the verbal conversation aspect and being able to immediately provide feedback or ask questions.

In my opinion, Twitter could be a very effective tool used in the classroom under certain circumstances. I think that it is a great way for students to share their ideas with a community and to learn new things as well. It is a great way to connect locally, provincially, nationally and even internationally. This allows students to broaden their horizons and really engage with different parts of the world, outside of their communities.

I do have some concerns with Twitter being used in a regular classroom setting. Twitter is not moderated from inappropriate material in the same way that other social media platforms are. I would have a tough time allowing middle school students onto Twitter given the fact that it is possible that they stumble upon violent and gory images, and even in some cases it is possible that they may find some pornographic images. I do think that there are other programs that could be supplemented that feature a similar mini-blog format such as Seesaw Blogs or Google classroom.

Lights, Camera, timelapsespinACTION!

I have made some new progress in my Learning Project journey! This past week I really went into more detail in the Stop Motion Studio app. I learned how to set up my camera for stop motion, how to take pictures while slowly moving the objects in the scene, and I learned how to change the speed of the frames to either slow down the stop motion or to speed up the stop motion.

While making the clip, I did encounter some challenges; small challenges, but challenges nonetheless. I was forced to redo the stop motion video that I made a couple times because either my hand got caught in the images or I bumped the camera and it moved. I’ve found that that is the biggest challenge, keeping the camera in the same spot, even on a tripod, it is difficult to keep it totally still.

The clip that I ended up making for my first ever stop motion clip was very simple. I took a LEGO Brickhead Harry Potter figurine and made it appear to be spinning. The steps to this are quite simple. Simply set up your camera, set up your scene, and start taking pictures! Taking multiple pictures and just slightly moving the figure after each picture is all that is needed to make the figure appear to be rotating. While the clip is literally 2 seconds long, I can assure you it took me a lot longer that 2 seconds to create it. Here is a link to my first ever Stop Motion clip

During this week, I also looked in some timelapse tools to try and show how to create the stop motion. I chose the app Capcut to edit the screen capture that I took while creating the stop motion. I’ve never used Capcut before but I know that my students use it quite often for various projects.

Capcut is very easy to use and has a very similar look to the stop motion app that I am using which makes the transition quite simple. Once I started a new project, I was able to choose the video that I wanted to edit. Once you move into the editing part the app, there are several options for editing your video such as adding effects, audio and text to your video. Below are some screen shots of a couple pages of Capcut.

Finally I got to the time lapse part of the editing process. This part was super easy to do! I found the area where you edit the speed. Once there, you can choose the speed you’d like to use and it is that simple! You add it to the project and your timelapse is complete. Here is the making of my stop motion video, condensed into 23 seconds!

As a review for Capcut, I think it was definitely easy to learn and use. I know that my students have used it in class in the past and I would feel confident that most of my students would be able to figure it out in the future. As far as the SAMR model goes, I believe that it definitely falls into the deep end of the model, modification or redefinition. Capcut allows students to show different talents of film editing, film making, and showing talents through film that otherwise would not be possible to show at school. Capcut is also a great way for students to show progress over time using a time lapse or a similar feature with the app. That is something that would not be possible without this technology.

Here. We. Go! (Joker voice)

This week I started doing some research into what apps might be good and where to get started with stop motion. I started by talking to some former students of mine and hearing what they had to say and the experiences that they have had. I then did a little bit of my won research and have come down to the app Stop Motion Studio.

Once I decided on the app that seemed to be the best based on reviews, articles, and the opinions of my students, I started looking into the app and how to use it. After downloading the app, I realized that the app provided multiple tutorial videos that I could watch as well as other example videos from other creators. I took it upon myself to look into YouTube as well to find some more in depth tutorials and some general tips for stop motion.

I’m super excited to get going. This week I plan on fooling around with the app to get used to using it. I would also like to start coming up with ideas for my final project… I’m think maybe a StarWars/Harry Potter crossover maybe? Stay tuned for details…

Tutorial sign on a wooden table in a room with lights

Where do I start?!

For my learning project, I am going to focus on learning how to do Lego stop motion. My baseline for this project is basically nothing. I know that I am going to need a camera and Lego and after that my knowledge is practically nil.

My plan for this project is to amass as much knowledge as possible from multiple different sources. I’d like to start my search on YouTube to try and find out which app might be the best for stop motion and then move on to other ressources. My thoughts on finding some other ressources start again on the internet. I’d like to look through some blogs, social media feeds, and possibly some different online articles. Another sources that could be very helpful is some of my former students. I have done a similar project with my students on focusing on new skills as we are in this learning project and I have had students in the past work on stop motion. I believe that their knowledge and input could be invaluable to my progress.

https://stopmotionhero.com/what-equipment-do-you-need-for-stop-motion-animation/

https://backlightblog.com/stop-motion-video-on-iphone

Hello and Welcome!

Hello EdTech world!

Welcome to my blog… My name is Marcus Zumstein (twitter: EDUZumstein). I am a teacher with 5 years of experience. 4 of those years have been spent in Regina and I taught and lived in Victoria BC during my first year after finishing my Degree in Education. I currently live in Regina, Saskatchewan with my wife and son.

In my class, I try and use technology at any chance I can. I have experimented with many education apps such as Seesaw, FlipGrid (now Flip) and various Microsoft products. While I do try and use technology in my class often, I also do my best to ensure that the technology that is being used is enriching the learning experience for my students and not simply replacing something such as a pen and paper.

I am very new to blogging so bear with me and my posts… I do believe that blogging has a very important place in education and can be quite a useful tool as well. I look forward to expanding my horizons when it comes to blogging and look forward to meeting new people along the way!

think outside the box on school green blackboard . startup education concept. creative idea. leadership.

Photo by escapejaja