Category: EDTC 300 (Page 1 of 2)

Networked Learning

Throughout the semester I have contributed to others learning on blogs/eportfolios, and twitter mainly. However, I definitely could have done better in this area this semester.

The blogs were definitely a good place stay connected to people, and it was interesting to see what everyone was doing. A few of the blogs I commented on were Tracey, Shelly, and Madeline. I also tried to keep up with comments on my own posts, if someone commented I would go and reply to them (and try to comment on their posts).

The main place I contributed was on twitter. I mainly shared resources but also responded to others tweets. I also participated in a few #edchats, I went to #resiliencechat and #saskedchat which were both awesome and gave me the opportunity to connect with other teachers/ education students.

I didn’t really post on slack very much, as it wasn’t really my thing. I did share this list of all the #edchats.  

Learning Project Wrap Up!

When I started my learning project, I had no idea how to draw faces, the only experience I had was drawing cartoons. (which are not very good)

Throughout the learning project I learned lots of different techniques that I am excited to keep practising to make my drawings better. A few things I learned were using guidelines and shading, along with learning how to draw each feature. The hardest thing for me was to draw the hair, and I could still use a lot of practice.

I learned early on that it was much easier for me to draw with guidelines, then without them. I found that if I didn’t use them my drawing ended up looking sloppy and inconsistent. I found that I valued the consistency that my drawings had when I used the guidelines.

The other thing that was completely new to me was shading/blending. Different videos showed different ways to do this such as using different pencils, your finger, a tissue or a q-tip. I found that I didn’t like the look of the drawings when I tried to use a pencil to shade/blend. I tried the finger and tissue, but they didn’t really work for me, I found that I didn’t have control over where I was blending and making the shading lighter or darker. The q-tip was the obvious winner, it was small enough that I had control of exactly where I wanted it blended and made the drawing smoother than the other techniques. Overall, I really enjoyed learning how to draw faces, it was something that I wanted to learn for a while and I’m glad that I finally got the opportunity to learn it.

For this project I found it the most useful to use videos to learn, I tried to find different channels to find different techniques every week I will list the channels that I used each week below.

RapidFire Art and Farjana Drawing Academy (eyes)

RapidFire Art (noses)

Silvie Mahdal and Ebru Art Channel (lips)

Kirsty Partridge Art (hair)

Coding with a Silent Teacher?!…

This week in EDTC300 we talked about coding. I did the Silent Teacher activity on hour of code. I found this activity to be especially interesting because it did not give any kind of instructions or hints to tell you what to do, it taught you through trial and error and repeating the same skills a few times before moving on. I thought this was interesting because a lot of coding and computer science is common sense and some of it you can follow just by looking at the code. It was a different approach to teaching, by just letting the students figure it out on their own instead of trying to explain every little thing. It is a common mistake in Computer Science to overthink it and make it much more complicated than it would normally be. I would be interested to know how someone with no knowledge of coding would do with the silent teacher activity.

Since I took computer science in high school, I fell in love with it, I learned some Java, Python and C++ and would love to teach it eventually. I have really enjoyed learning it and have continued to see the benefits of teaching it in the classroom. One of the main benefits of coding is problem solving, I learned this by experience when I was coding, I had to learn how to solve the problems I would encounter. One of the nice things about coding is that it is appropriate for almost all grades. You can teach block coding to younger students and eventually move into typing code when they are older. It is also important because there are lots of new jobs involving coding that didn’t even exist 20 years ago. With the new jobs, it seems logical to teach some coding in high school.

Fake news and digital literacy

Photo Credit: <a href=”https://www.flickr.com/photos/140988606@N08/40506279863/”>Christoph Scholz</a> Flickr via <a href=”http://compfight.com”>Compfight</a> <a href=”https://creativecommons.org/licenses/by-sa/2.0/”>cc</a>

It is incredibly important to teach how to distinguish between real and fake news. It becomes especially important because of social media and how easy it is to spread information. In this video by John Spencer and this one by Damon Brown they both give some good tips to help tell the real from the fake news.

Since I want to teach high school Math, Chemistry and Computer Science, this will most likely come into the classroom when the students have to do research for a project or report. One thing I really like about the videos is that they give tips that you can apply to many different times that you need to know if something is fake news or not. For example, you can use the same tips to know if something is fake when you are going to post something on social media, as you would on a research report. The reason why I like this is because sometimes people will put a lot less importance on sharing something fake on social media then if they where writing about it in a paper or project, and there are some cases where it is not as big of a deal but posting something that is fake on social media can cause a lot of damage and it could have a ripple effect where once you shared it you can’t stop it from being spread around, so it is important to make sure, to the best of your ability that whatever you are posting is accurate.

I also read through this comic that discussed the backfire effect/ confirmation bias, it is very interesting to see a comic talk about the backfire effect. Confirmation bias is the bias that most people have where you want to post/hear/read things that support your established beliefs. It is a natural response to want to defend yourself when someone is challenging your beliefs, but it is important to be able to look at all perspectives and not get defensive. It is very important to teach students (especially high school students) to look at different perspectives to be able to make their own informed decision about something, this is not only for school but also a good life skill. For example, when you are writing a paper you have to look at your best counter arguments to make sure you pick an effective thesis, and that you are addressing the right points. A good real-life example is when teenagers start to question their beliefs, and if what they were taught as a child is really the right thing. It becomes vitally important that they can look at both sides and decipher what is fake and what is real.

Last learning project post: putting it all together.

So, this week is my last learning project post (besides my wrap up post), so I decided to put all the things that I learned about drawing faces and put them together to make a complete face. If you want to see how I did each aspect go check out the rest of my learning project posts.

This week I just put everything I have learned in the learning project together to make a face. The only new things I learned this week was where to position everything, and the ears which do not look the best, but they will do for my purposes in this project.

I used this video from RapidFire Art as a reference not for technique. I really liked the RapidFire Art channel for drawing tutorials, they went into lots of detail and explained everything really well, however it was a bit over my skill level so I definitely recommend finding a beginner video if you are just getting into drawing, but RapidFire is a great channel if you have a little more experience. I started by making a general head shape and estimated where the middle of the eyes would be and drew a horizontal line there. Next, I drew a vertical line down the middle of the head, I used these two lines as guidelines. I also made small lines at the sides of the nose and the where the corners of the eyes should be. I then drew each aspect as I did in my other posts and used the video to draw the ears and to do a little more shading around the face. The one thing that was more difficult was drawing two eyes that were the same size and shape.

Overall, I am happy with the result and I’m pretty impressed that I could do everything from videos on YouTube. I could definitely use more practise and I am excited to see my skills improve.

Learning Project: Drawing Hair.

Attempt #1. Definitely could be smoother.

This week I decided to do hair, and it was the hardest part of drawing faces so far. I watched a few videos, but they all seemed to say the same thing (this one was good). It was hard to get the details right, and I could definitely use more practice! However, for the purposes of this project I decided to keep it simple, but there is definitely room for improvement. The hard thing about this week was that the video didn’t really help me, I really had to just practice it until I was happy with it.

Attempt #2. A bit better than the first one.

I watched this video, which was a do’s and don’ts video. So, here is a few things I learned about drawing hair. I need to have a reference photo, I didn’t really try to copy the photo exactly, but it was helpful to have something to look at to guide me (I believe that I was just loosely following the example in the video). It was also easier to draw the hair if I had a general face outline to work with. The next thing was to break it up into different sections and focused on one at a time. And the last thing was to start light and keep adding layers, I feel that I rushed this more than I should have. Also, I found that I had better results if I did one long stroke instead of doing small strokes for the hair. And I did the same shading technique with a q-tip, I did it quite light, so the hair still has some definition. I know I keep using the same shading technique, but I found that it works the best since I don’t have many drawing supplies.

As always suggestions are always welcome!

Knowing my Digital Identity

This week for our blog post we were assigned to cybersleuth someone in out EDTC300 class and reflect a little bit on what we find and digital identity.


So, for this post I cybersluethed Terrell Draude, for this activity I looked at twitter, Instagram, Facebook, his blog and a google search. I started with his twitter, which it seemed that he is fairly active on (sharing resources), he also has a second account that is mostly posts relating to sports. I also checked to see if he was on Instagram and Facebook, however both of those accounts are private, so I didn’t get anything from them. I did do a google search and everything that came up was related to hockey. I did find that he lived in Warman Sk, and in Saskatoon, and he played hockey and now couches hockey. He is in the education program at the University of Regina (middle years). I get the impression that Terrell keeps his his life fairly private and is careful of what he posts and makes public, and I respect that. I have no doubt that he will be an excellent teacher and find a job soon after completing his degree.


I believe that it is important to make a good digital identity, however it is also important to have different platforms for different things. For example, I have Instagram and Facebook, but I keep them private and I only friend people that I know and mostly just family and friends, and I don’t post much about teaching or school, it is mainly for keeping in touch with family and friends. My accounts aren’t private because there is inappropriate content, I just prefer to keep my professional and personal lives separate. However, I do use twitter for more professional use, I post mainly about my education, resources and experiences relating to teaching. In this article, the author talks about having different accounts to display different parts of her personality or life, different accounts have different audiences and different content. I also think it’s a personal preference if one keeps their accounts professional or personal or mixes them together on social media platforms.


It is also important to be aware of the personal information that you are putting online and how easy it is to find. As we learned from Srkj from this article, written by Katia, it is easier than we would like to believe to find information online. One of the examples that come to mind is having a phone number on a Facebook account, it just always seemed strange to have a phone number on an account. Just the fact that anyone can find your phone number if they know where to look on Facebook, and I never knew what the purpose was of having it there (if anyone knows please do let me know). Anyway, my point is that it is important to check up on your accounts to see what information is available about you.

Talking About Race

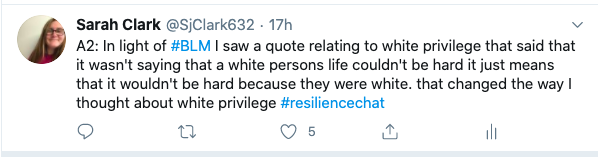
For me personally, I feel that it is just as (if not more) important to continue the conversation about race online. One good reason is because online spaces give a great opportunity to learn more from your peers, not just in the classroom. For me, the fear of being wrong or someone getting offended often stops me from posting something, but just because I could be wrong shouldn’t mean I just don’t talk about it. If I am wrong, I can apologize, learn from it, and not make the same mistake again. The thought of being wrong shouldn’t stop anyone from participating in the conversation. I found this article that talks more about silence online and explains it better than I ever could.

As I was trying to find good resources for dealing with racism in the classroom, I came across an article/podcast by Angela Watson called “10 things every white teacher should know when talking about race.” All the points are relevant but the ones that stood out to me where 3, 7, 8 and 10.

Point #3: “There are different rules for white people and people of color when talking about race,” this is something that I have thought a lot about because there were always things that a person of color would say but it just didn’t seem right for me to say. One common theme that was in this article is to look at the bigger picture of racism, I have found that looking at the bigger picture helps me to know what to say and do. For example, when I am going to say or post something, I try to put myself in other people’s shoes and ask myself how would I feel? Is what I am posting making a necessary point? Is it my place to say or post that?

Point #7: “Develop a listen-first ethic when a conversation turns to race, rather than insisting that race is irrelevant.” This point stood out to me because I used to think that, in certain conversations, race did not play a part. It took a long time for me to realize that just because race doesn’t seem to affect the conversation from my end doesn’t mean that race doesn’t affect the conversation from the other end, and I should listen to the other persons perspective and consider their point of view.

Point #8: “You can prevent knee-jerk defensiveness by actively working to decenter your experience as a white person in conversations about race.” Basically, don’t take it personally, don’t take it personally when someone is talking about things that white people have done, don’t get defensive, it wasn’t you that did it, trying to justify it doesn’t help. I had a conversation with someone about what happened with George Floyd that basically led to him trying to justify that the police officer was there for a reason, which I understand, but whether the officer was there for a reason or not does not justify what happened. I didn’t understand that he was trying to justify it until after, and I was thinking about it. I think that it is really important that I don’t justify what happened, because it was wrong, end of story. There is no way to justify it, it was just wrong, and on no planet is it, ever was, or ever will be ok.

Point #10: “The solution is not to ‘stop making everything about race’ and just all come together as one. We have to be anti-racism, not anti-talking-about-race.” This stuck out to me because I used to think that I should be somewhat “colorblind”, but I came to realize that I should not strive to be colorblind, but to acknowledge our differences and talk about race.

Now, what do these points have to do with talking about race online? Well, all the same rules apply, all the things we should do when talking about race in person are the same things we should do when talking online. I found the article by Angela Watson to be helpful for me to understand how to use my online space to talk about race.  


If anyone has any tips or resources please do let me know!

Time lapsing and drawing lips

This week I tried out an app called Life Lapse (available on iPhone and android) and used it to show my progress in my learning project. The app basically is a stop motion app, you take a series of pictures that make it look like you took a video. I tried out a few different apps before settling on this one, the reason I picked this one is that it has a “ghosting” feature that puts the last picture faded on your screen so you can see the difference between the last picture and the one you are trying to take. This feature was helpful to make your final video smooth. One thing I didn’t like was that it did not offer a tool to add text or any drawing tools, but other apps had the feature, but you had to pay for it. The other thing that I did not like was to get the pro version you had to get a subscription, and it is pretty expensive ($10.49/month). Overall it was pretty user friendly and self-explanatory.

Now for my learning project.

I tried to find videos from different channels that I haven’t used yet. The first video that I found was from Silvie Mahdal called “How to Draw Lips & Mouth in 10 MINUTES – EASY Tutorial for BEGINNERS.” This video did not use very many guidelines, and it was hard for me to make the lips consistent and proportional. Therefore, I found a second video from Ebru Art Channel called “How to draw a lips – Drawing technique,” this video only went over the basic shape but it used a box with a horizontal and vertical line and three circles. I found that I didn’t need the circles, but the lines and the box were helpful. I used the shading technique from the first video and used a q-tip for blending.

« Older posts