Learning Through Living

Category: EDTC300 (Page 2 of 3)

Woodworking With Kids

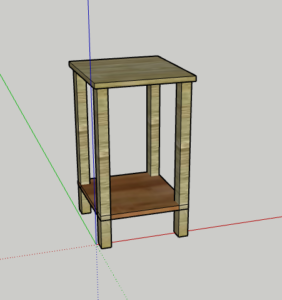
I have been having a lot of fun exploring the woodworking world and finding an outlet to express my creativity, but I did not want to keep all the joy to myself. Most people will think of woodworking as an adult activity due to the power tools and risks of danger, however, there are several ways to get kids and teens involved! My goal this week is to find some websites and resources that are kid-friendly to encourage young people to explore the shop, with some supervision of course!

There are several YouTube videos with project ideas to make with kids such as this one.

It is important to use your judgment with what tools you allow the kids to use. I think there are excellent learning opportunities to use power tools by going very slow and providing a lot of hands-on guidance. Due to the risk factors, you are able to teach the kids focus and the importance of patience. This is something that even veteran crafts people can forget but when using power tools you must give that task your full attention, double checking your hand placements, and making sure everything is lining up, there is a lot to think about. This is where the patience comes in. When using a table saw for example, there is no rush as a lack of focus can result a trip to the emergency room. In my opinion developing a positive relationship with items like this at a young age is important but there should always be a small element of fear present, even for adults, that fear is what will remind you to take the task seriously and give it your full attention. Again when with kids, use your judgment. Maybe have them watch you do the task, and talk through what you are thinking about with them. When they are a little older maybe you can shadow their movements and guide them by having your hand overtop of theirs. With that said, there are many tasks for them to do that do not involve power tools and they can definitely remain busy as you make a few cuts.

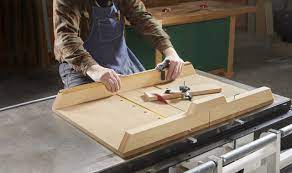
Here are a few examples that I found on Pinterest that I think would be great to bring into the classroom. The first

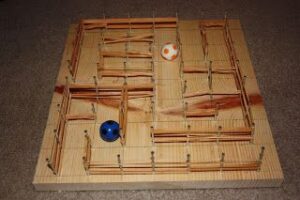
survivingateacherssalary.com

is this maze made from rubber bands. You can have the students experiment using their imagination to create a maze, but you can also implement certain constraints to have them think through. For example, there must be one entrance and one exit, you can only have a max of 4 sections that include a 2 square long hallway, a max of 1 section that includes a 4 square long hallway, and the ball must pass through an “S” shape pattern to complete the maze. 


A second example is this mini foosball table. More that half of my grade 6/7 internship class was obsessed with soccer and would have loved something like this for indoor recess.
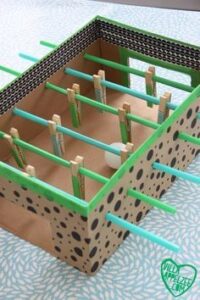
joyintheworks.com

The image is depicting a cardboard box and straws, however it would be easy enough to precut the boards and have the students help you put them together and drill out the holes. The can be a great mini math lesson to problem solve the spacing for the clothes pin players and where the straws need to be placed. If you are wanting to make this all out of wood, you can buy some wooden dowels to act as the straws.

Hopefully this has given you some ideas and inspiration to create some DIY wood working crafts with your kids, or to implement some wood building into your classroom!

See you next week!


Staying Connected in a Disconnected World: My Experience With Digital Citizenship

Digital citizenship is an important part of modern society. We spend most of our day online and digital platforms are responsible for a large part of how we obtain and share information. With that being said there is some learning that needs to be done to navigate this sphere, safely, efficiently, and effectively.

When I was in school the internet and social media were discussed purely in terms of education benefits. How to search information and use Google Docs and Google Slides for projects. It was not until 2012/2013, around the time of the Amanda Todd story, that I remember our school discussing the word cyberbullying. It started out with scare tactics, telling us that the internet can be a dangerous place and creating the notion that you never know who you’re talking to online. I feel that for some of us, this worked initially, however, as we became more comfortable with the platform the idea that every person you talked to on the internet could be a potential predator became a little more unrealistic. Who could blame the adults for using scare tactics though. I feel like it was more of a reaction on their part than a strategy. They themselves were scared of a rapidly changing world that was hard enough to keep up with but now it was putting their vulnerable kids at a higher risk than ever to be put in a dangerous situation.

Over the years we have gained more information and realized that scaring kids or telling someone not to do something is an ineffective strategy in education. As this Jason Ohler article suggests, we must take a “one life” approach to technology by understanding that it is everywhere in the student’s life and should not be separated from their education. Personally, I feel that when I teach digital citizenship I will approach it from the understanding that students will encounter potentially harmful things on the internet. Rather than dismissing it or telling them to simply avoid it, I would like to give them strategies and techniques to deal with these problems. For example we can learn how to identify misinformation on websites and in videos, we can discuss comment sections and how to deal with receiving negative comments.

With this being said, Nathan Jurgenson’s article brings up some interesting points about having our lives online. It suggests that we are living in a disconnected world, and everyone is yearning for the days of old with less technology. I myself notice a significant shift in my stillness and flow when I am off of my phone for a while, however ironically that very thing I am trying to get away from also has all of my meditations and music which help with my flow state. Instagram is another place that can bring me out of joy as I mindlessly scroll for hours watching meaningless videos. But once again my algorithm also gives me inspirational videos and moments of mindfulness. The point I am trying to make is that we are so intertwined with our technological lives that the answer isn’t simply to stop using your phone, it is to learn how to use it. Let me explain!

I am sure most of our morning routines are quite similar. Wake up, turn off your alarm (that’s probably on your phone), and check some form of social media, news app, or emails, while still in bed, while getting ready or as your are eating breakfast. I was no different, but because of recent circumstances in my life I noticed that my daily practice of checking Instagram before I got out of bed was putting me in a low state before my day had even started. Shortly before this realization I had made the commitment to myself to finally purchase a mindfulness app that was created by a spiritual teacher that I look up to named Gabrielle Bernstein. The app includes a daily mantra, a journal, weekly lessons and a wealth of meditations available at any time. I decided to shift my technology use in the morning to click on the mindfulness app and do my daily meditation before anything else. This has greatly improved my mood, and my relationship with Instagram is much more positive after I have placed myself into my flow state.  The lesson here is that I did not change the amount of time spent on my phone in the morning, I simply changed what I chose to do with that time. I believe this to be the key to teaching our students healthy technology habits, because we all know they are going to use them, so let’s guide them to make decisions that are going to keep them happy and healthy.


Until next week,

Kyle

Learning New Woodworking Tips With TikTok

For this week’s learning project, I was unfortunately limited in time due to various other commitments. So I was unable to physically create something, however, I took this time instead to try out a new learning strategy. TikTok! This is a platform where content creators upload videos similar to YouTube, however, TikTok’s focus is primarily on short-form videos. This is great for woodworking as you can scroll through several videos in short succession to gather inspiration and ideas. Some pages that I found interesting and helpful were design.by.fatema, nickscustomwoodworks, and therealgerber.

Simply typing in DIY woodworking projects or one of the related searches seen on the right, is a great way to find thousands of videos to gather ideas about what to build next. Although small glimpse of the process are often present I have found that with TikTok it is a lot about the reveal of the finished product, which is perfect when browsing for inspiration.

Another use for TikTok that could be helpful is the content surrounding tool tips. There are numerous videos dedicated to making life easier around the shop or a cool function that you have on your tool that you may not have known about.

@woodwhisperer

Dovetail Gap Repair | Can you see it? #woodworking

♬ original sound – Marc Spagnuolo

Woodwhisperer is a great place to look for tool and project tips. The video shown above demonstrates a strategy you can use to repair a miscut in your project, which I think any beginning woodworker would greatly appreciate.

I will say the only downside is due to it’s focus on short form videos TikTok is not a place I would go for a how to video, as most of the content I came across were time-lapse or smaller tips about an overall build. However, I do think it is an excellent place to gather ideas and improve your woodworking knowledge and will definitely be making it’s what into my repertoire.

Until next week!

Follow Along With Me: Woodworking YouTube Videos

I have been putting off this form of learning for a while now, due to the fact that in other areas of my life, I tend to gravitate towards this form of learning. That is of course the humble YouTube tutorial. I have used it in some ways during my learning project such as, to help with the learning of programs or to gain inspiration, but this week, I wanted to see how it would go if I built something alongside the video, in real time.

Throughout this experience, I have been trying to make practical items that I will be able to use every day and this week is no exception. As I was looking through YouTube to gain some ideas, I came across a video talking about coasters. I thought this would be a perfect build as it is not something that I currently own and I believe it is another approachable project for someone who is just getting started with woodworking.

There were two videos that I decided to follow, the first was by Ben Grimsley Woodworking.

This was an great place to start for building the coasters. I decided to make some modifications to the size as I did not like how thick these coasters were but that was a simple enough adjustment. In the video Ben is using a hardwood, which I did not have available to me so I used some old scrap pieces of pine we had around the shop. As you can see from the thumbnail of the video the coaster holder is very basic. I wanted to challenge myself a little more with a more appealing design. Lucky for me a video appeared in my recommended feed from Keddie Woodshop which had exactly what I was looking for.

Something I found challenging at first was the fact that my coasters were one measurement and the coaster holder was a different measurement. I almost made the mistake of copying each video exactly as they were, but I am glad I caught this before it resulted in a lot of frustration.

Keddie Woodshop’s video also finally inspired me to create a crosscut sled for the table saw.

https://www.familyhandyman.com/project/table-saw-crosscut-sled/

They are very easy to make and in addition to making all your future cuts much easier, it adds a slight level of safety as your hands have more surface to hold onto while you push the board through the table saw. I constructed mine on my own however if you are interesting in building one yourself, Jay Cork with Family Handyman is an excellent website to check out. He has an instructional video as well as a step by step walk through with images on the website for you to follow along.

Overall the coasters turned out really well! As I anticipated watching a step by step YouTube video is my preferred way of learning a new skill. Being able to see exactly what the individual is doing helps a lot when you are trying to replicate it yourself. You also have the luxury of pausing at anytime so analyze the image further or even replaying certain steps if you did not fully understand the first time.

I am enjoying the process of exploring other methods of learning online, but I think myself and instructional YouTube videos will forever have an unbreakable bond.

Until next week,

Kyle


Flip That Camera on and Start Recording!

This week I will be reviewing a website called FlipGrid. I have used the site once before in my ECS 300 class however, that was as a student and I was curious as to what the program could offer for educators. FlipGrid is a video recording website used for educational purposes and is very easy to set up. Once you have signed up using your email you will be prompted with a screen asking you about the community and subjects for your account.

This is excellent for organization if you are using this in multiple way or for multiple classes. There are several options from math, law, and science, to art, music, and language. Once you have set up your account it is time to make a group.


On the left hand side of the home screen you will see a camera tool, a spot where you can view videos that you have created, a purple plus sign with group next to it, and underneath that you can view all the groups you have either created our are a part of. For today we will be creating a new group and after clicking on the purple plus button a drop down will appear (as shown in the image), we will click on create group.


You will then be given a screen that askes you to select a grade level for this particular group. Again this is very handy for organizational purposes.

Following the selection of the grade level you will be able to customize your home page. I have titled this group Woodworking Project, however for a teacher is might be beneficial to name it something like Math Grade 6, or building project February 2024. Not only does this help keep you organized but also helps your students navigate the program if they are in more than one FlipGrid group.

I have also chosen a background that pertains to the topic of the group. The website offers some stock examples however they are limited. With that being said there is an option to upload your own images to the program.

Now that we have set up our group it’s time to look at what FlipGrid has to offer. The main premise is that the teacher will create a topic which the students are able to access and respond to in video form. Some of the stock examples that are generated when you first create an account are shown below.


Creating a topic is very easy. Simply click on the purple topic button that can be found on the home screen. It will take 
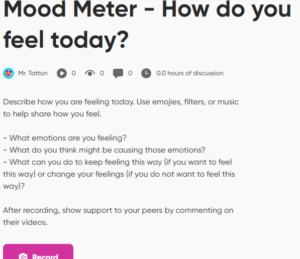
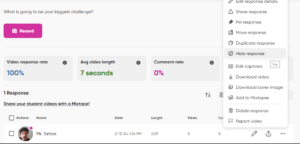
you to a page where you can give your topic a title, and a brief description about what you would like to students to discuss in their video. One of the features that I find super interesting is the time limit for recording. It ranges from 15 seconds to 10 minutes and I think it is an excellent way for your students to stay on track while answering. If you have a shorter time limit it forces the students the really think about what is important in their response and only share the key details.

I have created a topic as an example for how FlipGrip might be used in the classroom. I have titled to topic “What’s in your Shop?” and the prompt is asking the student to create a video describing some of the tools and materials they have available to them, what they are going to build with it, and what is going to be their biggest challenge.

After clicking on the record button the students are brought to a screen where they can create their video. There are several options to choose from including a backdrop selection, the choice between video or audio only and a number of text and drawing features that add a level of creativity to the recording.

Jumping ahead slightly, but after you have created your video there are a few editing options such as, trimming your clip and adding ambient music. Something else that is think would be super helpful for students is the ability to access the prompt while record. As shown in the image below.


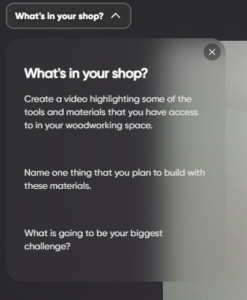
This saves students from having to write the prompt down and look at their paper while record, or have to redo their recording because they forgot what they were supposed to talk about.

Overall I think this is an excellent website to use in classrooms. It gives students an alternative to journal writing or other small writing tasks. It could also by a tool used for accessibilities if a student has difficulties with writing or if  English is their second language they may be able to express themselves more thoroughly this way than on paper. I could also see myself using this a lot in art classes as students create their own songs and dances as well as skits for drama. The interface is easy to navigate and all topics and groups are given a code which is great for easy sharing. A new topic can be added at anytime which makes this a very interact process. The teacher can also record a video that can be view by the students for an example.

While exploring this program I had a thought that students may not want their peers to be able to view their videos. I think for some assignments it is important to share with classmates, however something like journal responses can be quite reflective and vulnerable. There is a solution for this! Once a video has been uploaded to the topic, the educator can click on the three dots at the far right of the video (can be seen at the bottom right of the above picture). This will bring up a menu with several options. Clicking on hide response, will only make that submission visible to the educator.

I have created an example video responding to the “What’s in your Shop?” topic that can be viewed by clicking this link. Once again I think this is a great tool that will definitely be seeing some use in my future classrooms. I highly recommend checking it out. I am also going to link two YouTube videos one for teachers, and one for students that visually walk you through the steps of setting up an account and provide a more in depth look at how to use some of the additional creative features while recording.

Thanks, see you next week!

Education in the Digital Age

When you picture a classroom what do you see? Maybe some desks, a whiteboard, several books, notebooks, pencils and paper. I would say this is a common idea of what a classroom looks like as this is what most of us experienced growing up.

Picture of a Elementary Classroom

https://en.wikipedia.org/wiki/Classroom

But perhaps in your vision, you also saw a smart board or TV and students with laptops and tablets. If so you have envisioned the modern classroom and what most schools look like today.

A Picture of a class of students with laptops in front of a tv

https://www.dell.com/en-ca/blog/tags/education/

As our society changes over time, so too does our education system and the tools we have available to us as educators. I feel like there are a lot of varying opinions when it comes to how technology is affecting our youth. I myself go back and forth on this topic as well. So let’s look at some facts to see if we can get a better understanding of both sides of the story.

Firstly, it is clear to see that youth are using social media and technologies more than ever. A Pew Research Center article states that 46% of teens aged 13 to 17 report using the internet almost constantly, with 48% claiming to use it several times a day. That same article collected data on social media use and found that the most common apps were YouTube (95%), TikTok (67%), Instagram (62%), and Snapchat (59%). So what does this mean for educators? I personally see this as students being able to stay connected outside of the classroom community, as well as having first hand access to what is happening in popular culture. This connectedness can be a great tool to use to connect with your students. If you are also aware of what is happening in popular culture you can relate your lessons and topics to things that are relevant in your students lives. There is a concept in the video An Anthropological Introduction to YouTube called participant observation, which means that to truly understand how something functions we must try it ourselves. I think this goes back to my point of popular culture. As educators we must try and stay on top of new technologies and what our students are interested in to better understand them and what they are going through. This way we are able to provide them with meaningful experiences and opportunities in the classroom.

However with that being said, there are some downsides to this increase in technology. I have found in my own life that at times I can be a much less social individual in person than I used to be as most of my communication now takes place online. This is something that I am aware of because I know what I was like before being consumed by technology. But I am curious to see what this is going to do for the youth that have always had a screen readily disposable for their entertainment. Facetiming their friends instead of making playdates or choosing to be on their phones rather than exploring the world. Will they have the insight to take a step back and remind themselves to take a break, as I so often do? Is this issue as bad as we think or is online forms of community just as good as communities developed in person? Only time will tell. I am interested to hear where your views stand! Please let me know your thoughts!

Thanks for reading my post!

Woodworking in a Virtual World

This week I wanted to take a different approach to the art of woodworking. Obviously the main focus is on the construction of an object and that process is where most people find their joy with this practice. However, there is another, arguably more important, step that must take place before you dive into a build. The planning!

I am someone who has a vision in my head and I will kind of just go for it. At times I will make a small drawing on paper with rough estimations of sizes and shapes, but I often will brandish the attitude, “I’ll figure it out as I go.” Sometimes this is fine and things work out but on occasion, my lack of plans results in a lot of pacing around the garage, some words said under my breath, and the need to restart the project. Today all that changes!

As I was surfing through YouTube one day I came across a video discussing the importance of modeling your builds and how it can benefit your work flow and limit mistakes. They mentioned a program called SketchUp which I decided to explore further. I found an incredibly helpful tutorial by Home With Stefani where she creates the design for a planter box in the program. The video is detailed and approachable and was a great start to gain some knowledge before exploring the application myself.

SketchUp is super easy to access! Simply typing “SketchUp” into your web browser will take you to this page. Image of the SketchUp WebPage

Selecting the option for personal projects will give you access to the free version of the program which in my opinion will be more than sufficient for most DIY at home builders. I also noticed a section for primary and secondary education. This can be a very helpful tool for educators to use while exploring various math topics such as geometry, or simply being able to visualize the calculations you are making. I highly recommend checking out Du Bois Design Class’ playlist on SketchUp which covers how to setup an account and what all the different features are used for and how you might use them in the class. Students can also have access to this program and explore making creations of their own.

I spent about 30 minutes exploring the program and it was relatively easy to navigate after a few minutes of familiarizing myself with the layout. I decided that I wanted to design some end tables for the living room that would match the color and style of the wine rack I made with my dad a few years ago. This is what I came up with.

I was limited with the colours in the program but my idea is to have the major colour be a light grey stain and the bottom shelf a walnut stain. I am also thinking about adding a small drawer but I am not sure just yet.

I am very excited to get started on the building process! This coming week I will be in search of some new websites that might help me with this project! If you have any ideas or suggestions please let me know!

Thanks, see you next week!

Constructing a Cutting Board

This week I tasked myself with making a wood-cutting board. My idea was to create something similar to what is depicted in the image below. Using a few different colours of wood to create a pattern.

wooden cutting board with various types of wood

Cutting Board created by PaulTheMaker

Seems simple enough, but now I needed to pick what type of wood I would be using. My technology for this build was blog posts and websites as they are not normally my first place to look when tackling a DIY project. I found a very informative post by Virginia Boys Kitchen which outlined 5 criteria to lookout for when selecting your wood.

5 Main Criteria for Selecting Wood – Virginia Boys Kitchen https://virginiaboyskitchens.com/blogs/features/best-wood-for-cutting-boards

The category that stood out to me the most was the toxicity section. I would not have been actively thinking about that if it were not for this article. They do not go into extensive detail on the subject but note that any tree that is bearing fruit or nuts is probably a safe option for wood type. based on my previous knowledge of woodworking I know that some wood is treated with chemicals to allow it to last longer outdoors, so we will definitely be staying away from that.

A second note is the hardness of the wood. We will be needed a hardwood board for this build as it offers durability for the wood but also a proper board selection will not dull your knife as quickly. Wood types we will be looking out for include, walnut, cherry, maple and acacia. With this in mind I went out to search for my lumber, however, this is when I ran into my first problem. I could not find the type of wood I needed. Being that my hometown only has 2 small lumber stores I was limited on my selection. I was able to find some oak (not ideal for cutting board) and repurposed some old scraps I found laying round my dad’s garage. I decided that I wouldn’t be able to use this particular cutting board for it’s intended purpose but it would be a good way to practice for when I am able to acquire my desired lumber.

Now that I have my materials, I was ready to begin crafting my cutting board. I found a very helpful guide on this home depot website. They also gave an idea of what types of wood you should be using which was a great way to cross reference my information I had found before.

List of tools needed for project

HomeDepot.com https://www.homedepot.com/c/ah/how-to-make-a-cutting-board/9ba683603be9fa5395fab901c8502155

I found it very helpful that the website included all the different tools that were needed for the projects. This allowed me to gather all of them beforehand and resulted in a more efficient workflow. I did not have all of the tools needed for such as a router, however they are used for finishing the build and not a overall critical item for my new intent of having this be a practice cutting board.

To begin the construction of my cutting board I used the website FixThisBuildThat.

Boards of different colours cut into strips and layed together on a table

FixThisBuildThat.com https://fixthisbuildthat.com/how-to-make-a-cutting-board/

Different colour boards glued together and held with red clamps

FixThisBuildThat.com https://fixthisbuildthat.com/how-to-make-a-cutting-board/


This website was just as good as any DIY video I have watched. Every step of the way they added a picture for reference and a small description of what to do next. I will say however, that the website does assume that you have some basic knowledge of how to use the equipment. For example, when setting the table saw, the website says “I set my table saw to 1-7/8,″ but it does not show you how to do that. Where as with a gif or video you are able to see the maker physically preform all of these actions resulting in replicating the actions a little bit easier.

Overall I would say I gained a lot of information from these websites and I think using a website for woodworking projects is a great option. The most helpful usage was the ability to research materials and what tools you will need to complete a specific job. With the only major downside being that the progress of the build is completed in steps with at times ambiguous picture references. Actions like setting up your tools, or how to sand properly not included.


Here is an image of my progress! I am still waiting for the glue to dry, and I’m hoping to finish sanding tomorrow!


Technology In My Daily Life

This week I have taken the time to reflect on how I use technology throughout my day. Some of my uses were quite obvious but there were a few habits that were a bit shocking. Let’s start with the obvious one, school!

This semester I am taking all of my courses online, therefore most of my day is spent in front of a computer. My morning routine for school consists of opening my laptop and checking UR Courses along with my course email. This is normally followed by briefly looking at my personal email to ensure no urgent messages are waiting for me. I will then return to UR Courses and begin the day’s tasks. Programs that are in frequent rotation on a school day include, zoom, word, VitalSource: Bookshelf where I read several of my textbooks, and a new addition, thanks in part to this class, discord! I was familiar with the other programs from previous years in school however, discord was new to me. It is an excellent place to ask questions and build a community with peers in your classes, especially when those course take place online. Recently I was invited to join a discord in one of my other classes and this has proven to be most helpful as a number of us were confused about due dates and the expectations for various assignments. I find that the work flow while using my laptop is successful, I do not find myself flipping between tabs and getting distracted too often. However, let me make this abundantly clear, I do get distracted… just not with my computer.

Enter the dreaded love hate relationship I have with my phone!

Obviously it is a wonderful tool to help me stay connected with friends and family, as well as provide some entertainment when I get bored. I frequent apps like Snapchat, Messages, Facetime, and Instagram to keep in touch, while Spotify and Youtube have me covered on the entertainment side. It all seems relatively harmless though, right? Well the problems start arising when I “get bored” while doing something productive. Somehow the thought of “I wonder if so and so messaged me” turns into at least 10 minutes spent scrolling through Instagram reels. Or my favourite, “let me find a random Youtube video to have as background noise,” which turns into me obtaining 2 hours of useless information. Anyone want to know how an electric guitar goes from a plank of wood to a finished product? I have this “background noise” video to thank for that extensive knowledge.

All jokes aside this is normally a simple fix. I either leave my phone in a different room while I work on my tasks, or if I really need to get some stuff done I will leave my phone in the glove box of my car while I go to a coffee shop and lock in to my studies. This example does not happen that often, only if I am in a major time crunch and I know I will get distracted. I have also found that listening to binaural music has helped me to stay focused, as I enjoy the relaxing instrumentals.

In my personal life a lot of the same technology appears. I often listen to music or podcasts while doing things around the house, or watch a Youtube documentary. The only addition I would make to this rotation is the PlayStation. I will often voice chat with a friend of mine from Edmonton while we catch up with each other a play a game called Rocket League.

Overall my relationship with technology is a positive one, however, as I am on my computer a lot for school this semester I have been trying my best to limit the amount of time I am spending in front of a screen for leisure.

Thanks for checking in to this weeks blog post!

Time To “Branch” Out: An Adventure In Woodworking

Welcome to my journey into woodworking!

I have always been interested in how people can take a few pieces of wood and create something incredible. From making a table or desk to carving an animal out of a stump there are so many creative ideas and outlets that you can explore while woodworking.

As I begin this adventure I am starting with some base knowledge of the subject. Throughout my life, I have helped out with numerous house renovations and small projects with my family. This allowed me to learn how to use basic tools like saws, drills, and hammers. I have fond memories while helping out my family, such as the time when I made a wine rack with my dad.

Author (left) and father (right) posing either side of a grey and brown wine rack

Although I do have experience with woodworking I have never tackled a project completely on my own. I am very excited to explore the different ins and outs of my creative flow. One of my main influence’s that has made me want to pursue this passion is world-renowned maker and MythBusters host Adam Savage. Adam has a channel on Youtube called Tested where he and other makers create all kinds of movie and tv props, maker space upgrades, and various tool reviews. His excitement and down to earth nature has drawn me to the community and I am thrilled to get started!

In terms of what I will be making, I have gone back and forth on a few things. However, the first project that I have decided to take on is to build a wood cutting board similar to the one depicted in this image.


If you have any tips or tricks as I get started on this journey please let me know!

Check back next week for a progress update!

« Older posts Newer posts »

© 2024 Kyle Tatton

Theme by Anders NorenUp ↑