I am so thankful that I was able to work on this project throughout EDTC300. Otherwise, it would have been kicked to the curb until I had more time. And let’s be honest… I never have enough time.
I know I was not able to actually finish the course, but I made so much progress! It will be way quicker and easier for me to complete the rest of the modules now that I have already created one. And no the relationships module is not quite finished yet either, but I have done everything I can until I get the audio file. Once the voice over is on the presentation everything is going to look amazing. I seriously cannot wait.
This class has provided me with so many skills that have allowed me to create an online course and be comfortable doing so. I never would have thought that I would be capable of something like this– I have never thought of myself as tech savvy.
Maybe one day you will even be a participant in my course.
Well my friends, it seems as if I have come full circle.
The only thing left for me to do while I wait to receive the voice over is to start the next module. Once I receive the audio file I will be able to add it to the presentation and upload it to the LMS. I’ll probably have a few technical difficulties because that is just the way my life rolls, but I learned some pretty new skills (and some patience) in this course that will help me through. As of right now, I should have the audio by December 20th and so I can hopefully have this module COMPLETELY done by Christmas.
After I finish the first module completely and enjoy some Christmas festivities, I am gonna keep my head down and work on this second module! I would really really really like to have the course done and ready to test launch by the end of January (but that might be wishful thinking).
https://rb.gy/elq3iq
So… since I am starting the second module I am back to the boring stuff. I already have most of the research done because I did it while researching the first module. I am thankful that past-Paige did the research. This Paige is exhausted from finishing the semester and would probably procrastinate.
That means this Paige has to start sorting the research and creating an outline! As of right now, this is what I have for the outline for the Communication module:
Why is communication important in everyday life? In sports?
What are the types of communication/communicators
Which one are you?
How can you identify what kind of communicator your athlete is?
What does harmful communication look like?
What can harmful communication do?
How can we positively communicate with athletes?
Language
Why is the language you use important?
How can it be harmful?
How can this be harmful to people suffering with mental health issues?
What are some harmful sayings?
What can we say instead?
This outline might change once I am able to start organizing my research a little more, but that is okay! This module will likely change a million times over before I am done with it.
I am still using Google Docs for all of my research, writing, and planning because that is what is working best for me right now. I honestly do not have the time to fiddle around with new platforms, but I hope to do that over the winter break!
We are getting close to the end of the semester, which means my learning project is coming to a close soon!
I am so thankful for my #edtc300 class and the fact that we were able to pick a passion project. If I was not forced to work on this project every week for this class, then it would have been pushed to the side for a very long time. Instead, I will be able to launch my own course in the new year!
This week, I utilized TalentLMS‘s quiz feature to add the knowledge check for the end of the relationships module. I am not able to add anything else into TalentLMS yet because I am waiting for the voice over, and so I figured that I could get a head start and add in this little quiz!
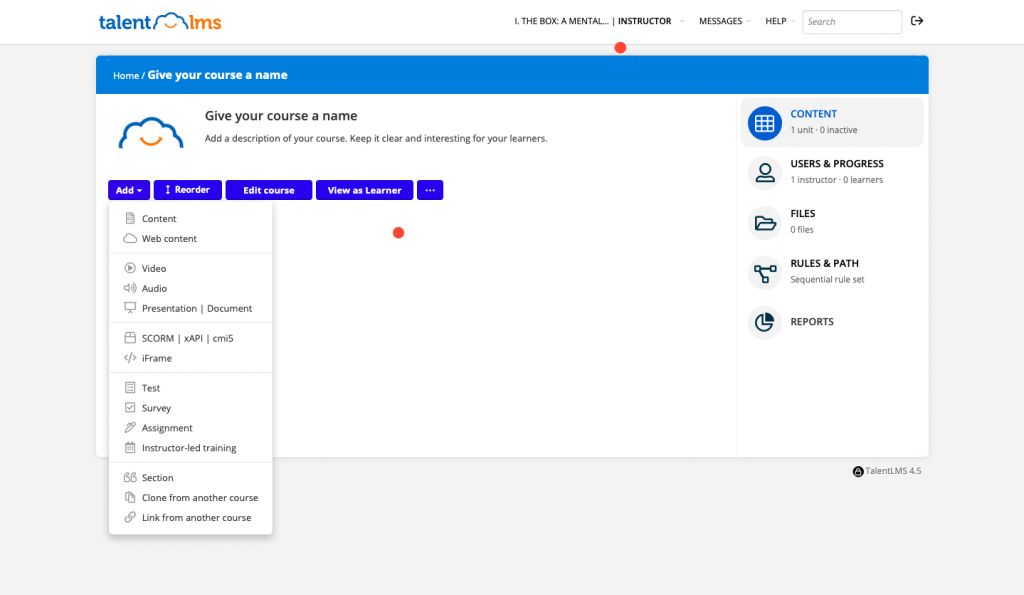
The photo above shows all of the options to add to a course. When I am ready to add my presentation I will use the “Presentation” feature, but for this knowledge check I used the “Test” feature.
TalentLMS is very easy to navigate and has a ton of options for every feature. On the test feature, you can add multiple choice, fill in the blank, ordering, drag and drop, free text, and more. For this knowledge check, I used all multiple choice!
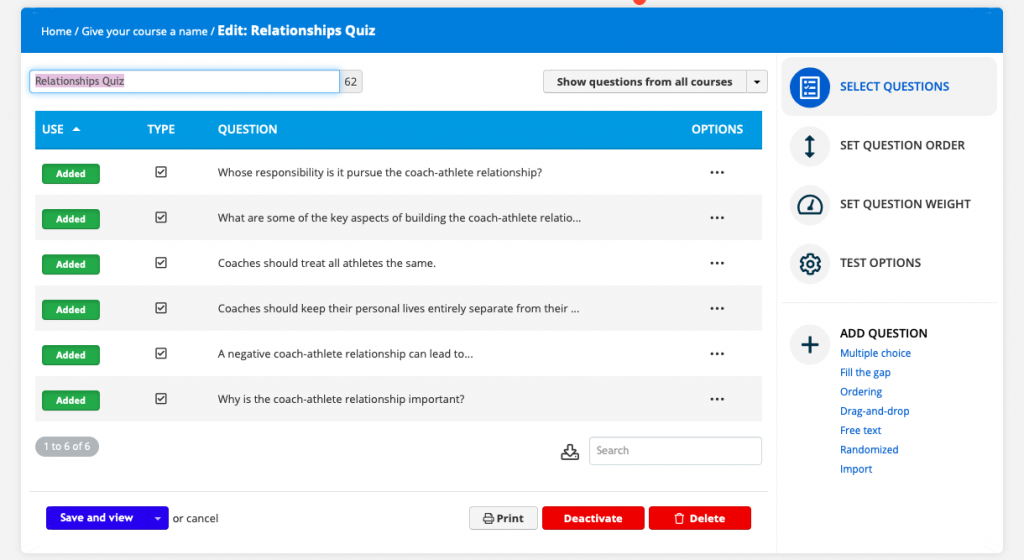
Inside the test feature! Here you can edit questions, add questions, and change some of the details.
I quite like that TalentLMS allows the instructor to provide feedback or a rationale for all of the answers. This helps participants to understand why that is the correct answer.
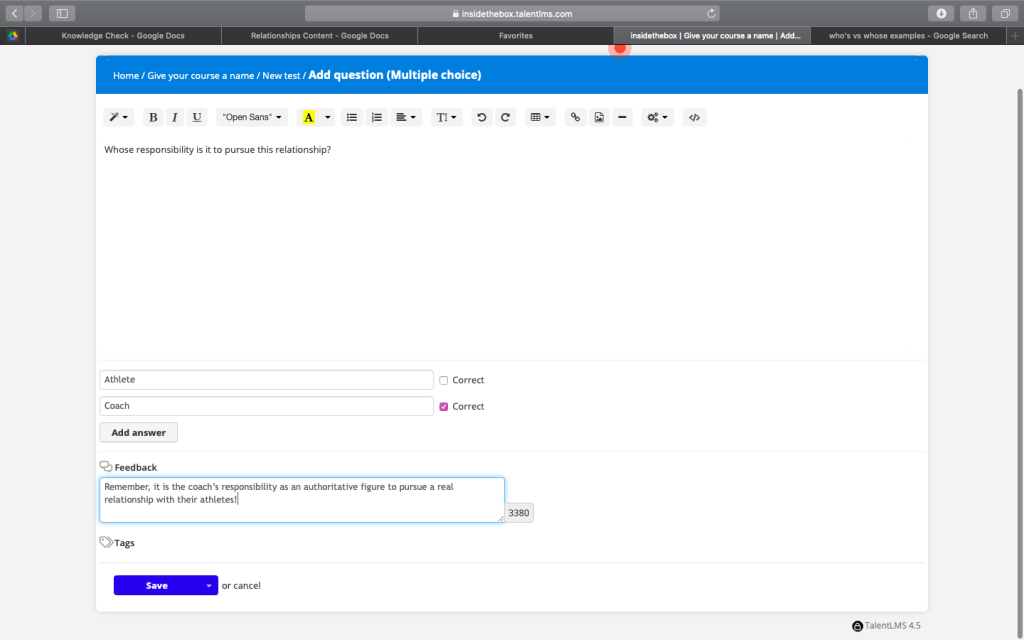
What is looks when creating a multiple choice question.
Because this is just a simple knowledge check, I only chose 6 questions. Quite honestly, many people will be able to pass this check without even taking the course, but it simply reinforces some of the important ideas throughout the module.
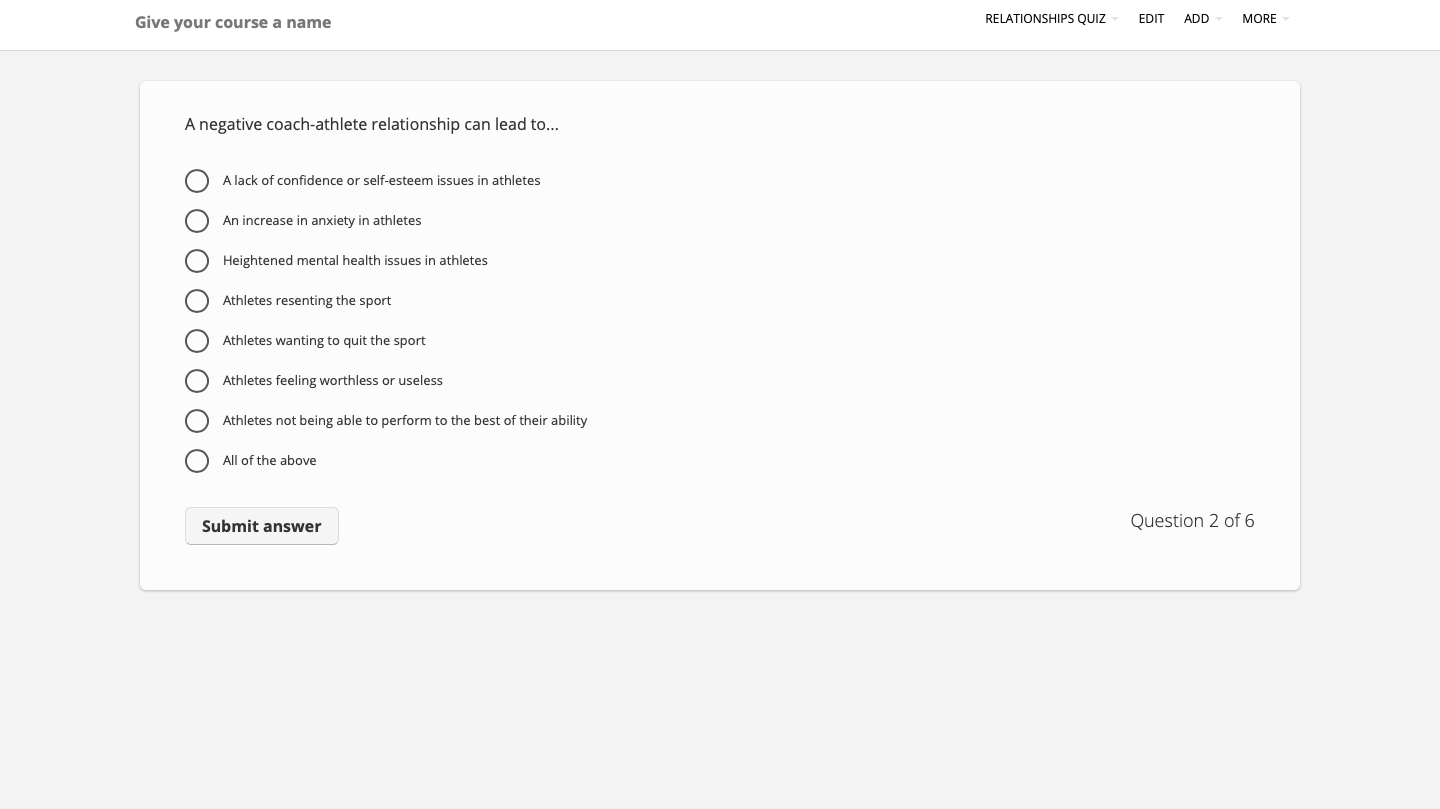
What the test looks like as a student!
I am really looking forward to exploring more features on TalentLMS and finally uploading the rest of the relationships module! It is slowly but surely coming along, and I am SO excited to have it launch next year.
I am writing to you from my third day of isolation in my tiny bedroom! I do not have my test results back, but I was a close contact to someone who tested positive for Covid-19. So, I am stuck in my small bedroom for the time being.
But let me tell you, it is HARD to find the motivation to do any of my work when I am in my bed all day. My room is too small for a desk, and so my bed has become my entire life for the last three days.
However, I suppose I have accomplished some work (make sure you emphasize some).
For my learning project this week, I found an individual to VoiceOver the relationships module, and I created the knowledge check!
The individual we found to VoiceOver the relationships module was a secondary educator and athlete for the University of Regina. With experience as a coach, athlete, and educator, we thought he would be a great fit to be involved with out course! We reached out to him over Instagram and have been in contact via email. We are still working out the logistics, but we are super excited to have him involved!
As I said earlier, I also created the knowledge check for the module. I want to make sure that there is some sort of assessment after each module to ensure the participants are paying attention. Even if the questions are rather straightforward, they reiterate the main messages of the module so that if participants don’t focus during the presentation, then they still take something away from the knowledge check! The questions I chose for the knowledge check relate to the learning objectives. The LMS I chose has the option to add assessments within each unit, so I am going to take advantage of that feature!
This was a boring post, but it seems fitting since my whole life is boring in my bedroom right now.
Thanks for checking out my eighth learning project post! I am really excited to show you what I have been working on this week.
Last week, I created the content for the first module and created templates for the presentation. We are finally getting to the meat and potatoes and I am so excited! It is really starting to come together and I am really excited about the positive feedback I have received.
This week, I worked on the presentation! I finished the slideshow portion of this presentation, but there is still a lot more to be done. I would like the entire presentation to be voiced over, and at some points I think it would be beneficial to have the speaker on the screen. I have not quite started on those pieces yet, so that will be my task for next week! Additionally, I need to create knowledge checks to guide the participants and ensure they are actively listening. As of right now, I would like the knowledge checks to appear at the end of each module.
Anyway, when I was completing the slideshow, I wanted to make sure there were minimal words on the screen. The participants should not be reading the slides, they should be listening to the speaker! That being said, I would like to make sure that there is an option for subtitles because I know that some individuals need or prefer them. I also utilized the animation function to have my text appear on the screen at different times. This way, participants will not be distracted by the points that are yet to come, but will be forced to listen to the point at hand.
To document this portion of my learning project, I wanted to create a time lapse! I have never created one before, so I was not quite sure how to start. I looked for a free online tool that would record my screen and automatically convert it to a time lapse, but I could not find anything. After a quick google search, I realized that if I simply recorded my screen, I could upload those videos into iMovie to create the timelapse. So, I used Screencastify to record my screen and then attempted to import the videos to iMovie.
Screencastify automatically saves recordings to a folder on google drive, and so I downloaded all of my files from there. I have never truly used iMovie, and so I did not know which type of files could be imported. It turns out that the files saved from google were not compatible with iMovie, and so I tried to use multiple websites to convert them to .mp4. That seemed to be taking forever and I could not seem to get it right, so I went back to Screencastify instead of google to see if there was something else I could do. It turns out, Screencastify has the option to export as an .mp4 and so I just used that!
After finally uploading my files to iMovie, I found an article that helped me to adjust the speed on the videos. I followed that and increased the speed of the videos by 2000% because that seemed to be fast enough. From there, iMovie had an option to export directly to YouTube. That was super handy and made the export process much easier.
Ultimately, I was very confused by iMovie. But like everything, there was a quick tutorial for me to follow which helped immensely!
I am really excited to continue working on this module and I can’t wait to see how it all comes together!
I think I might have seen one too many Carol Baskin costumes this past week, but that’s okay!
Welcome to my 7th learning project post: the one that is almost a week late. This post is very late, but stuff happens and I am learning to be okay with that. Because I posted late, I was able to have more than just my content notes (and those are really boring), so I guess that is a bonus! The two weeks before reading week are always loaded with due dates, and so I am not going to beat myself up over this… so on we go!
I am finally ready and able to start creating content for module 1 of my course! It is starting to feel like this course is real and that I can really make a difference in the athletic world.
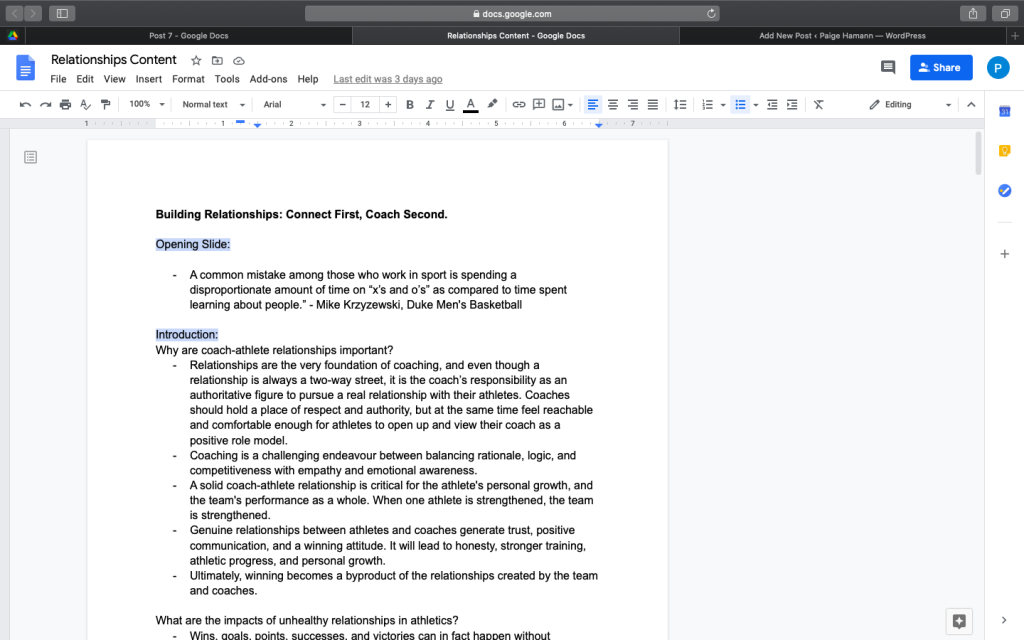
I started to build my content on Google Docs, because I use it for everything. To begin, I looked over my research a few times to familiarize myself with everything I wanted to incorporate. From there, I picked three major topics: Connecting as humans, deeping the connection, and connecting in the coaching role. After picking the three major topics, I integrated the subtopics. For instance, in the connecting as humans topic, we will cover showing genuine interest in your athletes, listening to your athletes, and respecting your athletes.
My draft of content for module 1.
After choosing the topics and subtopics, I started to write. I wanted to keep everything short and sweet to keep people engaged, and the language simple so that it is not confusing at all. I also made sure to include examples of what coaches can do so there is something for the participants to take away.
After finishing my first draft of content, I started to share it with people to get some feedback! I shared it with four individuals who have been competitive athletes as well as coaches. I also shared it with my counsellor, who is a psychotherapist and on the nonprofit’s board of directors. I wanted to have multiple sets of eyes go over the content to ensure it captured multiple perspectives and was effective. Knowing that a professional mental health worker, athletes, and coaches all think that this is amazing makes me feel so proud. Of course they provided a few tweaks and suggestions, which I am so thankful for. But all in all, module one is really starting to come together!
After I finished the content and had it approved, I wanted to start making the presentation! Now this is the reason that this post was late this week. I thought it would be incredibly boring if all I had to show for is another google doc. So, I kept working long past the due date. TalentLMS (the LMS that I will be using), has an option to upload PowerPoint presentations and convert them into a video that plays automatically so that participants do not have to keep pressing next. My vision for this module is to have my powerpoint play as a video, but with a voiceover. I would also like for the speaker to potentially be on the screen at some points, but that part I can figure out later on.
I knew that I wanted the presentation to be aesthetically pleasing, but also clean and simple. I use Canva quite often for school projects and social media posts, and I noticed they have presentation templates, so I decided to use one of those! While putting my presentation together on Canva, I realized that I did not want to have all of my text on the screen at once, but rather have certain points staggered and appear on the screen when it was time to talk about them. This way, participants are not distracted by what is yet to come and they are forced to pay more attention to the content at hand. So, I made the foundation of the slides on Canva, and then decided to move them over to Google Slides to continue working on the final presentation. I saved all of the slides on Canva as .PNG files, and then uploaded them as images on google slides! I like that Canva automatically saves your work so that you can go in to change things later on. I am sure that I will be doing this at some point, but that is absolutely okay with me.
My templates in Google Slides!
As of right now, I have the templates from Canva waiting for me in Google Slides so that I can start importing information and adding final touches. That is what I will be doing this week!
For the video in this blog post, I used Loom. Loom is another screencasting video tool, similar to Screencastify, which I used in the past. Loom can be added as a chrome extension, which makes it super easy to find. I found it really easy to navigate and use, but I did not go into too much depth. The video itself was super easy to export, as there was a download button right as you finished filming. However, as an avid google user, I appreciate that Screencastify saves their videos to google drive instead. I will definitely have to play around with Loom a bit more before I decide which one I like better!
I am super excited to share my findings with you this week.
Last week, I explored different learning management systems. TalentLMS is the online training platform that I am going to use to host my course. I chose to delve into TalentLMS because the website did a wonderful job of explaining the system and its features, and other LMS websites failed to do so. I honestly did not have the time to schedule a phone call with every LMS host that I was interested in, and so I saved time and jumped right into TalentLMS.
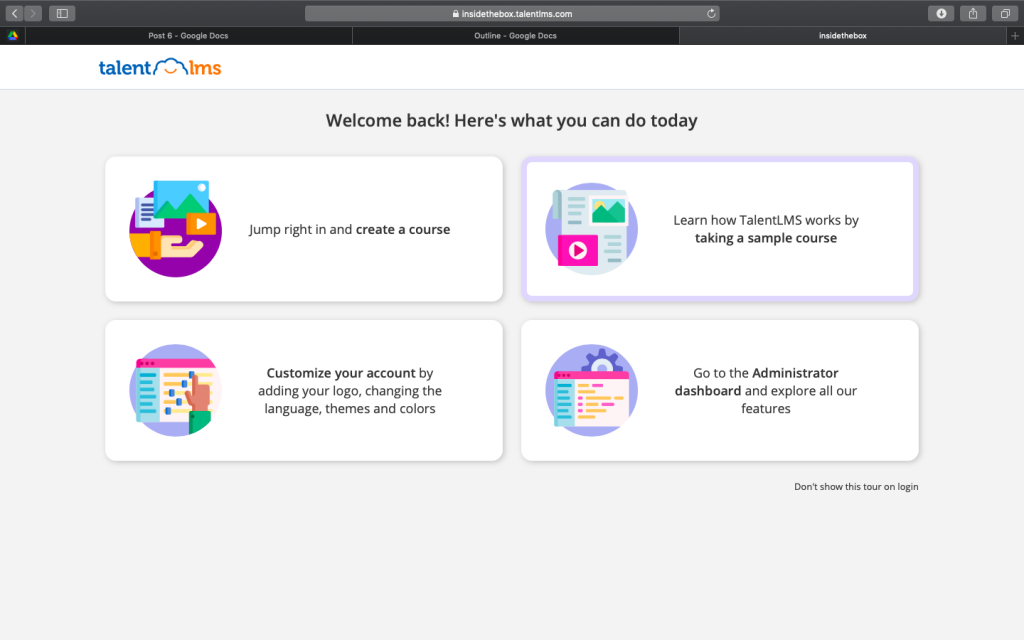
The opening page on TalentLMS after logging in the second time. I really liked the option to take a sample course.
Right away, I registered for a free account on TalentLMS. All that was needed was an email address and a password! From there, you are to create a domain (which is free because it still uses .talentlms.com at the end). For instance, since my organization is called Inside the Box: A Mental Health Initiative, the domain is insidethebox.talentlms.com!
After signing up for an account, there are tutorial videos that walk you through the system and its different features. In fact, it has a course that demonstrates how to build a course. I loved this because it helped me to understand how the courses function as a student, but also as an instructor.
The video I used to customize my account!
I watched this video which taught me how to customize the site a tad. I was able to add our logo, a short description, and change the header colour. For now, I added our slogan as the description: “Because it should not be outside the box to talk about Mental Health”. I chose a dark blue for our header colour because our colour palette so far has been sticking to blues and greens. We can easily change these features at any time.
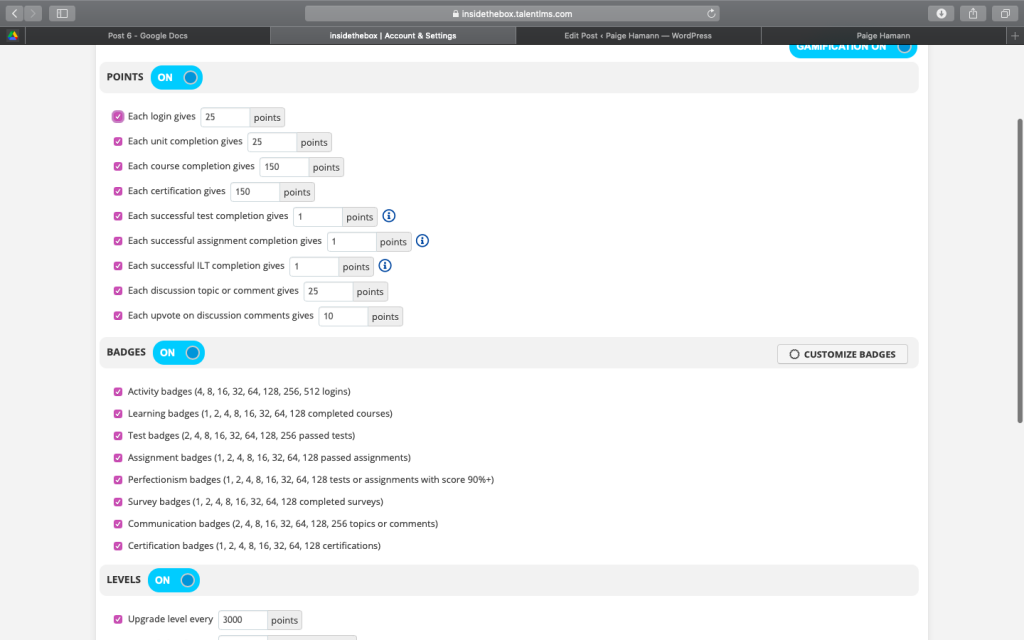
The Gamification options on TalentLMS
An aspect of TalentLMS that I found super cool is the gamification. Essentially, learners receive points for different tasks, which acts as an incentive! Administrators are able to determine how many points are awarded for specific tasks. Additionally, there are badges that can be earned for certain things including assignments, tests, and certifications. Students are able to cash in their points or badges for discounts on courses! The discounts and amount of points or badges needed is determined by administrators.
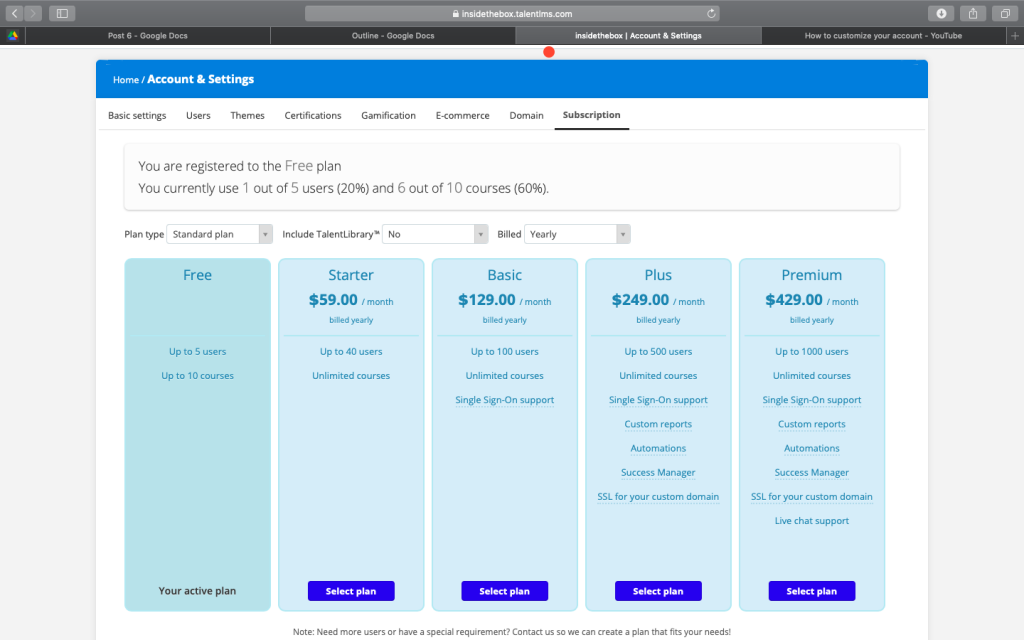
TalentLMS has multiple payment plans and options. The cost varies due to the number of users and number of courses. As the price increases, so does the amount of features and support. Throughout the creation of this course I will stick with the free version, but as time goes on we will likely upgrade to a pain version!
The payment options on TalentLMS
I really appreciate the options that are available to upload content. This is a list of the different formats you can use to create content in TalentLMS:
Simple content
Web content — embed content from external URLs in two clicks
Video — embed YouTube videos or simply upload your own directly to the platform
Audio — upload an audio file or record a new one without even leaving your TalentLMS account
Presentation — choose between uploading a presentation file or embedding from SlideShare
SCORM / Tin Can / cmi5 — add more interactivity to your courses by choosing among these three eLearning standards
ILT — Use instructor-led training and webinars to stay in touch with your learners even if they are a million miles away
Flash object — of course, we support Flash, too!
iFrame — copy and paste any URL and depending on what you want, it’ll either show as embedded or as a pop-up.
TalentLMS will even convert PowerPoint slides and PDF documents into a video so that learners don’t have to keep pressing continue.
If you are interested in any of the TalentLMS tutorials you can find them here!
I am really excited to start creating and uploading content.
I hope you had a wonderful Thanksgiving and took some time for yourself. My Thanksgiving weekend was kind of amazing because my parents surprised us with a puppy! We now have an 8 week old mini Labradoodle and a 1 year old mini Aussiedoodle. To say it is a little hectic in my house right now is an understatement.
For this week’s blog post, we were challenged to try a new tool. I looked at the list of tools on our course weekly plans and decided to update you on my learning project through a newsletter! I think that this tool could be super handy for my non-profit or sending updates to parents. Creating a newsletter is also a great alternative to writing an essay and gives students a different opportunity to demonstrate their learning.
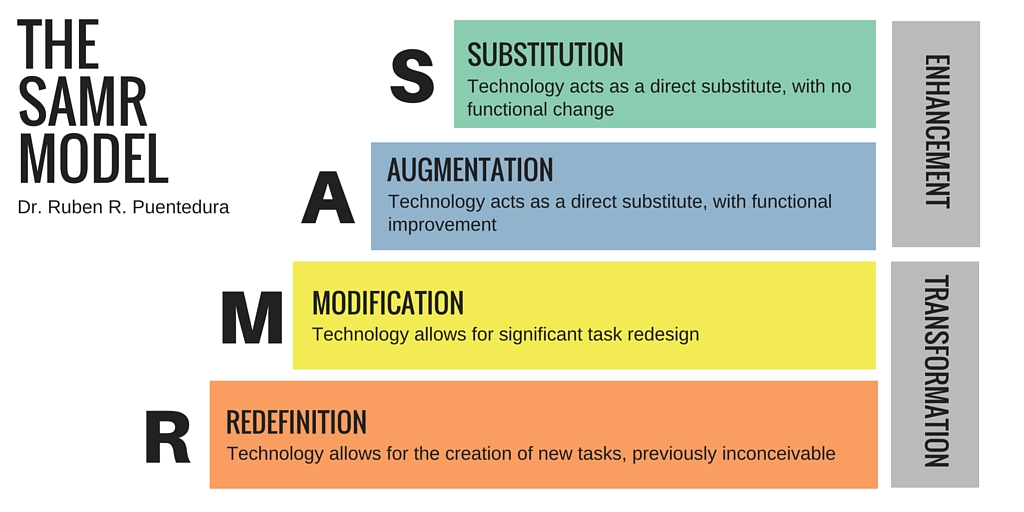
SAMR is a technology integration model that helps us evaluate the use of technology and if it is enhancing or transforming the learning experiences of students. It stands for substitution, augmentation, modification, and redefinition.
At the substitution level, technology acts as a direct substitution with no functional change. An everyday example would be typing notes instead of using pen and paper. A e-newsletter like this could be substituted for a paper newsletter to parents informing them of school events.
At the augmentation level, technology still acts as a substitution, but there is some functionality added. For instance, students could begin an online journal where others could comment. Augmentation could be demonstrated with creating an e-newsletter as Students could create and easily share them with one another to study from.
At the modification level, technology begins to transform the learning experience and allow for task redesign. A general example is using google docs to collaborate with classmates or even another class. An e-newsletter could act as a portfolio to show a student’s work, and could be sent to numerous friends and family members so that it could be shared with numerous people instead of just the people at home.
At the redefinition level, the learning experience is transformed into something previously inconceivable. For example, students could attend a virtual field trip. An e-newsletter like this could allow this level of technology integration if it was used to create some social change or awareness in the community by being shared on social media or the news. Additionally, students could create a voiceover and share the newsletter with sound for those who are visually impaired or have a difficult time reading.
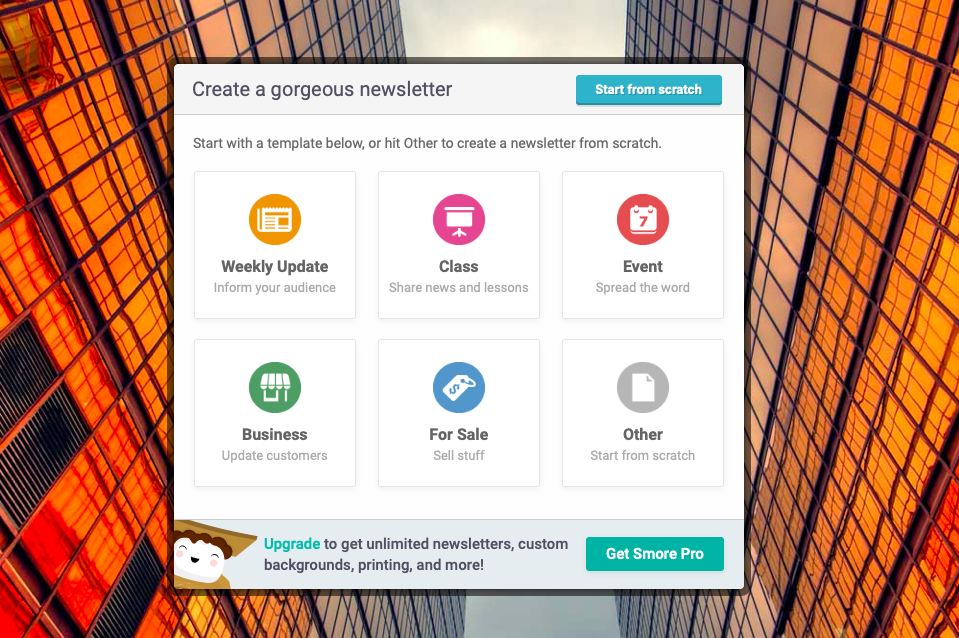
I used Smore to create my newsletter because it was suggested on the tool list I chose from. It is very user friendly and easy to navigate. The free version of Smore limits the user to creating only 3 newsletters, but there is a discount for educators if you want to upgrade and use the website actively.
The template options on Smore.
When you first begin to create your newsletter, you can create one from scratch or use a template. There are templates available for the following categories: Weekly Update, Class, Event, Business, For Sale, and Other. I chose the class template! From there, you can begin to add your text. The pre-made text boxes make it super easy to add your own content. Similar to our WordPress blogs, you can add different blocks for texts, pictures, events, etc. This way you can choose how you want to display your content.
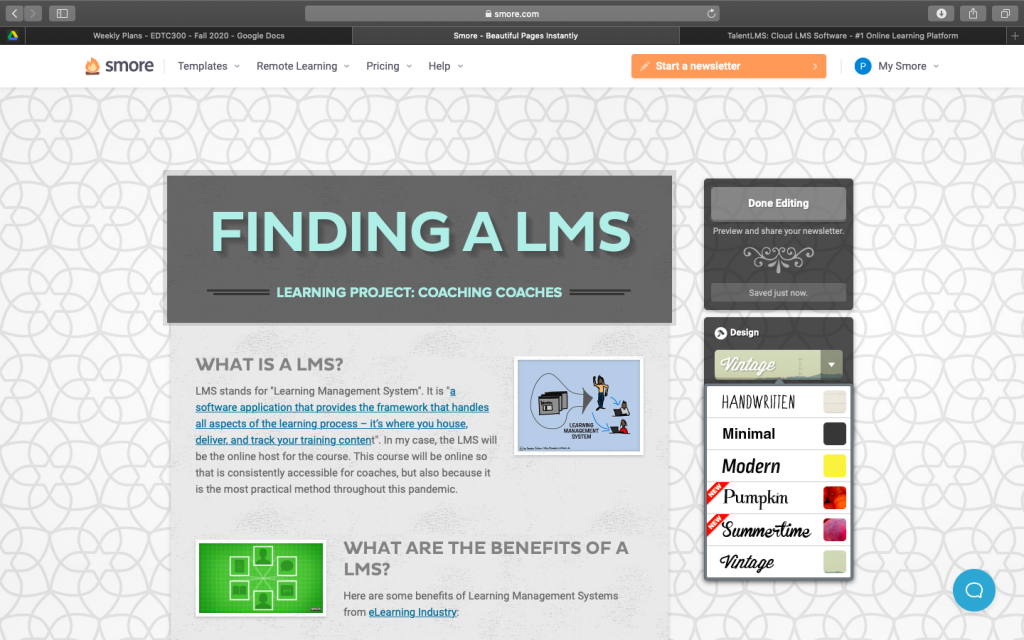
Creating my newsletter on Smore! The drop down list on the right are the possible theme options.
The customization on Smore is fairly limited, which I believe makes it more user friendly. I also think the lack of customization is perfect for classroom use, as students will be forced to focus on the content rather than endless customizations. When customizing your newsletter, you must choose a theme. Out of the six possible themes available, I used “vintage”. You can also choose your background, colours, and fonts from a limited selection.
After adding content and designing the newsletter, it is time to export! There are more options for exporting if you are a paid user. For instance, only paid users can download their newsletters in pdf format. As a free user, you are able to email the newsletter, copy the link, and copy an embed code. Because I wanted to display my newsletter on this post, I decided to use the embed code. This is where I struggled.
Smore has a feature that easily lets you copy the url or code, so I used that. Once I had the embed code, I was a little unsure of what to do since I have really only embedded links before. I tried to use both the “code” and “embed” widgets, but that was not working. I asked my classmates but they were not sure either, so I resorted to Google. It took me a while to find what I was looking for. I found a ton of articles that really just confused me more, and the first four videos I watched were from old versions of WordPress. But then I found this video and it was like the angels started singing. All I had to do was use the “Custom HTML” widget… who knew?! Once I pasted the code into that widget, I was good to go! I mean look at how gorgeous my newsletter is sitting up there.
Before this week, I really had zero clue what a LMS was. All I really knew is that I would need some sort of online platform to host this course. Now I atleast have a basic knowledge of what a LMS is and some of the differences between them. I started to look at a few LMS online to figure out which one to use. I looked at Canvas, but I had to set up a phone call to get more information so I don’t have much of an opinion yet. I also looked at TalentLMS which I really liked. It seems to be very user friendly and have a ton of different features. I think I am going to set up a free account to see if it is something I will be able to use in the future.
Welcome to my fourth learning project post: the one where I make a video and gain an even larger appreciation for e-learning teachers.
But seriously! Not only is filming yourself speak so incredibly difficult and frustrating, but having to watch yourself back on film? Definitely not my cup of tea… but I have to get comfortable being uncomfortable (and you can totally tell I am uncomfortable when watching my video).
This week, I started to actively look at the sources I collected and I began to gather information. I created a new document for research on each of the main topics so that it would be easier to navigate when starting to create content for each module or segment. For example, I currently have research documents for building relationships, as well as communication and engagement.
Because I want this course to be effective, I know that I cannot rush it. Instead of trying to complete all of the topics at once and risk them being mediocre, I have decided to focus on two topics more thoroughly. This means that I will only be creating half the course throughout the duration of this project. I was still follow my outline as normal, I will just have to go back and add after the fact.
The next step in my outline after researching is creating the learning objectives for the course! Essentially, I have to decide what it is exactly that I want participants to take away and be able to do upon completion. This is really difficult for me as I have never had to do anything like this before. I found a pdf that has a structure and list of verbs for creating objectives. I really appreciated the verb bank and I referred to it with every objective I created. The learning objectives that I created are in no way finalized. I will likely add or remove as time goes on, as well as reword, revise, and rethink to ensure that the most important material is included. As I start to create content, I will send my learning objectives to various people to see if they are reasonable and apt. Perhaps some of my EDTC300 classmates will be able to help me with this!
This past week, I started the Respect in Sport online course. It is a fairly long course, and because I am very busy I have not had the chance to finish it yet. However, I have a fairly good idea of how the course functions. I really like that the modules are broken down into segments, and that the amount of time it takes to complete each segment is visible. This way, if I only have 30 minutes before my next class, I know that I have enough time to complete the 7 minute segment. I feel that it helps me to manage my time more effectively. I appreciate that there is an outline for each segment as it helps me keep focused. Something that I do struggle with a bit is the presentation. The segments that I have completed so far have been a slideshow with a voice over. This makes me feel very disconnected and does not keep my attention. I would prefer a balance of a visual presentation,like a slideshow, and a video of the person speaking to me. I think that this feeling of connectedness would help me stay engaged with the content.
Lastly, I would like to talk about actually creating my video. I used one of the chrome extensions we discussed in class called Screencastify. It was incredibly easy to download and use! I absolutely love that the video is ready to go as soon as you stop recording, and the fact that it automatically uploads to Google Drive is a gamechanger. I swear that exporting and uploading files can sometimes be the hardest part, but this extension has it all covered! I can definitely learn a bit more about the tools that you can use on the screen, but if I am being honest that was not quite a priority for me this video. My priority was making it through filming without crying. I was going to say yelling, but I did that multiple times out of frustration. I was not frustrated by the program by any means… I was frustrated with myself! I would be on a roll and then just completely blank and stare at the screen, so I had to restart numerous times. Or I would really stumble on a sentence and I would have to refilm it! I do not even want to know how many times I attempted to film this simple five minute long video. It really is not perfect, but at least I did it! Watching the video of myself after was just excruciating (maybe I am a little dramatic). I mean I don’t think there are a ton of people who like listening to their voices on recording. All in all, I started to familiarize myself with a tool that I will likely use again in the future, so really I call that a win. HUGE shoutout to all of the e-learning teachers right now who have had to tackle this! I hope it hasn’t caused you as much anxiety as it did for me.
As a little recap, I am creating an online mental health course for coaches. Athletics often cause excessive stress and anxiety, and helping coaches to understand and prevent this will hopefully have a positive effect on the mental health of athletes!
Throughout the last few weeks, I created and analyzed a survey to understand what it is that athletes are struggling with, and from there I decided the main topics for the course. This past week, I started to research the topics in order to create learning objectives and content!
To organize my research, I created categories based on the main topics I decided for the course. I am currently organizing my research in a Google Doc because it is what I am most familiar and comfortable with. In my document, I have created the following headings: building relationships, communication and encouragement, body image, post-competition, multi-sport athletes, and miscellaneous. By creating these headings, I am able to navigate the portion of the course I would like to focus on.
Because the research needed for this course will be quite extensive, I have only started to collect article titles and sources that seem relevant to the topics. I have been using the Google search engine to look for articles regarding the main topics. Once Google provides me with a list of websites, I quickly look at those whose titles seem applicable. After quickly scanning and skimming the text, I decide if it will be useful. If it is not useful, I simply return to looking for more sources. If it does seem pertinent, I copy the title and url to the appropriate heading in my Google Doc!
After I gather a few more sources, I will begin to dive into the articles and find quotations and information to use in the course. I need to ensure that I have the proper research backing this course because mental health is incredibly fragile. I will continue to collect more information, but I will also start to analyze it in the coming days as well.
An aspect that I did not include in my outline is participating in courses that have already been created. Before starting this project, I completed the Mental Health Awareness for Sport and Physical Activity online course from UK Coaching in preparation for creating my own course. I really did not take anything away from this course, and felt the information was too general and is already accessible to most people. Even though I did not learn anything specific to the topic, I learned about what I want to see in my own course and how I would like to communicate it. I decided that I am going to look for other courses similar to the one I am creating in order to improve my own!
This is definitely not the most exciting learning project and I don’t have much to show for it right now, but I am really hoping it will make a difference! Maybe some of you can help to test the course before it launches!