Where the Green(ish) Grass Grows – Week 4

Before I get into how this week went for my learning project, I want to quickly highlight two new tools that I will be using moving forward to better document my learning project.

The first one is Screencastify. This is a simple free Google Chrome browser add on that I can use to record my screen. It was super easy to download, and a small icon is now located on my tool bar so that I can quickly access the program. It allows me to record my whole desktop or just one tab. This is a great tool for better showing the online resources I am using for my learning project, but I can tell it will also be a useful tool as I move through my academic career and into becoming a practicing educator!

The second new tool I’m using is called Gif-Maker. This is another free Chrome browser extension, and much like Screencaster has a small icon located along my toolbar. This one opens another page where I can upload images or videos and create a GIF. There are some settings along the side that are straightforward to use. This is going to help me with something I feel is lacking in my learning project posts. It’s not nice to look at a large block of text so I feel like GIF’s will make be a great way to break that up.

Moving on, this week was pretty brutal! We finally had some nice weather so started the week by power washing the rest of the fence in the yard and left it a few days to dry. I figured it would be a great week to try and remove the old paint along the older portion of our fence. This went horribly! However that was not because of the resource I used this week. I found myself on this article written by Matt Smolsky. This article had great step by step instructions, as well as a list of things you will need, any warnings, and even some helpful hints. Unfortunately I didn’t quite listen to this resource! The article suggests using a quality paint scraper to get rid of the paint, however I didn’t immediately have one at my disposal, but I did have a power sander. I figured I could just skip the scraping step and go straight to sanding. This did not work so I made my treck to my local Home Hardware. I chatted with a worker there (can’t say enough good things about Home Hardware, the employees are always extremely helpful) who suggested I also pick up some paint remover. This was a bit of a pain as it was messy to put on and dried very quickly, and since the instructions said to keep the area wet for 30 minutes, this was a challenge!

The scraping itself was not that difficult, however once the paint was removed I was able to get a good look a the quality of the fence, and it was obvious that it was in pretty rough shape that was beyond any reasonably repairs. I think I will need to reevaluate if doing this portion of the fence is worth the time and effort it will take to complete!

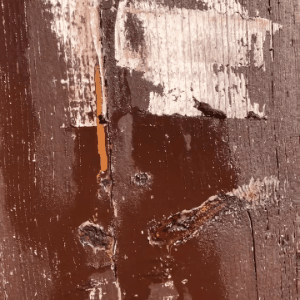
The other project I started again this week was to finish staining the other fences, as last time I had just done the area where I wanted the garden boxes to go. This also did not go as planned! Despite the fact that I purchased an air sprayer (nothing too fancy, a simple hand pump was all I figured I’d need), something went wrong with the stain itself. The stain went on in such a paint like layer that it was too thick to work properly in the sprayer, and left a horrible finish on the fence! Luckily this was an area of the fence that I was considering removing anyway, but I’m at a loss as to what went wrong with the stain! Check out this comparison between an untreated portion and the freshly stained portion.

When we purchased this house, the entire kitchen was painted in a horrible brown colour, and it was one of the first things I ripped out! As soon as I saw what looked like brown paint on the fence, I knew I had to stop and figure out what was going on. The only thing I could think of was that somehow the stain must have turned bad after I used it roughly two weeks ago, as it was very watery then and was easy to apply! Anything I googled just gave me recommendations on how to remove old stain, so I think I’ll have to do some more research. Thankfully I picked up two more cans of stain which will hopefully last me the rest of this project!

Where the Green(ish) Grass Grows Week 3

This week was a bit of a let down (which at the very least balances out last week!). We were lucky enough to get some rain, but then it rained almost the entire week which prevented me from getting out into the backyard very much! The biggest project on the go is to finish cleaning and staining the deck and fence. However I need a stretch of nice warm days to get that done, which unfortunately didn’t happen this week. Another reason I didn’t get to go out into the yard much this week was because we had the yard sprayed to kill the horrendous amount of weeds we get back there. I explain some of the reasons why in the video below but ultimately I decided this was one job that was best left to the professionals. These guys did an awesome job!

One thing I don’t think I’ve mentioned yet is our giant dirt pile. When we purchased this home, the grading along the outside of the house had been significantly washed away. We had some dirt brought in so we could help restore the grading, however we got a little bit more than we bargained for and we have been trying to use it up. All of this rain highlighted one area on the front portion of the house that needed a bit of help since it was directly underneath a downspout. The water was coming out of the downspout and pooling along our foundation, which is big trouble! I found this article through Pinterest that talked a bit about splash blocks, and I decided to DIY the project using some of the large rocks from our dirt pile. I think this will have to be a temporary solution, but for now it will do.

Lastly I tried to tackle a project I initially thought would only take me a couple minutes, but ended up taking much longer. One of the boards along the driveway was almost completely broken off, but under a bit of inspection I discovered that the screws weren’t simply missing, they were broken and lodged inside! This article from Lowes gave me some simple solutions to get it out, but also used some tools that I didn’t have available. The drill we own also is not the most powerful tool, which was quite the hindrance in this project. Because the tip of the screw was nearly flush, and the replacement screws location didn’t matter too much, I decided to just leave the broken screw in place. However I still ran into more problems when trying to get the replacement screw flush, and was unfortunately not able to succeed as any further attempts were simply stripping the new screw, creating an even bigger problem. This is probably the first ‘fail’ that I’ve encountered thus far. It wasn’t a great note to end the week on, however the weather for this upcoming week looks much nicer, so hopefully the future will be filled with more successes!

Where the Green(ish) Grass Grows- Week 2

This week was a productive one! I have been having a lot of fun trying to find online resources for the projects I want to accomplish in the yard, while also trying to not spend a lot of money. Sometimes this meant getting a little creative!

There was finally some warm weather this week, so advantage of it and started off by planting some flowers in outdoor pots. I had four pots in total to fill, two for the front of the house and two for the back deck. The front of my house is south facing, so we get full sun all day long, where as the back is shadowed by the house, so I needed to find plants that could survive in both of these conditions. I checked out Kwan’s Greenhouse located in Swift Current (check out their Facebook page here), where I actually worked for a summer a few years ago. I know the owners well and they are extremely knowledgable! They helped me pick out six full sun plants and six shade plants. Both of my grandmas are also amazing gardeners so I asked for their advice. When it came time to plant, I felt I should have asked more questions! My first two pots were very slow. I had only filled the pots about a third of the way full with soil because I figured it would be easier to put dirt around the plants once they were in place. This was a big mistake. It was not at all easier to put dirt around the plants, and I mostly just ended up with dirt everywhere. I filled my last two pots with soil to the brim and instead just dug a small hole and plopped the plants right in. It was a much easier process and took way less time!

I also took some time this week to try and figure out what the trees and shrubs that already existed in my backyard were. I stumbled upon an app called VTree which was available for free on the IOS App-store (and possibly on Android as well? I haven’t checked!). It was created by Virginia Tech and has information for trees and shrubs all across North America. It used my location to create a quiz I could put some quick details into and it was able to figure out what some of the trees in my backyard were. It was an amazing find! Two identical shrubs in my backyard still remain a mystery though, but they will hopefully be easier to identify once they grow some leaves.

This week I also built some garden boxes that I want to go along the back fence of the backyard. I found this blog which had exactly what I was looking for along with some amazing tips and easy to follow instructions with pictures, and I followed it very closely! This process went much easier than I thought it would and didn’t take very long at all, although I definitely needed help from my boyfriend for this project. We still have another box to make and they still need to be stained and sealed before they can be put in place.

The nice weather this week gave me a short window to prep and stain the area of fence I’d like the planter boxes to go along. I started by power washing (or pressure washing? Both terms seem to be used commonly) the fence. This video had a ton of great information. I had a minor malfunction with the pressure washer I used (which I borrowed from my dad) so it took a bit of time to sort out. Overall the difference in the fence was huge! I let the fence dry for a few days and then it was time to finally stain it. When we moved into our house, we painted the entire interior, but I had a feeling this might be a bit different. I initially had a tough time finding any resources that used a paint brush to apply the stain instead of using an air-sprayer. Eventually I found this article which offered me a few helpful tips. This was a big project, so I’m a little worried to tackle the rest of the fence and deck, but I know it will be worth it! I am still thinking I will apply a sealer on the fence to help my hard work last a bit longer, but I ran out of time this week.

Check out my video below to see what I all accomplished this week!